Sharing another make from (ahem!) last Winter today…I wanted to experiment with the Women’s Hero Vest pattern and some different fabrics so pulled some thick and stretch grey velour from my stash to have a play with. Frenchterry knits and flannel have been my fabrics of choice for Women’s Hero Vests to date but I had a vision for this one in my head and wanted to see how these fabrics would work together.
The exterior is a thick and luscious European velour knit. It feels amazing and is snug and warm. For the lining I wanted to add hint of floral – something bright and perhaps a bit unexpected. I used an Art Gallery knit – Priory Square, Cottagely Posy in emerald and love the contrast it gives to the plain exterior. Because the velour was so thick I didn’t need any more layers for warmth.
Because I was going for a fun look with this vest, I finished off with some dusty pink ribbing for all of the binding and waistband.
And there’s not much about the Women’s Hero Vest to add that I haven’t said before! Love this one 🙂
I’m not sure how I feel about blogging at the moment…gone are the days where I would sew up something new, head out and take photos straight away and then sit down and blog about it all. I’m not sure what it is exactly – probably a combination of busyness and trying to stay away from the computer (time sucker!) but I really think that social media is creeping in and taking over a big part of what a blog used to be about.
For me, Instagram is my favourite social media platform. I love all of the inspirational images and how easy it is to keep in contact with family, friends and other crafters and I especially love that you can get a quick snapshot of what has been going on without having to visit loads of individual blogs. It is a really convenient place to have a quick chat with other people too – ask questions, give feedback, etc. I find it much easier to be personable there than on the blog. However, I also recognise that Instagram can never fully replace the blog with more detailed photographs and information about projects or events that can be helpful and give insight to readers.
I still have a pile of unblogged projects (and an even bigger lot of unphotographed ones!) and I do want to get up to date eventually, but at the moment “plodding along” seems to be the best way to describe my blogging frequency! And now that I’ve written that, perhaps I’ll prove myself wrong and get stuck into blogging more frequently again!
Back when I released the Women’s Hero Vest, I made myself a few more to test of different fabric combinations and this is one of them. It isn’t my favourite vest, mostly because of poor exterior fabric choice but I still really like it and wear it often. This one seems to get worn to the gym a lot, it is thick and warm but extremely soft and light to wear.
The exterior fabric really let me down here – no fault of the fabric, just a bad choice made by me but I did want to see how it would turn out so used it as a trial run. This fabric is a semi-sheer french terry knit. I liked the speckled blue pattern on the white background though and decided to give it a go. Everything about it is okay except the pockets are really thin – you can see in the photo above how my hands can be seen through the pocket when I put them in there. If I was thinking ahead, I should have lined the pockets – they would have been particularly nice lined in the same fabric as the fleecy interior. As they are now, I try not to actually use them as I am worried if I stretch or pull on them too much that they will tear at the seams or circular stitching.
I do love the lining of this vest though. I used this minky cuddle sherpa and it is really soft and fluffy and cosy to wear. My kids love snuggling in it, I actually made Lil a new Uptown Girl jacket and lined it with the same fabric after I finished this vest because it is so snug. I think the blue ribbing finishes off the vest nicely and gives definition to the edges which could otherwise look washed out of it was finished in a lighter colour. And I inserted my zipper using the concealed zipper method – huge big winner, I don’t think I will make a vest without the concealed zipper again. Once you get the hang of it, it really doesn’t take much longer than the method described in the pattern.
So, overall this vest gets a tick…I love everything about it except for the fact that the pockets aren’t totally functional but it was a good experiment in fabric choice!
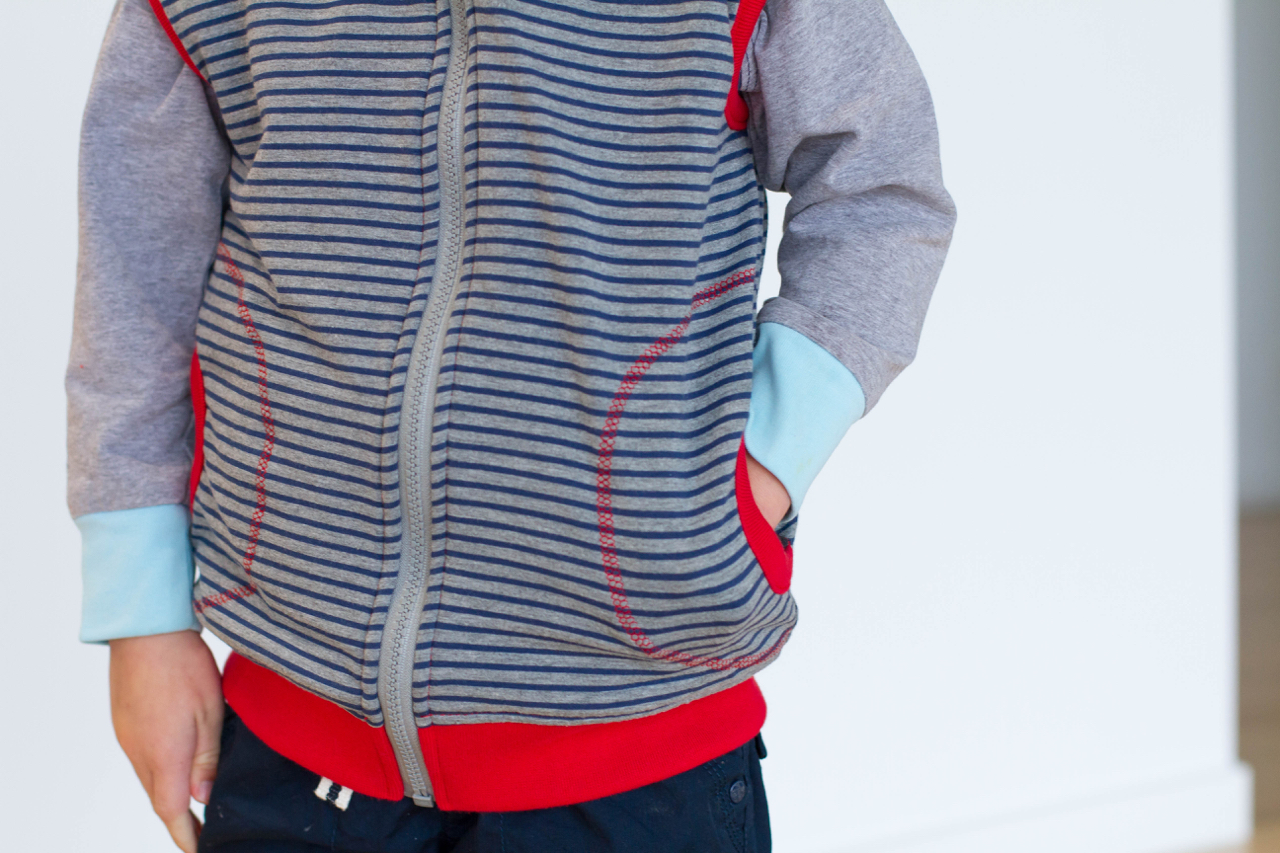
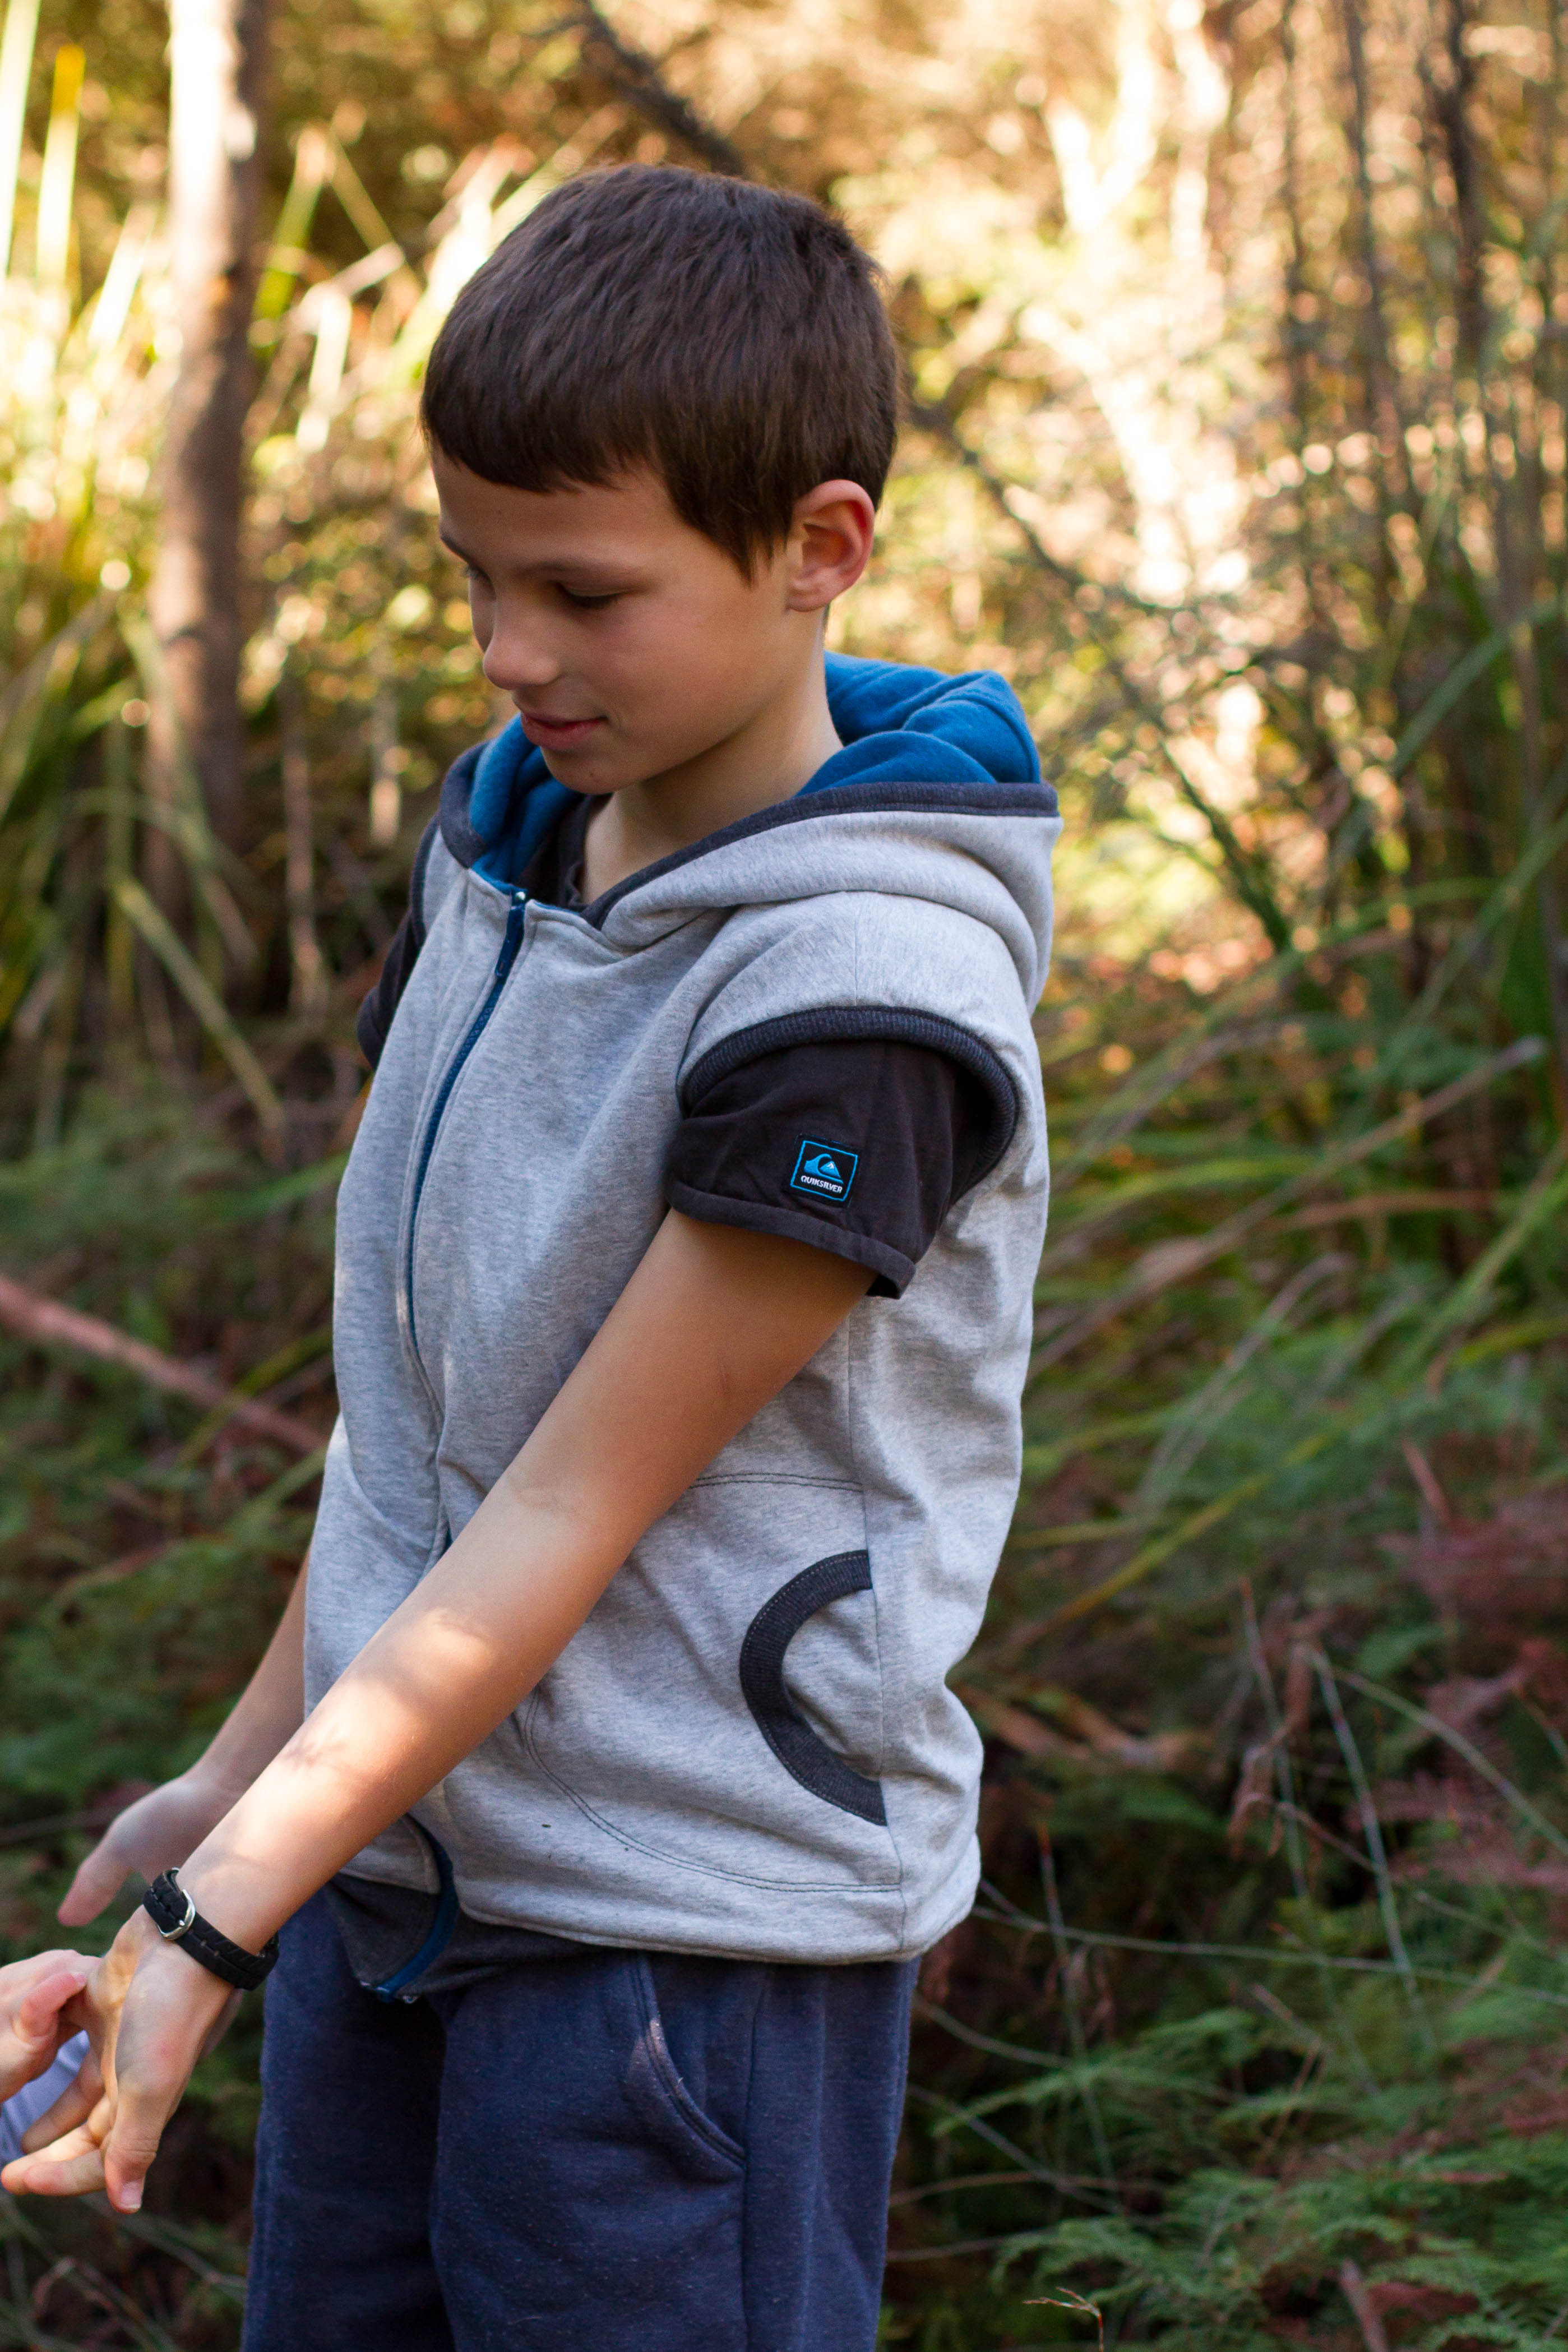
I’m trying to get through my list of unblogged sewing projects – it’s long and I don’t seem to be keeping up with blogging lately so this could go on forever! Here are a couple of Hero Vests I made for my boys at the beginning of Winter this year. Both are made with jersey exterior and polar fleece lining – my favourite combo for kids. Using a knit fabric for the exterior results in a soft and squishy vest – one that is easy to move and play in.
Oscar’s body temperature seems to have finally matured and he actually wore pants most of this Winter! Hallelujah!! I haven’t made him a Hero Vest in a long time because I knew he wouldn’t wear it, but I feel confident making him one now as I have a 50% chance of him actually reaching for it in the wardrobe! Although it doesn’t really bother me because I know it will be handed down to Tommy and/or Harvey anyway so it isn’t a wasted sew. This colour combo is great for a big boy – basic and will easily coordinate with most of his clothes. I bought the ribbing used in his vest online and it turned out to be more like a ribbed jersey fabric not cuff ribbing. I wanted to use a charcoal ribbing on his vest though so thought I would test it out anyway. The verdict? Not awesome. It does the job okay but you can see from the way the waistband keeps turning under in these photos that it doesn’t have enough stability and recovery to hold it’s own.
When I made Tommy’s vest he asked me why I keep making jackets with no sleeves?! Point taken Tommy…a jacket with sleeves will be sewn next Winter! I really love sewing clothes for Tommy, he is still at the age where he gets really excited and anticipates the finished product all the way along. If he knows I’m sewing something for him, he will sit at my feet in the sewing room, handing me tools and supplies and being a helper until he can finally wear what ever it is that I am making! I haven’t sewed him a lot of clothes lately, but I’m sure that with the change of seasons (pleeease hurry up Summer!) I’ll be sprucing up all of the kids wardrobes in the next few months.
I’m not 100% of the fabric sources used in these two Hero Vests…Tommy’s striped jersey is by Hilco and the red ribbing is a top-quality European purchase. I think Oscar’s grey marle jersey is a Stella jersey (pretty sure they no longer produce fabric?) and the polar fleece lining on both is from either Spotlight or Lincraft.
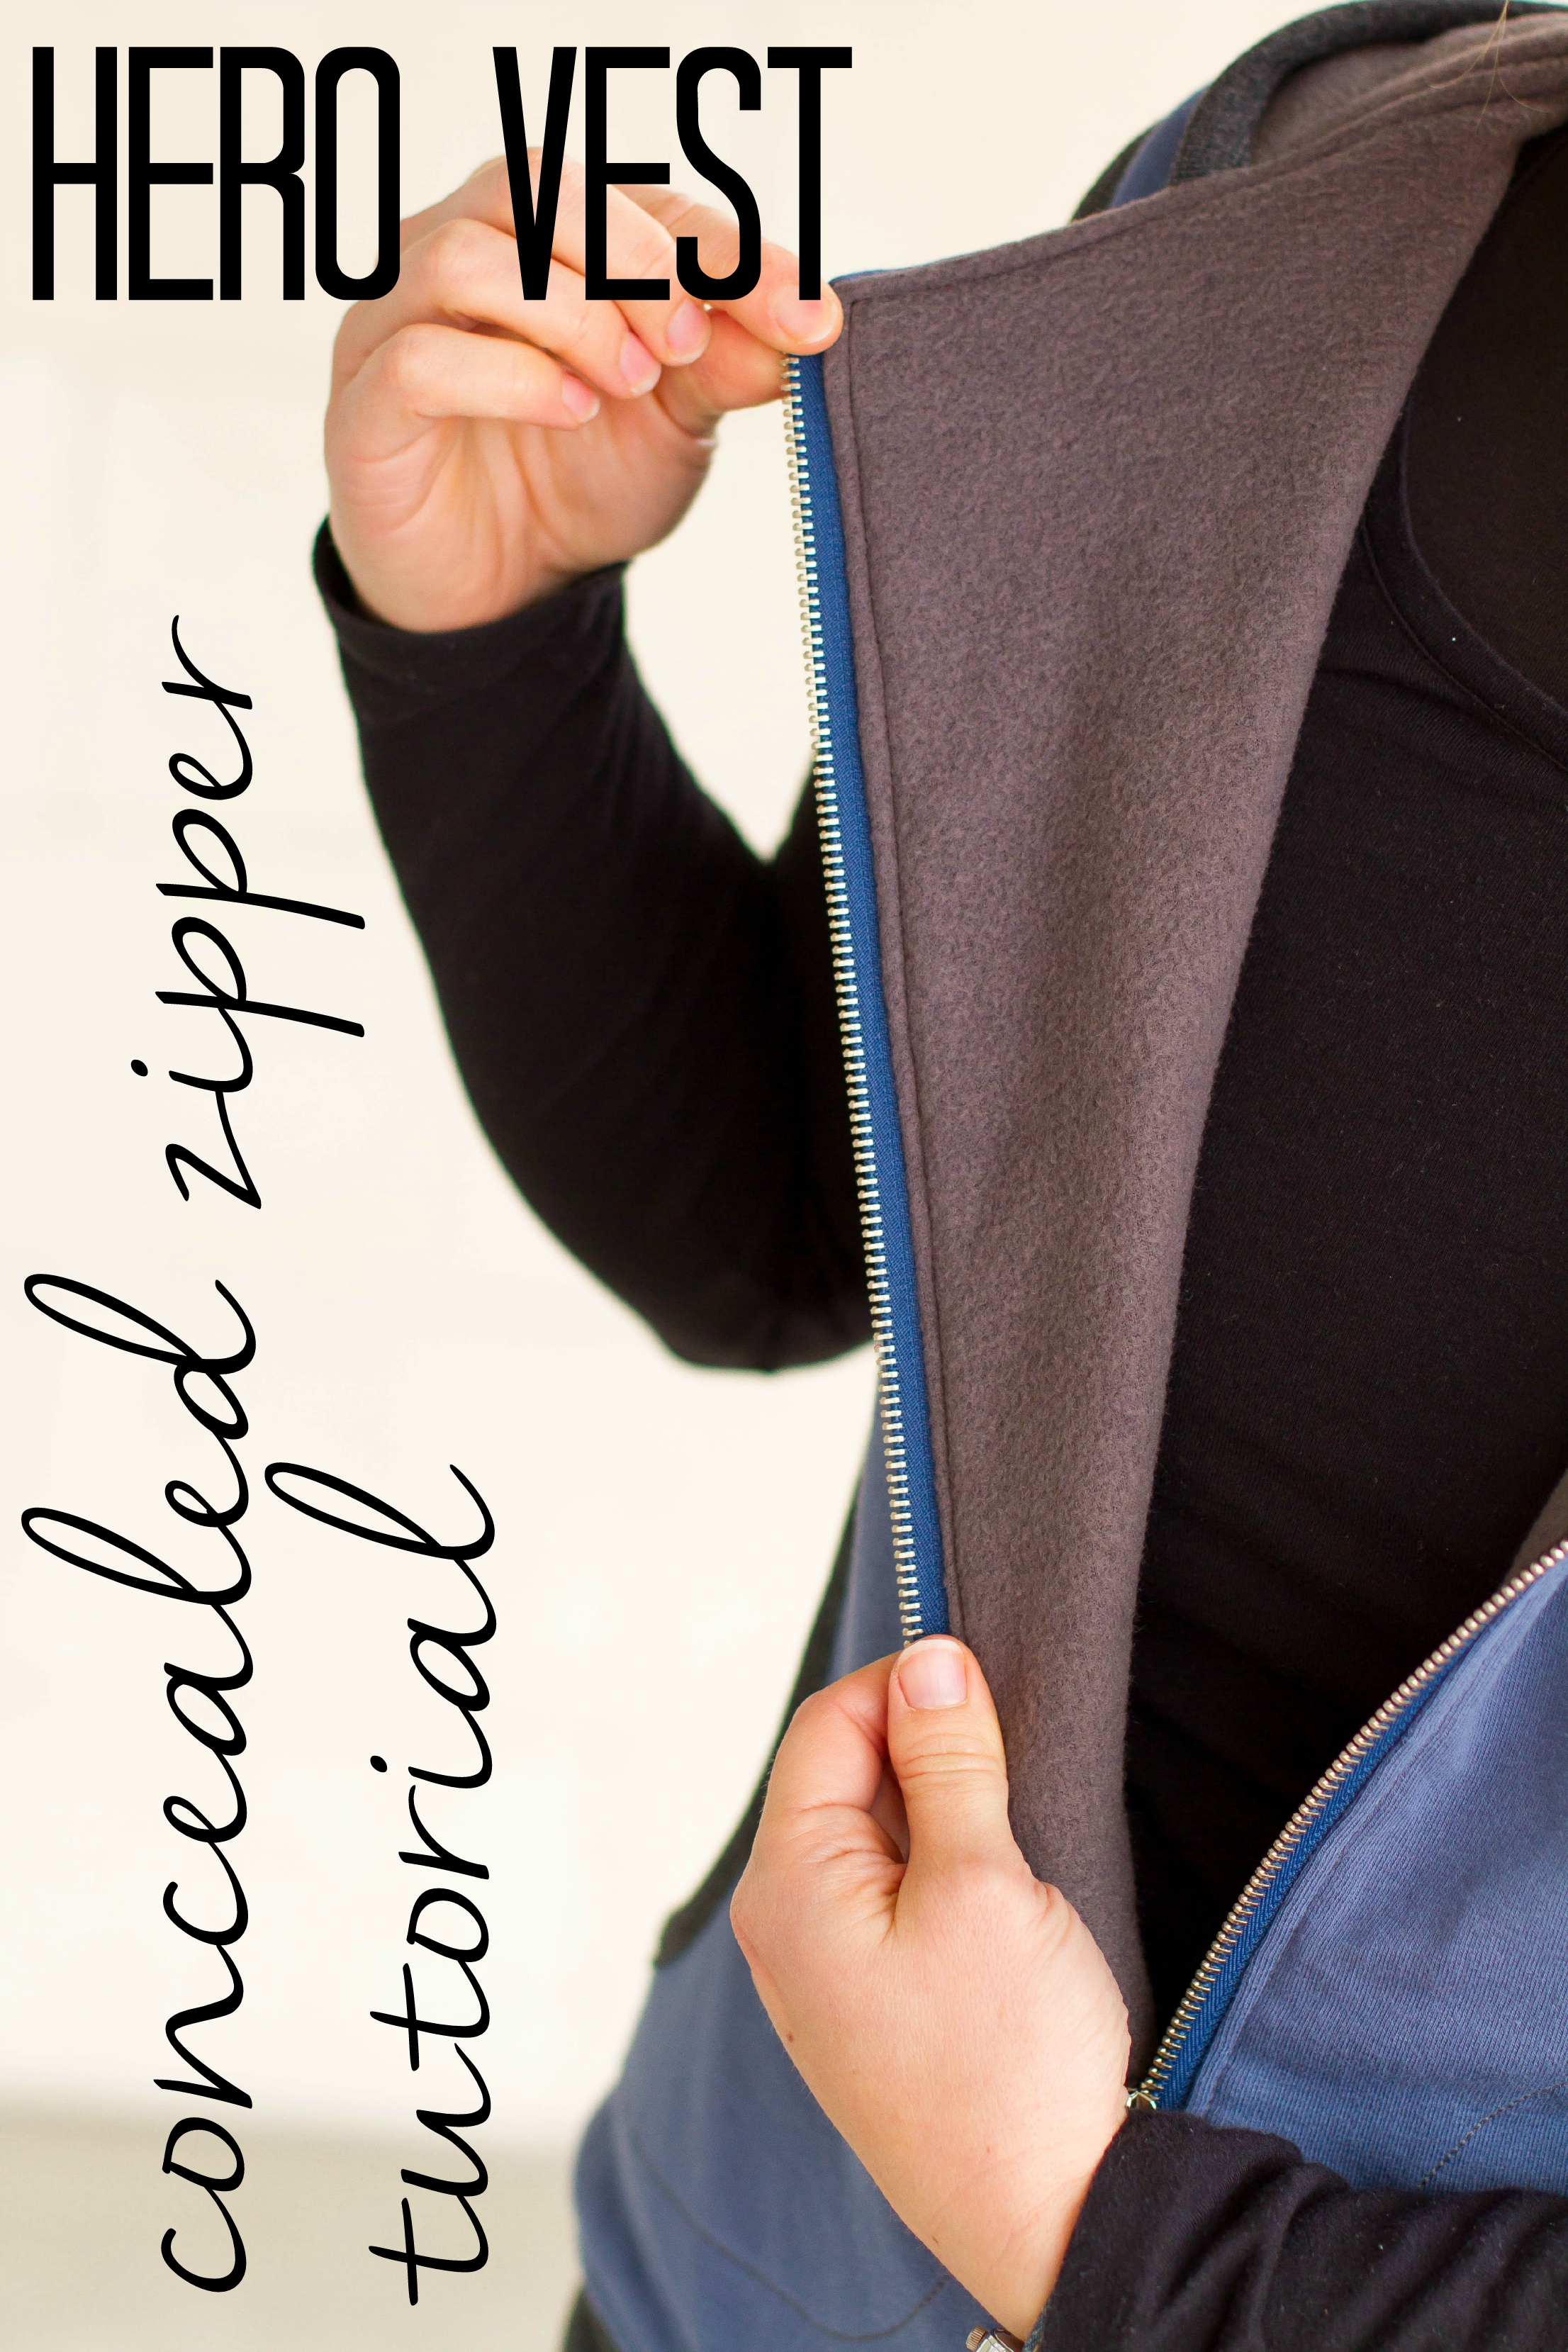
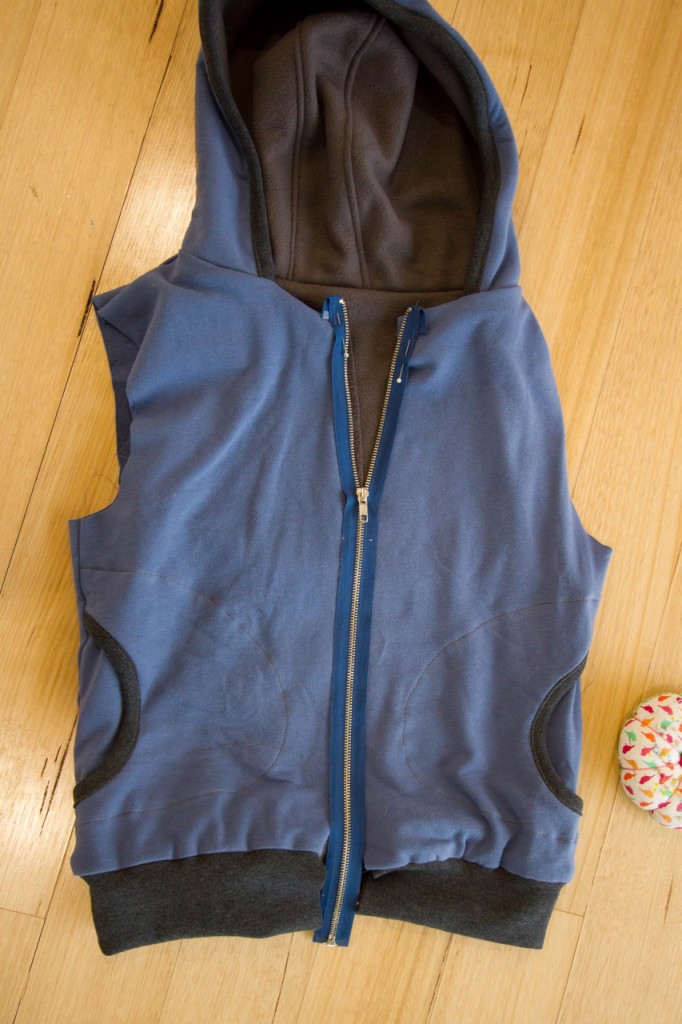
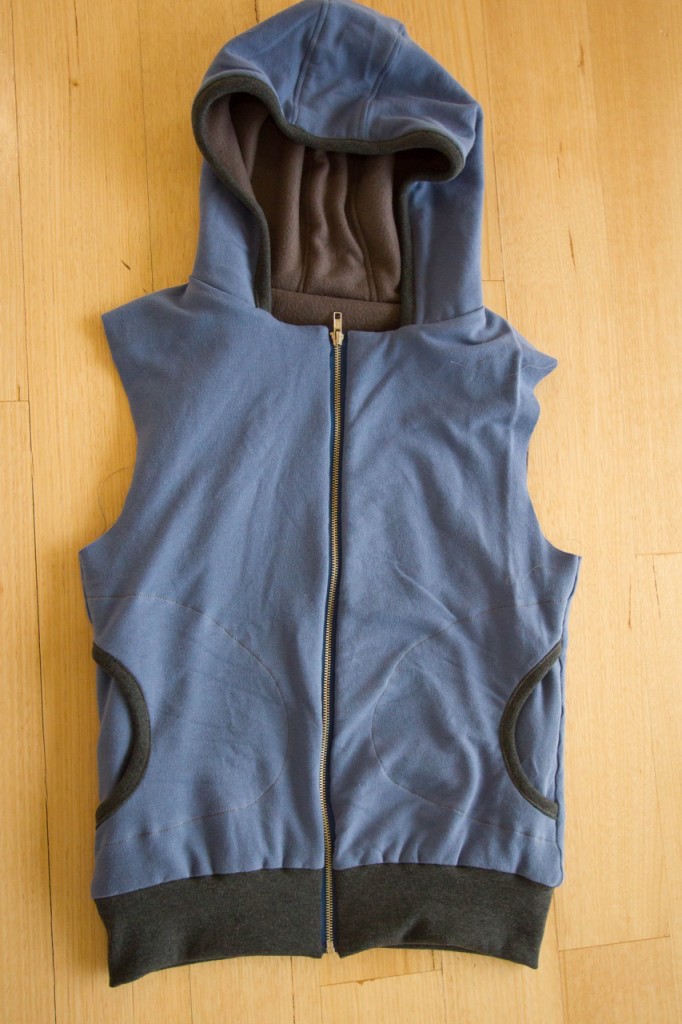
I’m back with another version of the Women’s Hero Vest. This is the one that I made for the Concealed Zipper Tutorial and it is the first one I have shared on the blog that is made using solid fabric.
For the exterior of this vest I have used a mid-blue french terry knit. I’m terrible at remembering where I sourced knit fabrics from (unless they have a selvedge with printed information on them!) so I can’t tell you where I bought this one from. I can tell you that it is one of my favourite french terry knits though. Really good amount of stretch and recovery, it holds it’s shape and doesn’t pill after many washes (I’ve also made myself a pair of trackies from this fabric so it has been put to the test! And I promise not to wear the trackies and vest at the same time…) The knit is also nice and thick which makes this Women’s Hero Vest even warmer. I used a grey polar fleece for the lining and a European charcoal ribbing for the waistband and all of the binding.
The fabrics combined together make a really comfortable and warm vest. I love making my kid’s Hero Vests with knit fabrics because they feel so much cosier, and this one really is super soft and cosy to wear.
If you want to check out how the concealed zipper looks and works in more details, then make sure you take a good look at the inside of the vest in these photos. It is a really neat and professional finish and means that you can wear your vest unzipped without seeing any exposed seams. I used a metal zipper on this vest too and once again, the weight of the metal really does help the front of the vest sit flatter than a plastic zipper.
Not sure what else to say about this one that hasn’t been said before! Has anyone made a Women’s Hero Vest yet? If you have, pop into our Facebook Sharing Group and share a picture or feel free to email me one yourself!
A few weeks ago over on the Make It Perfect Sharing Facebook Group there was a bit of discussion about how to make the Hero Vest (kids & women’s) with a completely concealed zipper from the inside of the vest. The way the pattern is written now, the zipper is sewn onto the vest as one of the very last steps, and from the inside of the vest you end up seeing the exposed edge of the zipper tape. While this method is completely fine (hundreds of kid’s Hero Vests have been constructed this way with no complaints!) I knew it would be a much cleaner finish if I could work out a way to conceal the zipper, especially for the Women’s Hero Vest where you might want to wear the zipper partially or fully opened from time to time.
A few group members shared suggestions and I tried out a few ideas of my own, but nothing was hitting the spot. Then one of our lovely group members emailed me and shared her method (which she learned from constructing another jacket) for concealing the zipper, I tried it out and it was awesome! I chose not to include instructions for this method in the pattern because it is a little tricky to get your head around and I felt like it really needed a bit of extra hand-holding and lots of accompanying photographs to help you get the correct finish. But trust me, after you’ve done it once it won’t seem tricky at all and you will be speeding through it in no time! So thankyou Helen, and may there be many more concealed zippers in your Hero Vest sewing!Before following this tutorial, begin making your vest following Steps 1 & 2 in the Hero Vest pattern. You will also need to follow Step 3, d & e to sandwich the hood between the exterior and lining vests – but don’t worry about attaching the waistband at this point.
To conceal your zipper, you will need to attach the waistband to your vest in a different way than the pattern instructs.
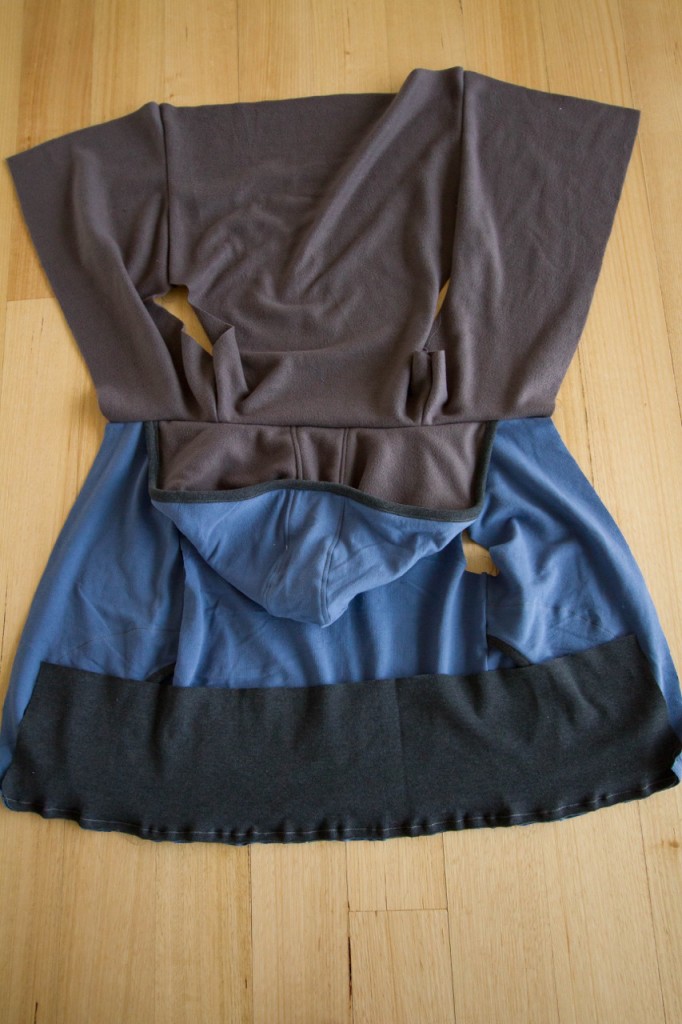
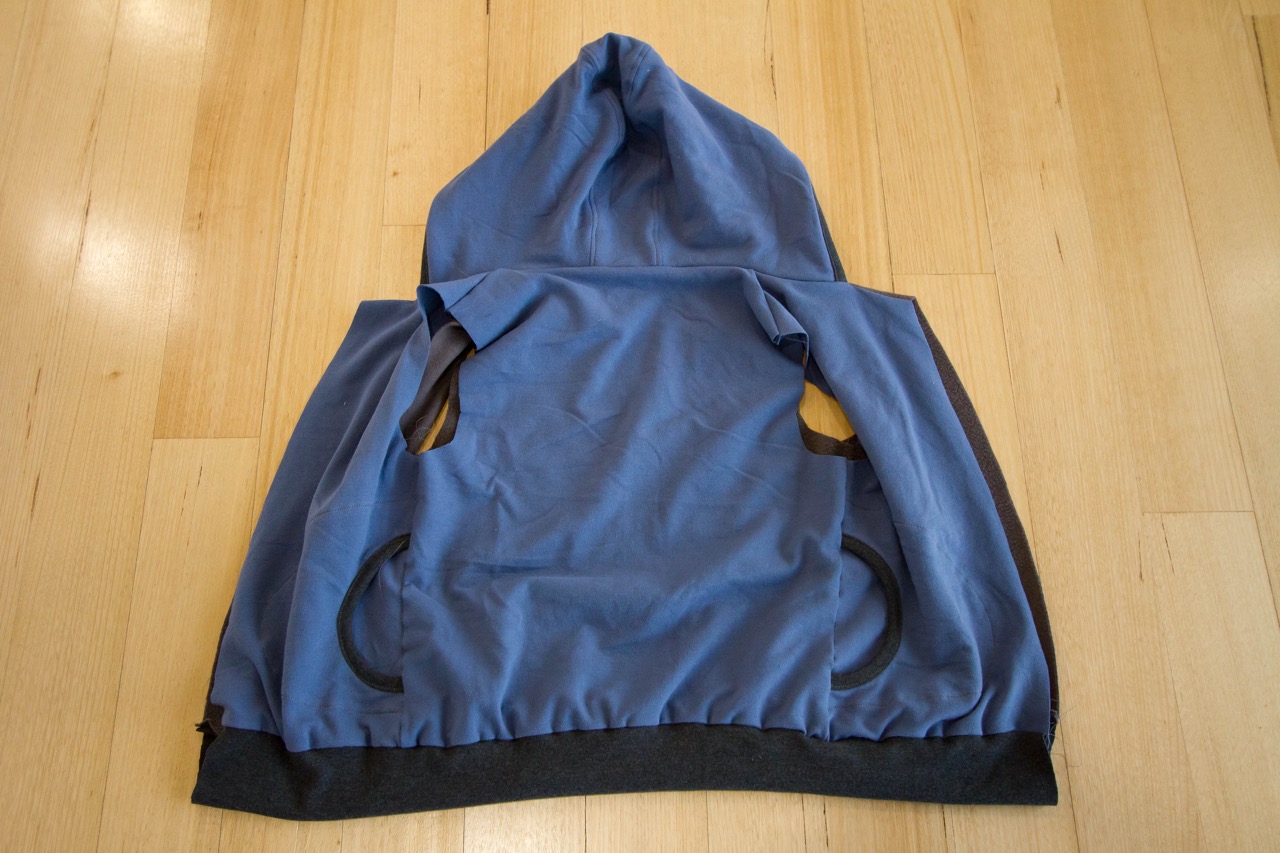
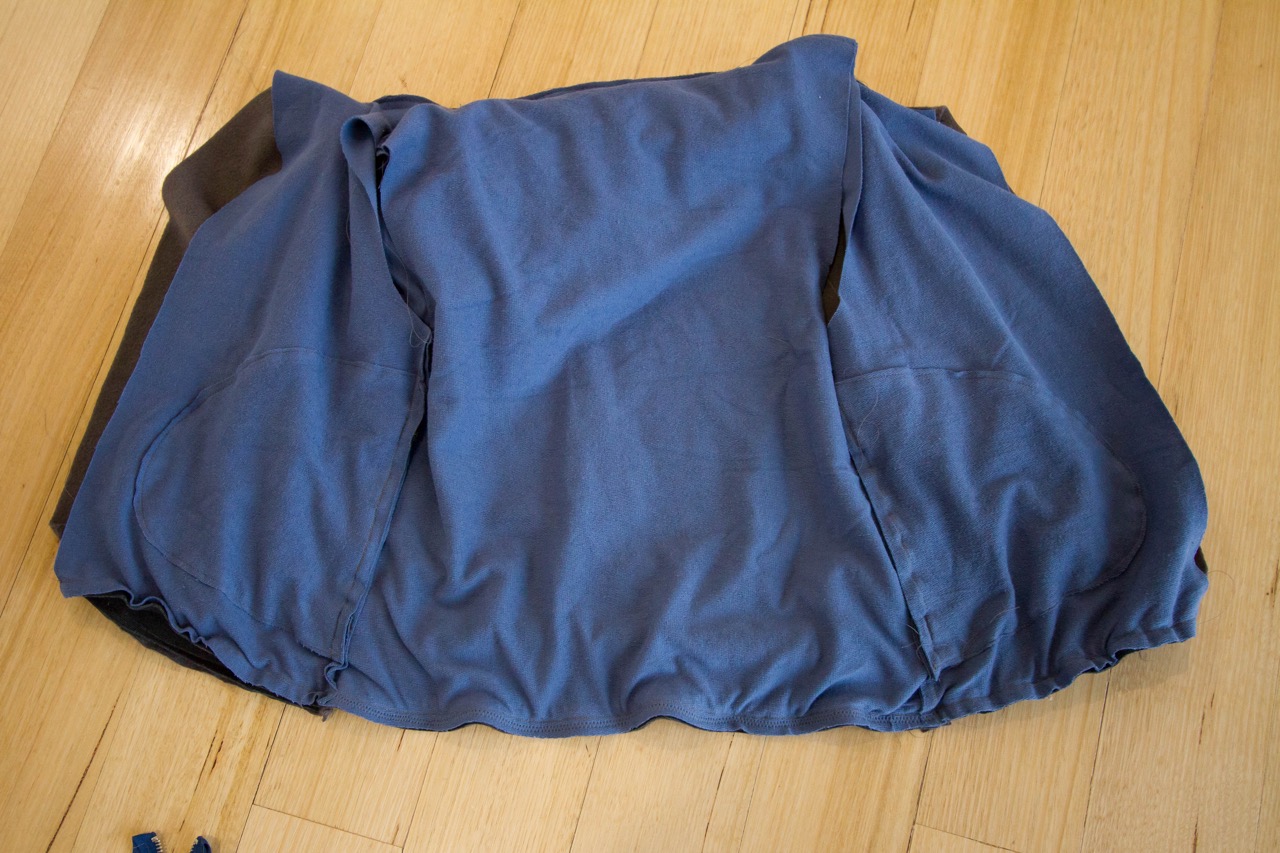
Take your vest and lay it flat on the floor with right side facing up. As you can see from the following photograph, the exterior and lining vests are joined together here at the neckline, with the finished hood sandwiched between them. For your reference, my exterior fabric is the blue (a french terry knit), lining is the grey (looks more brown in these photos – polar fleece) and ribbing is charcoal.
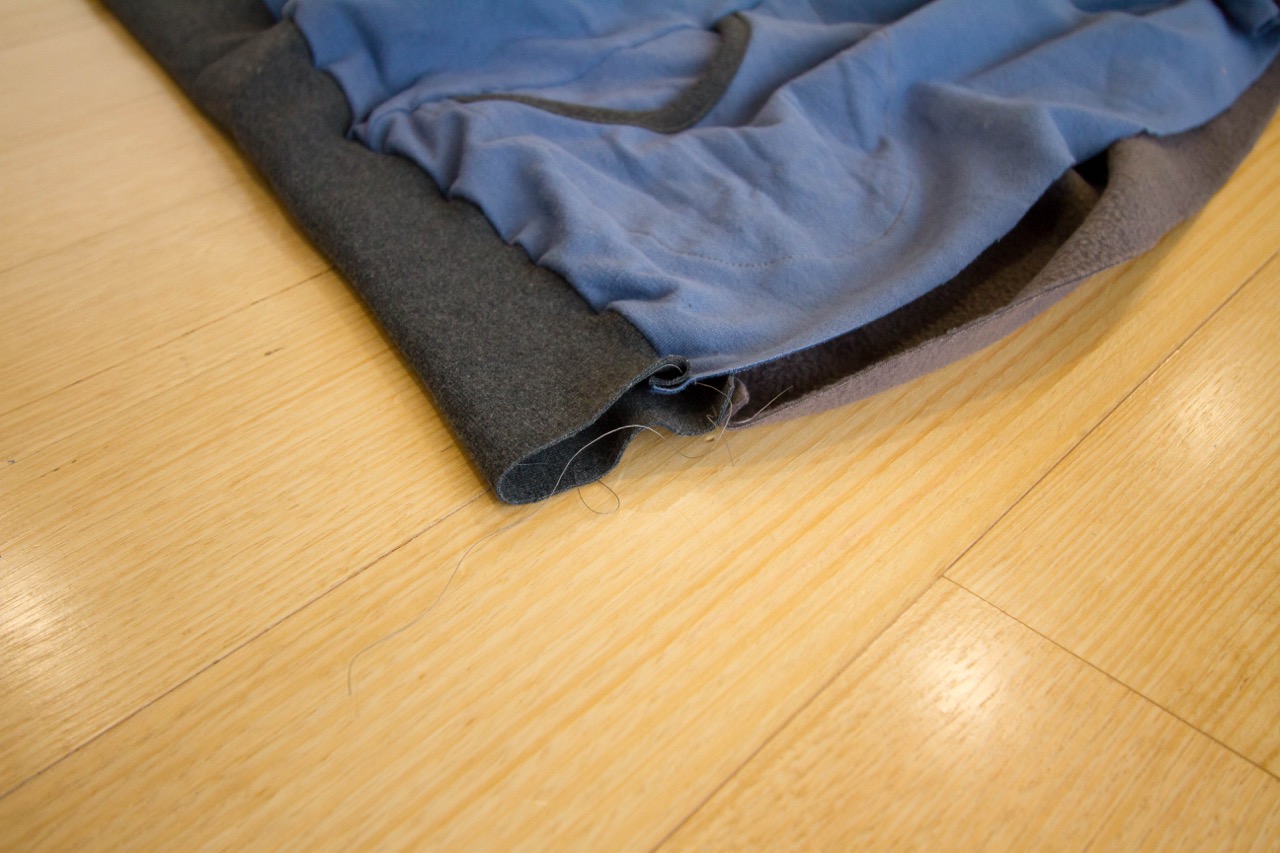
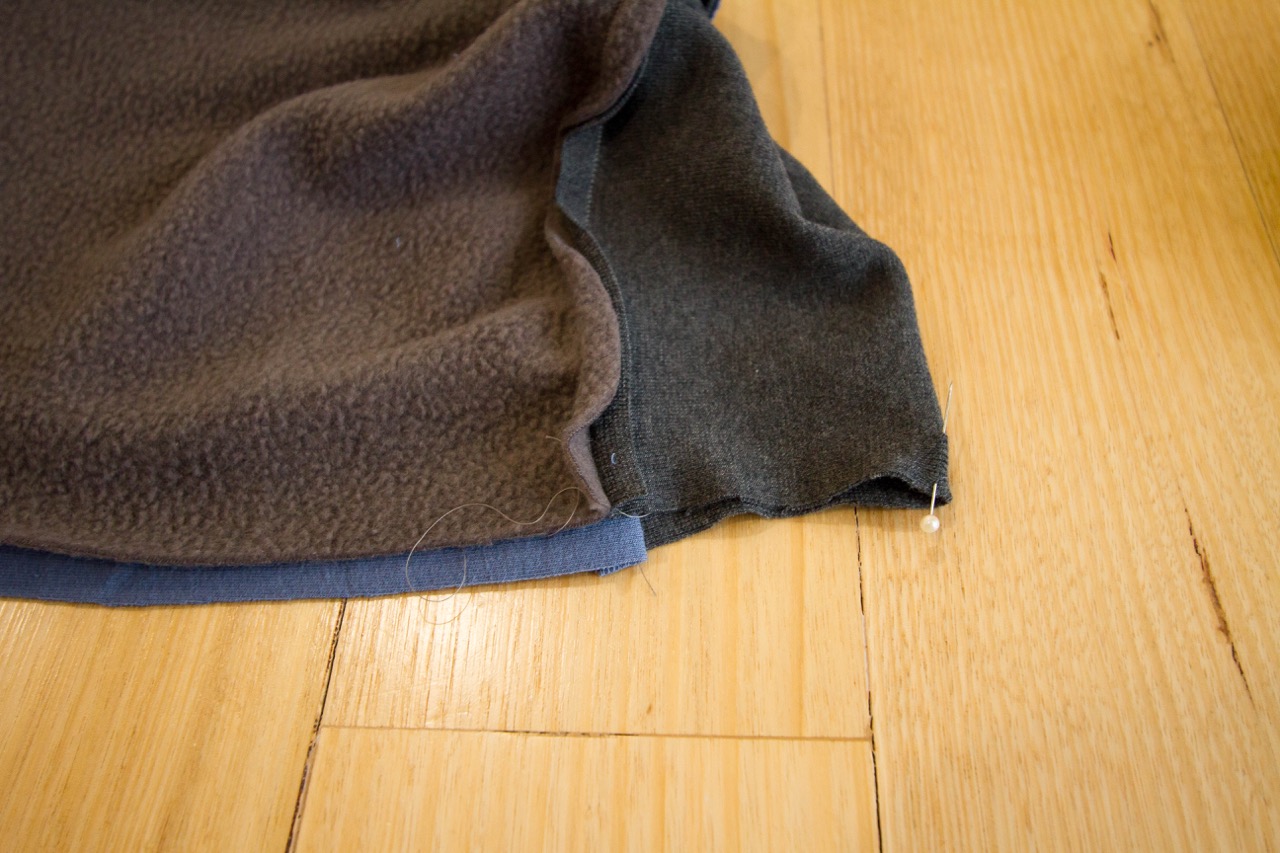
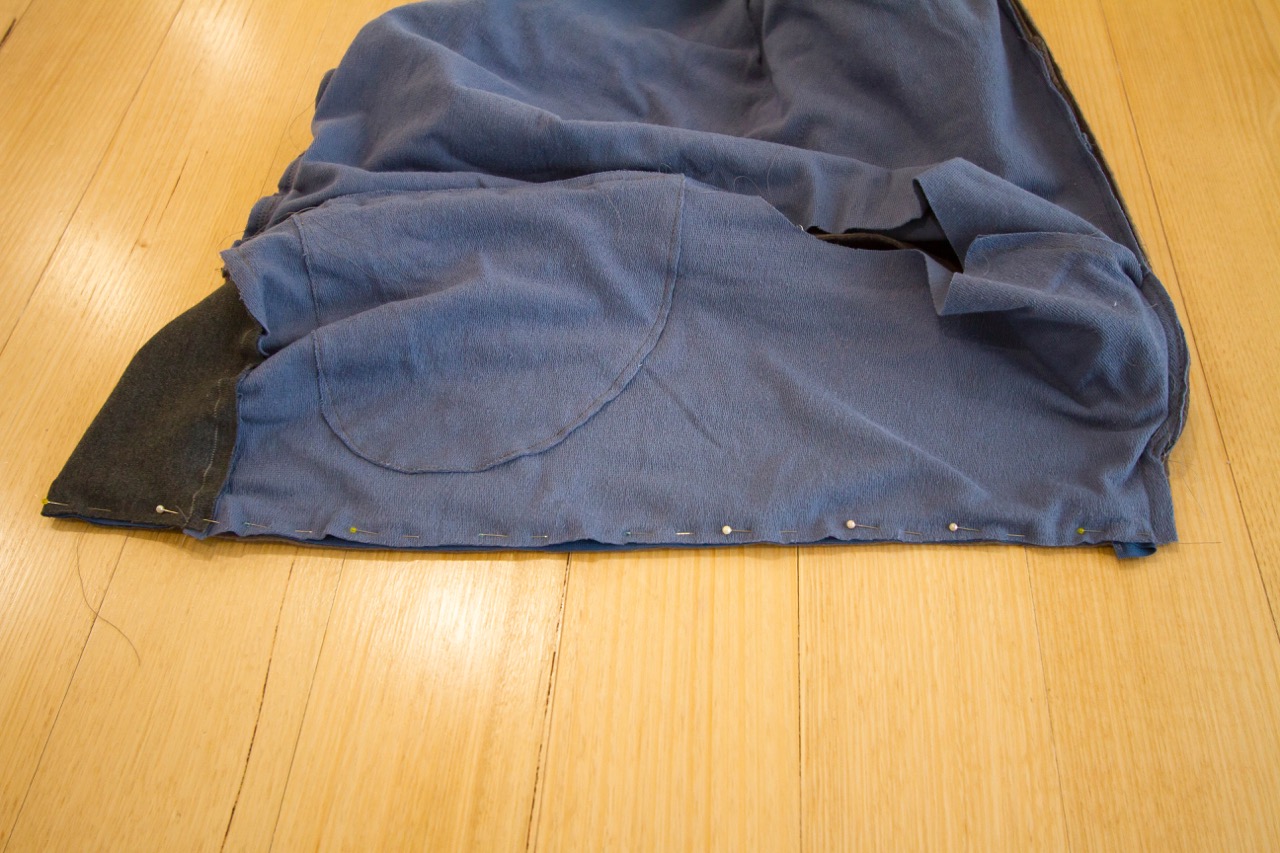
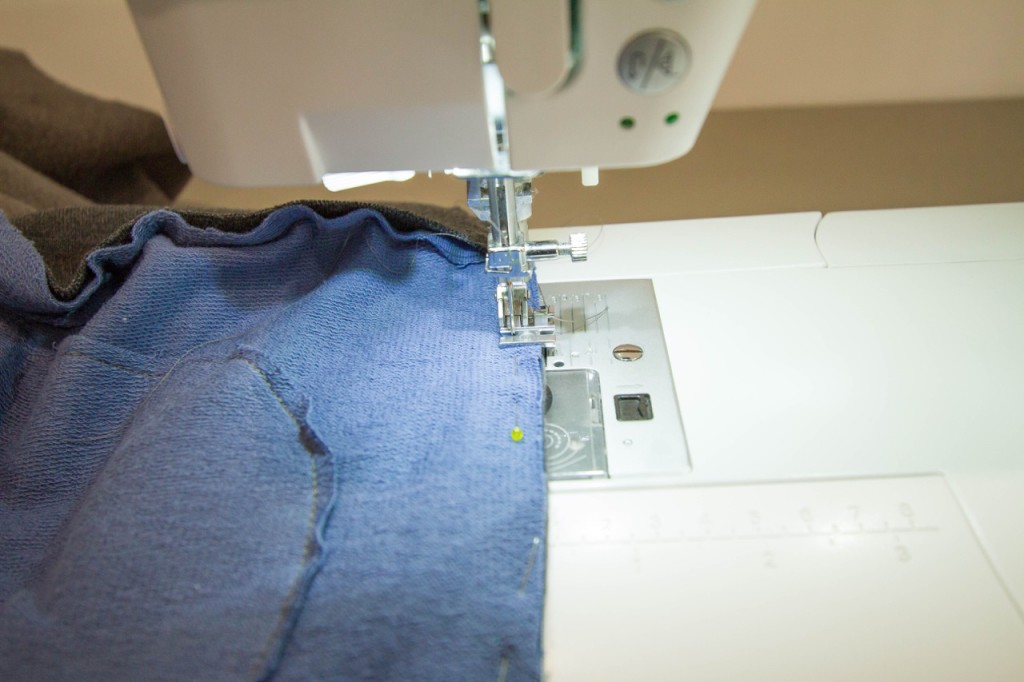
Take your waistband ribbing piece and, with right side of waistband facing right side of vest, pin waistband to the bottom edge of the exterior vest. You will need to stretch the waistband evenly to fit along the bottom edge of the vest. Sew waistband to the vest along pinned edge using a 1/2″ seam allowance. I have chosen to use a stretch tricot stitch here to make sure that none of my stitches pop when the waistband is stretched in the future. Here is a close-up shot of the waistband attached to the bottom edge of the exterior vest.Take the other long side of your waistband ribbing piece and, with right side of waistband facing right side of vest, pin waistband to the bottom edge of the lining vest. Once again, you will need to stretch the waistband evenly to fit along the bottom edge of the lining vest. Sew waistband to the vest along pinned edge using a 1/2″ seam allowance. Again, I used a stretch tricot stitch.
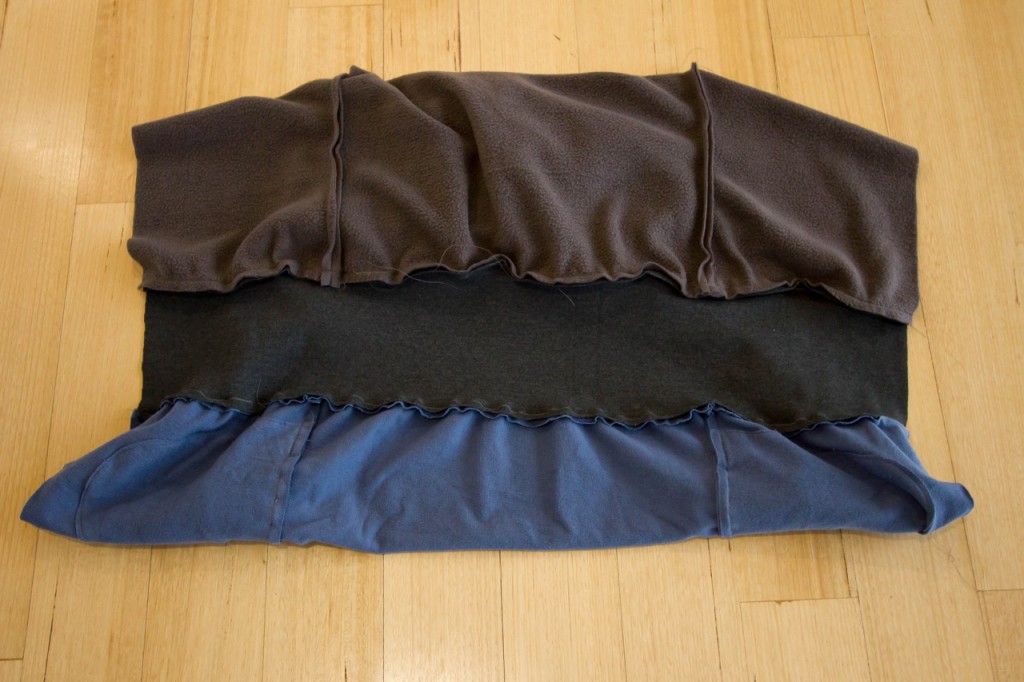
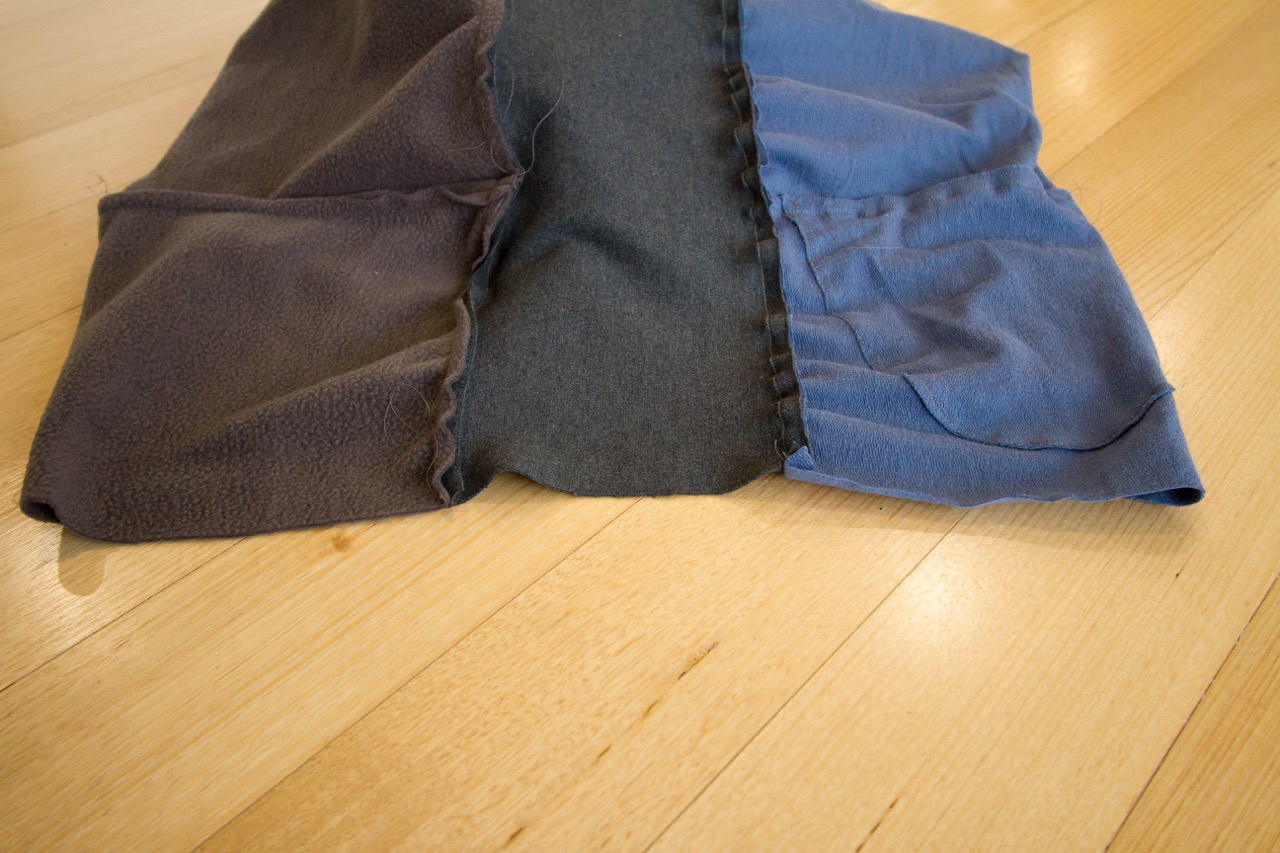
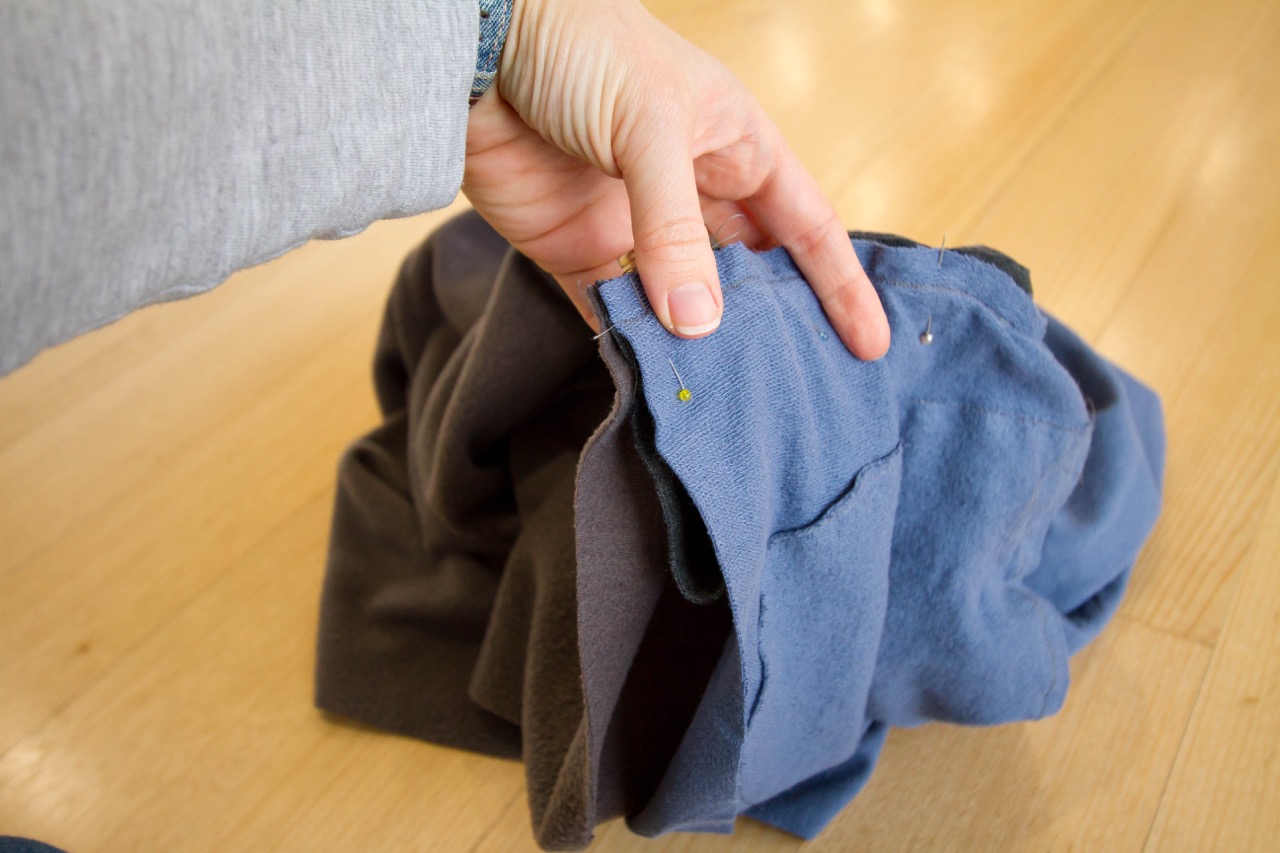
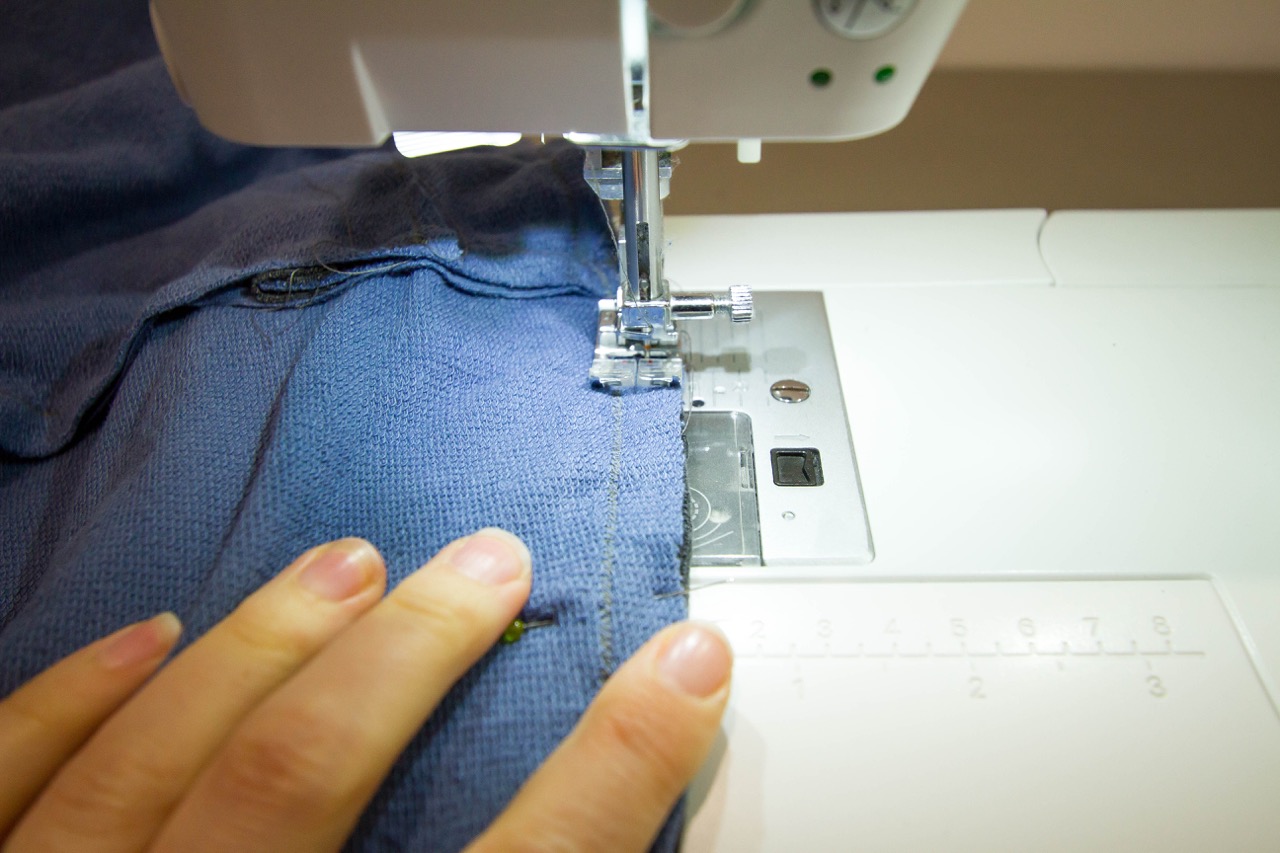
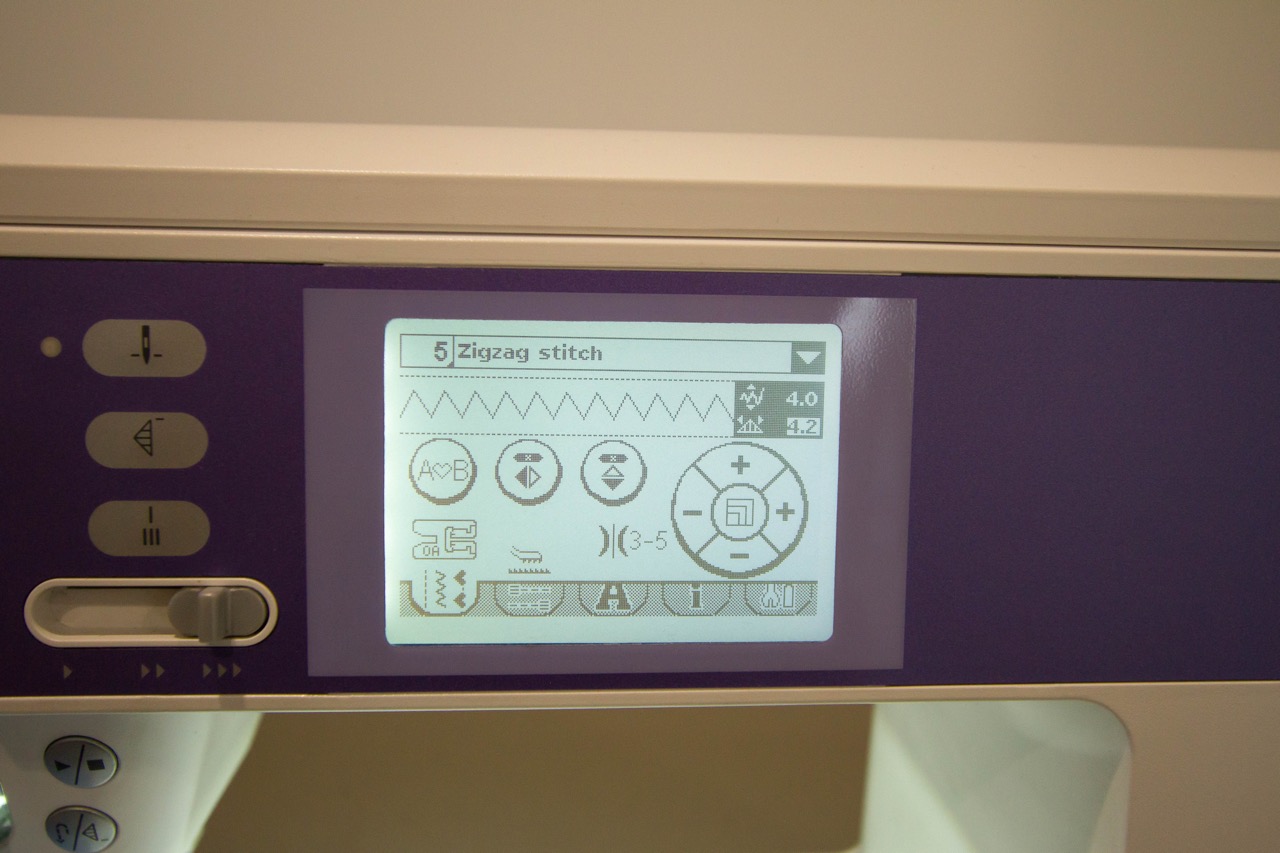
Now your exterior and lining vests will be joined at the top (neckline with hood sandwiched between) and the bottom (joined to waistband), making a big loop. Turn your vest right sides out and this is what it looks like from the lining side:This is what it looks like from the exterior:And this is what the front edge of the vest looks like – the waistband is folded in half, making the bottom edge of the vest.Turn your vest inside out again, with wrong side of lining, waistband and exterior facing out.Keeping the vest inside out, You will need to re-create the fold in the bottom edge of the vest as shown below. The waistband is folded in half, with wrong sides together and the raw edge of the bottom of the lining vest needs to line up with the raw edge of the bottom of the exterior vest.So the vest is still inside out, but the wasitband has been folded in half (length-ways) and tucked in between the lining and exterior vests. Make sure that the seam lines on the exterior and lining vests match up and pin into place along the bottom edge of the vest.Before you insert the zipper, you need to baste the bottom edge of the exterior and lining vests together to make things easier as you move onto the next steps. Starting at one side seam (not the front edge of the vest) sew the bottom edge of the vests together using a long, wide zig-zag stitch. It is important that this stitching isn’t seen from the right side of the vest, so keep the zig-zag within the seam allowance (between the stitching line and raw edge shown below).This is the setting I used for my zig-zag stitch:You can see in the photo below the row of zig-zag stitch sewn only from one side seam to the other (i.e. only along the back panel of the vest.)Here is a close-up of the zig-zag stitch sitting within the seam allowance:Now that the waistband is attached, it is time to insert the zipper.
Turn your vest right-way out again – this is a good time to check that you can’t see any of your zig-zag stitching on the back panel of the vest. I forgot to take a photo of this part, but open your open-ended zipper part way and fold the extra tape at the top of the zipper down and away from the zipper teeth to the back of the zipper. Baste into place.
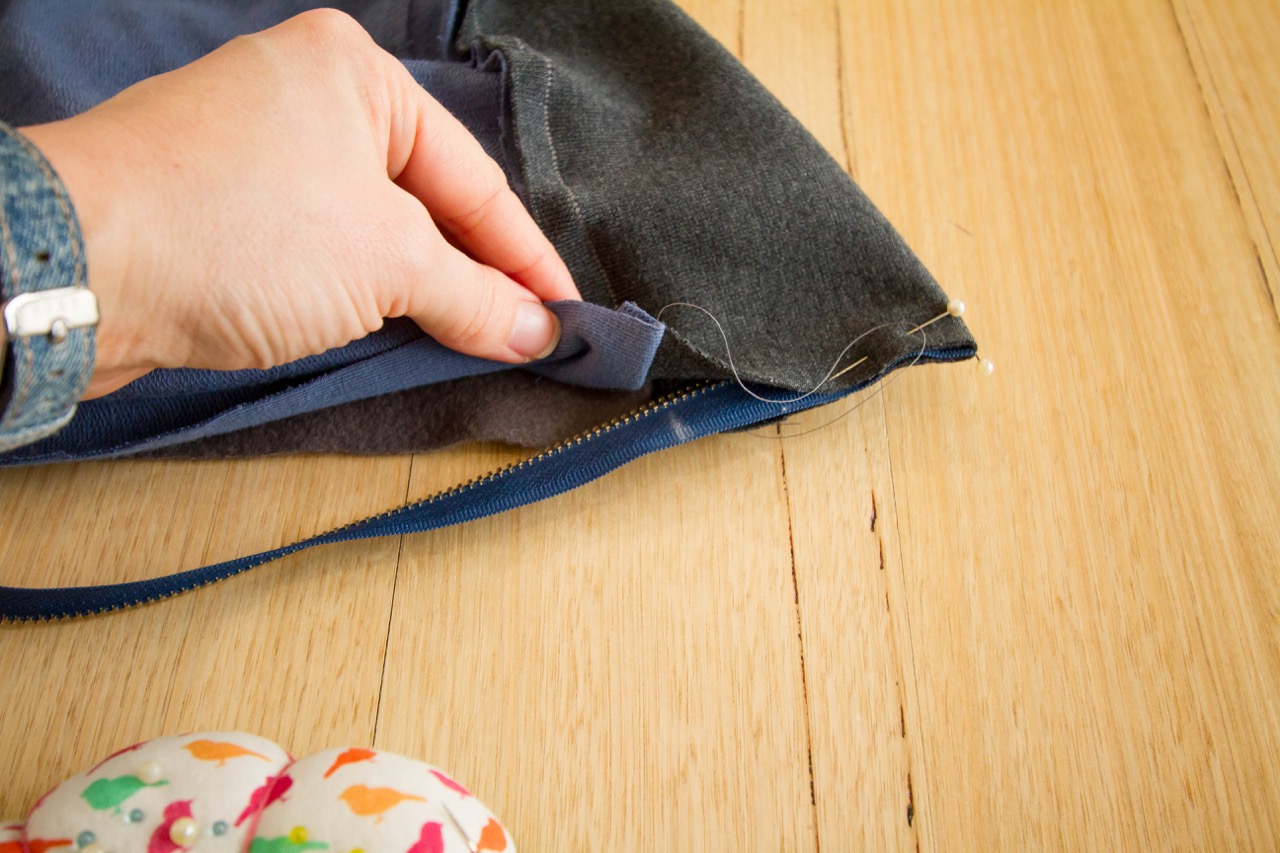
Place your zipper on top of your vest so that it is sitting exactly how it will be when you are wearing the vest. Pin the top of your zipper to the top of the front edges of the vest. This helps you to know which side of the zipper is attached to which side of the vest when you go to insert it. (You can see how the top edge of the zipper tape is folded back and sewn down in the photo below.) Open up your zipper completely, leaving the two sides pinned to the vest, and turn your vest inside out again. This next part is really important, it will make sure that the bottom edge of your zipper sits flush with the bottom folded hem of your vest. Take your waistband (it should be loosely folded in half from the zig-zag stitching you did earlier) and line up the seams joining the waistband to the lining and exterior vests so that they sit directly on top of each other. Then, take a pin and place it in the fold at the bottom of the waistband. This marks the very bottom edge of your vest.Take the zipper piece that is pinned to that same side of the vest and with the right side of the zipper facing the right side of the exterior vest, lay the zipper along the front edge of the vest. It is really important to make sure that the bottom of the zipper (with the zipper stop) butts up firmly with the pinned fold mark on the waistband. (Sorry for flipping the photo around here…hope it doesn’t confuse you!)
Line up the long edge of the zipper tape with the front edge of the vest, sandwiching the zipper between the exterior and lining pieces, and pin into place. I find I get a more accurate finish if I pin the bottom of the zipper into place first, then match up the seams at the top of the waistband and pin the zipper into place there next.Then I go to the top (neckline) of the vest and push the top edge of the zipper right up into the join between the exterior and lining pieces and pin into place so that I can be sure that there is no gap between the top of the zipper and the top of the vest.Then I pin the rest of the front edges of the vest to the zipper. Remembering the zipper is sandwiched between the exterior and lining vests. And the right side of the zipper faces the exterior, wrong side of the zipper faces the lining. I like to place a pin in the middle of the front edge first, then fill in the gaps in between. If you are working with a knit fabric for your exterior you might find that your fabric has stretched out a bit during all of the handling and will be a little too long for the zipper. If you pin evenly along the front edge it will eliminate big puckers later on when you are sewing your zipper into place.
Just a note here…if your neckline and waistband seam allowances are more or less than 1/2″ you might have trouble fitting your zipper into the front of your vest without any gaps at the top or bottom. If your zipper is just a little too short, you can either slide it up so that you have a bit of a gap between the bottom of the zipper and bottom of the waistband or re-sew along the neckline and bring the stitching at the front edge of the vest down a little to meet the top edge of the zipper. (Bear in mind that this will mean the finished neckline will be a little lower at the front of your vest.)Using a zipper foot on your sewing machine, sew along the pinned front edge of the vest using a 3/8″-1/2″ seam. When you reach the zipper pull, stop sewing and put your needle down. Lift the presser foot, slide the zipper pull past the foot and continue sewing to make sure that you seam line is nice and straight. My knit fabric was trying to pucker as I sewed so I made sure that I sewed slowly and smoothed out the fabric with my fingers as I went. I ended up with a few tiny puckers but they were easy to smooth and push out with my fingers once I was done.Turn your vest right sides out (again!) and you will see one side of your zipper is sewn in! This next step is also really important, I didn’t do it on my first vest and ended up with the seam between my waistband and vest sitting higher on one side than the other. And you don’t want it all wonky-looking!
Rejoin your zipper sides and close your zipper to it sits just a few inches above the seam joining the waistband to the vest. With a chalk pen, pin or some other method of marking draw a line across the zipper tape that sits in line with the seam joining the waistband to the vest. Open up and separate your zipper and turn your vest inside out again.Follow the same instructions as above to find the fold in the bottom of your waistband and mark with a pin. Place the wrong side of your zipper on the right side of your lining with the teeth of the zipper facing into the vest and butt up the bottom of the zipper stop with the pin marked at the bottom fold of the waistband. Pin into place.
Next you will need to match up the seam joining the exterior and waistband to the line marked on the zipper tape. Make sure that the seam line sits directly on top of the marked line and pin into place. Continue pinning the zipper to the front edge of the vest and sew into place as you did with the other side.Turn your vest right side out for the final time and do up your zipper again to make sure everything matches up nicely – the bottom folded edge of the waistband, the seam joining the waistband to exterior and the top of the zipper at the neckline.Look at the inside of your vest and, ta-da! A completely concealed zipper!
To finish your vest, follow Step 4, e-j in your Hero Vest instructions.


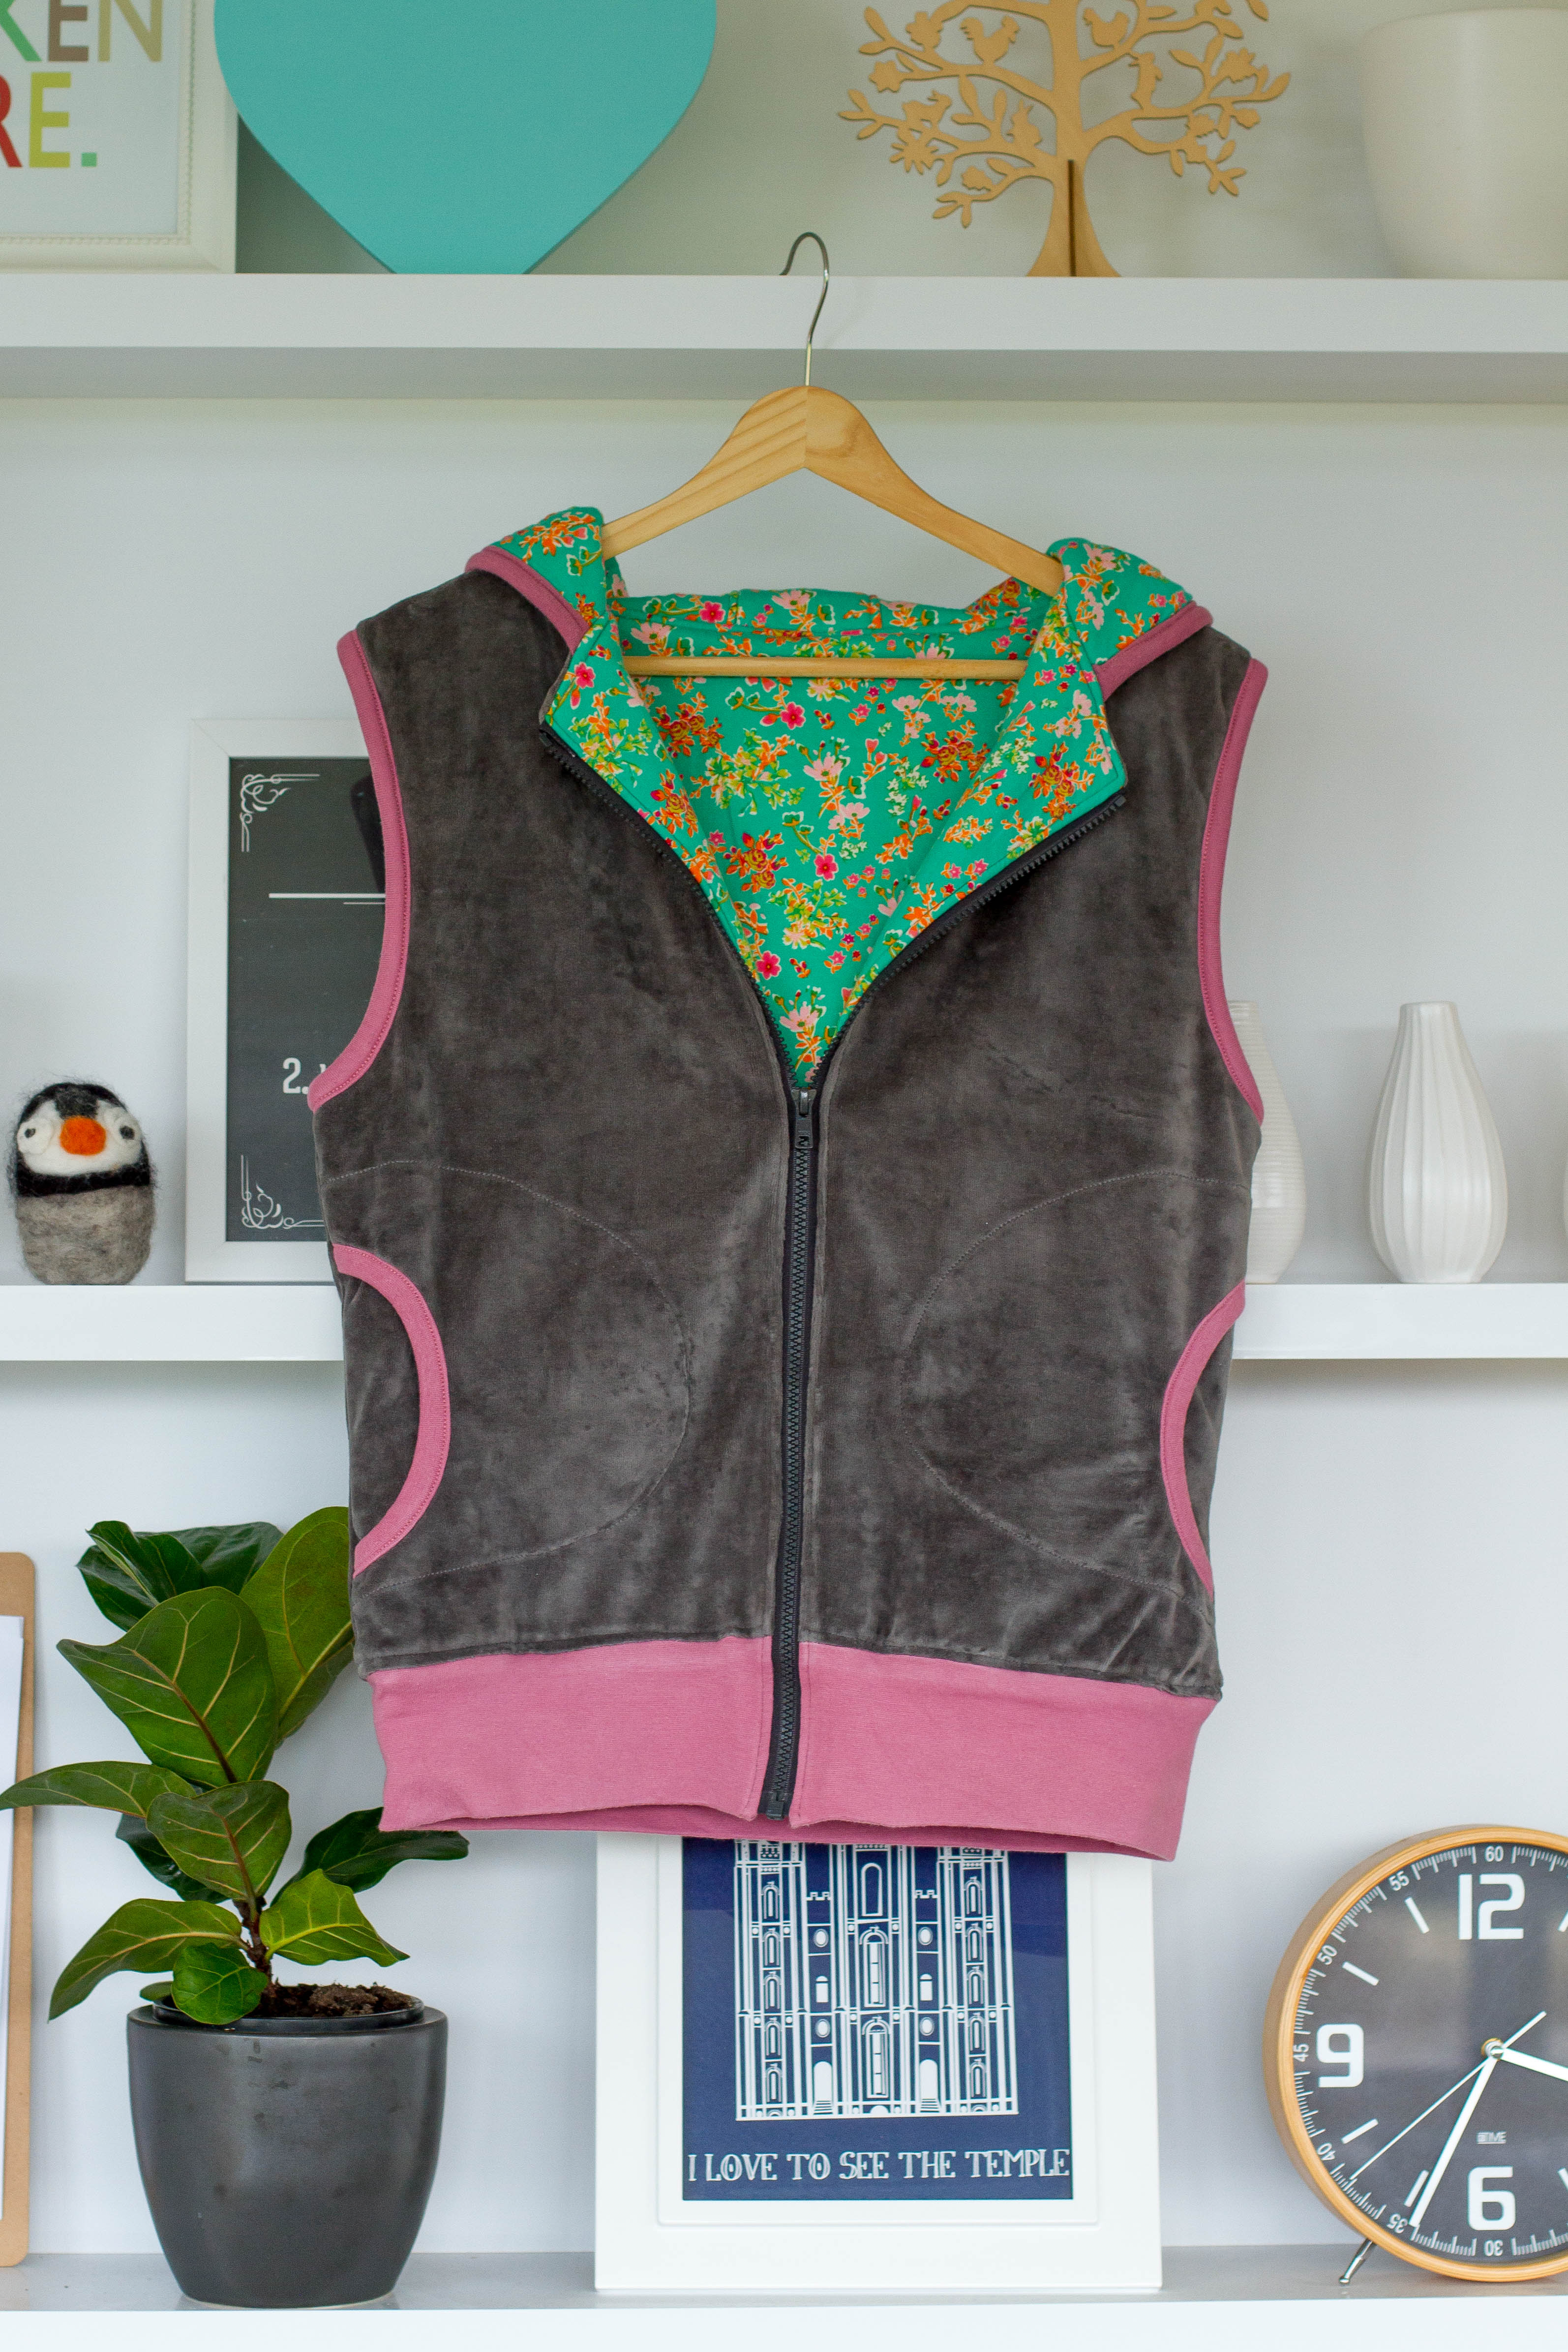

 Sharing another make from (ahem!) last Winter today…I wanted to experiment with the Women’s Hero Vest pattern and some different fabrics so pulled some thick and stretch grey velour from my stash to have a play with. French terry knits and flannel have been my fabrics of choice for Women’s Hero Vests to date but I had a vision for this one in my head and wanted to see how these fabrics would work together.


 Here is a close-up shot of the waistband attached to the bottom edge of the exterior vest.
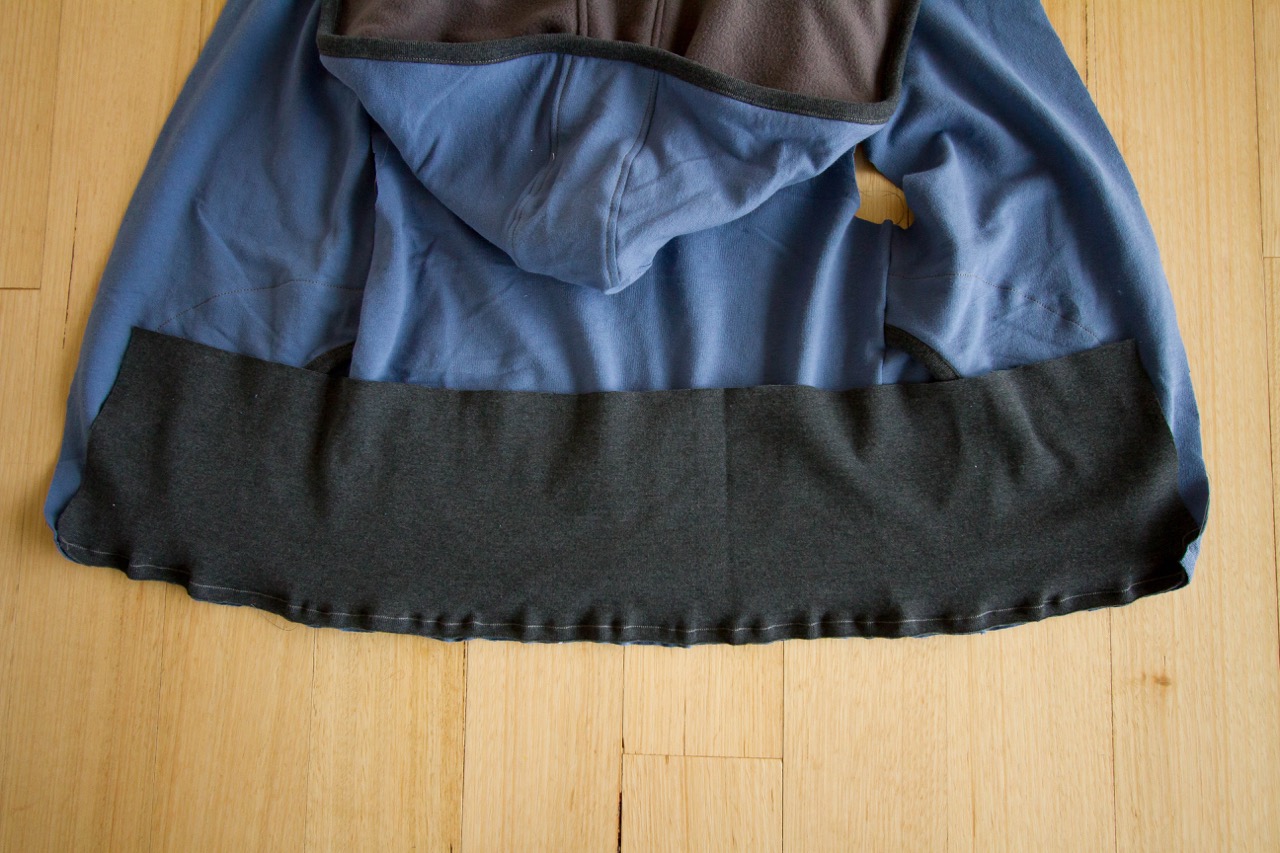
 Turn your vest right sides out and this is what it looks like from the lining side:
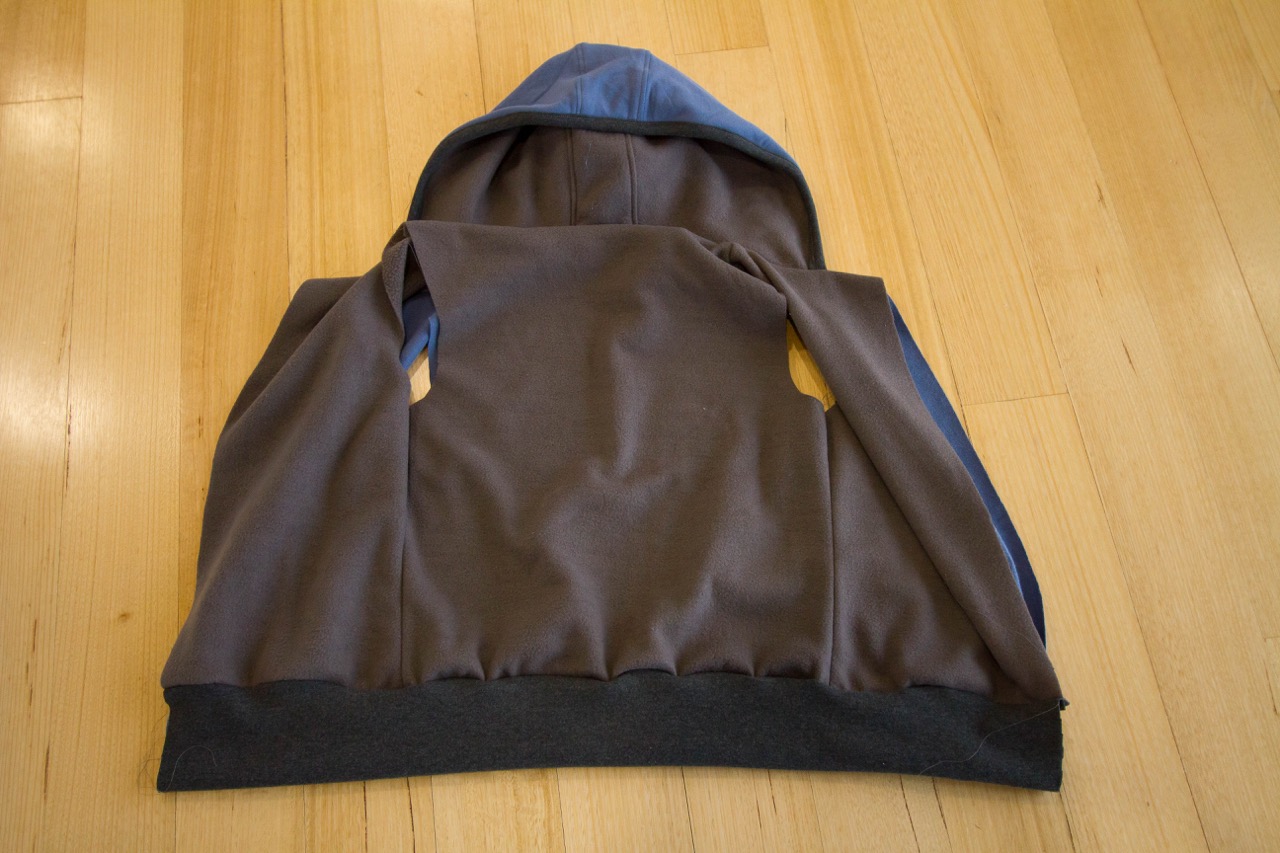


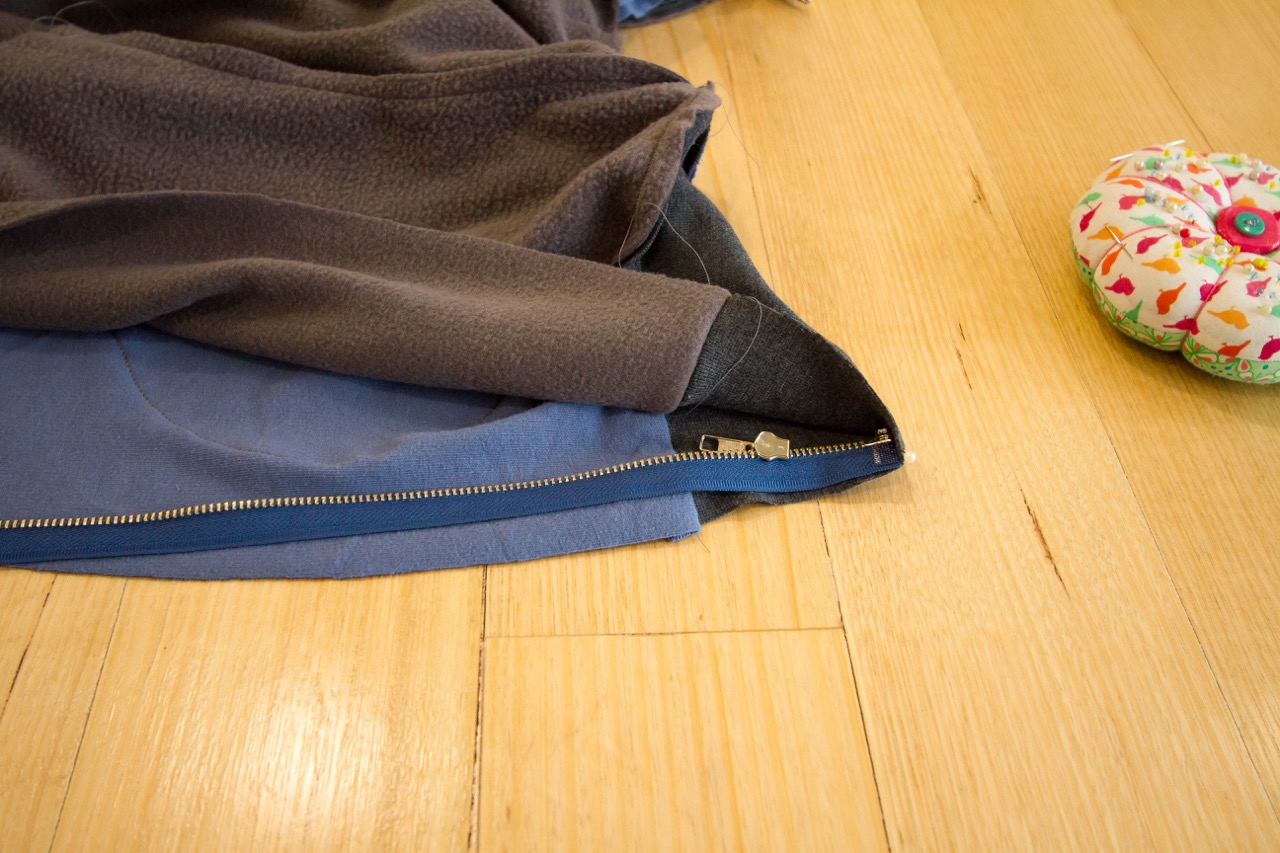
 Pin the top of your zipper to the top of the front edges of the vest. This helps you to know which side of the zipper is attached to which side of the vest when you go to insert it. (You can see how the top edge of the zipper tape is folded back and sewn down in the photo below.) Open up your zipper completely, leaving the two sides pinned to the vest, and turn your vest inside out again.
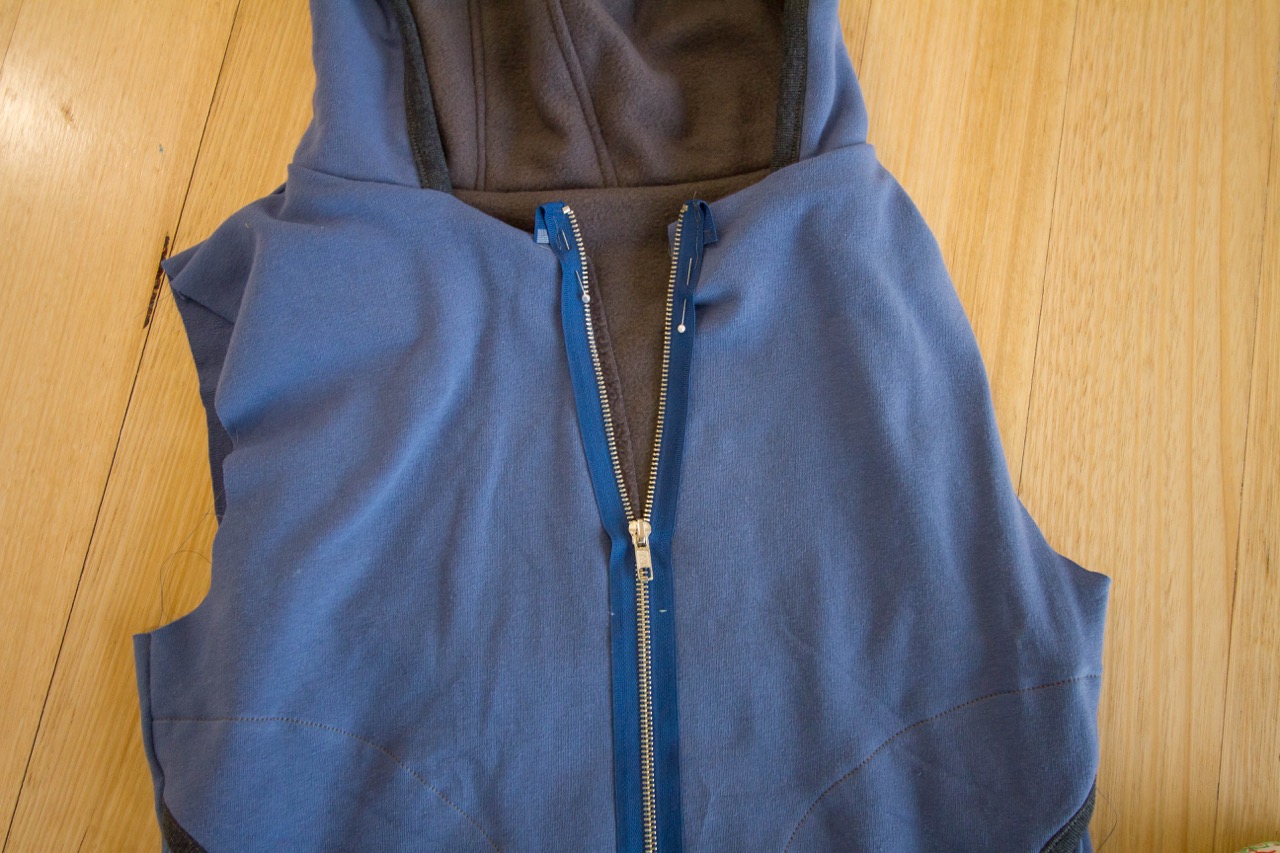

 Turn your vest right sides out (again!) and you will see one side of your zipper is sewn in! This next step is also really important, I didn’t do it on my first vest and ended up with the seam between my waistband and vest sitting higher on one side than the other. And you don’t want it all wonky-looking!
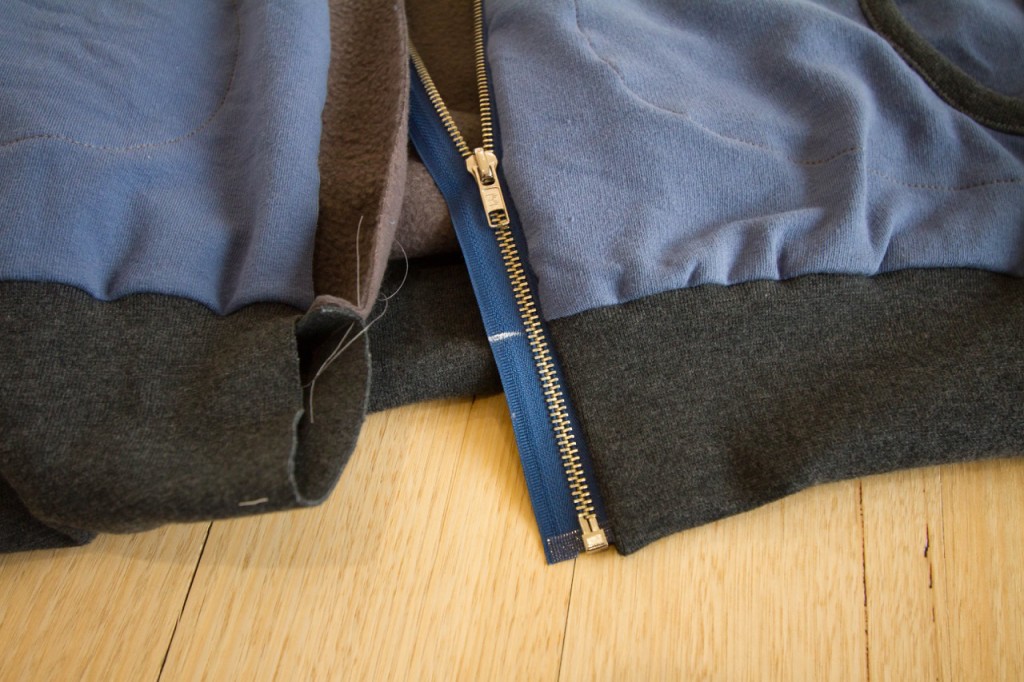 Follow the same instructions as above to find the fold in the bottom of your waistband and mark with a pin.
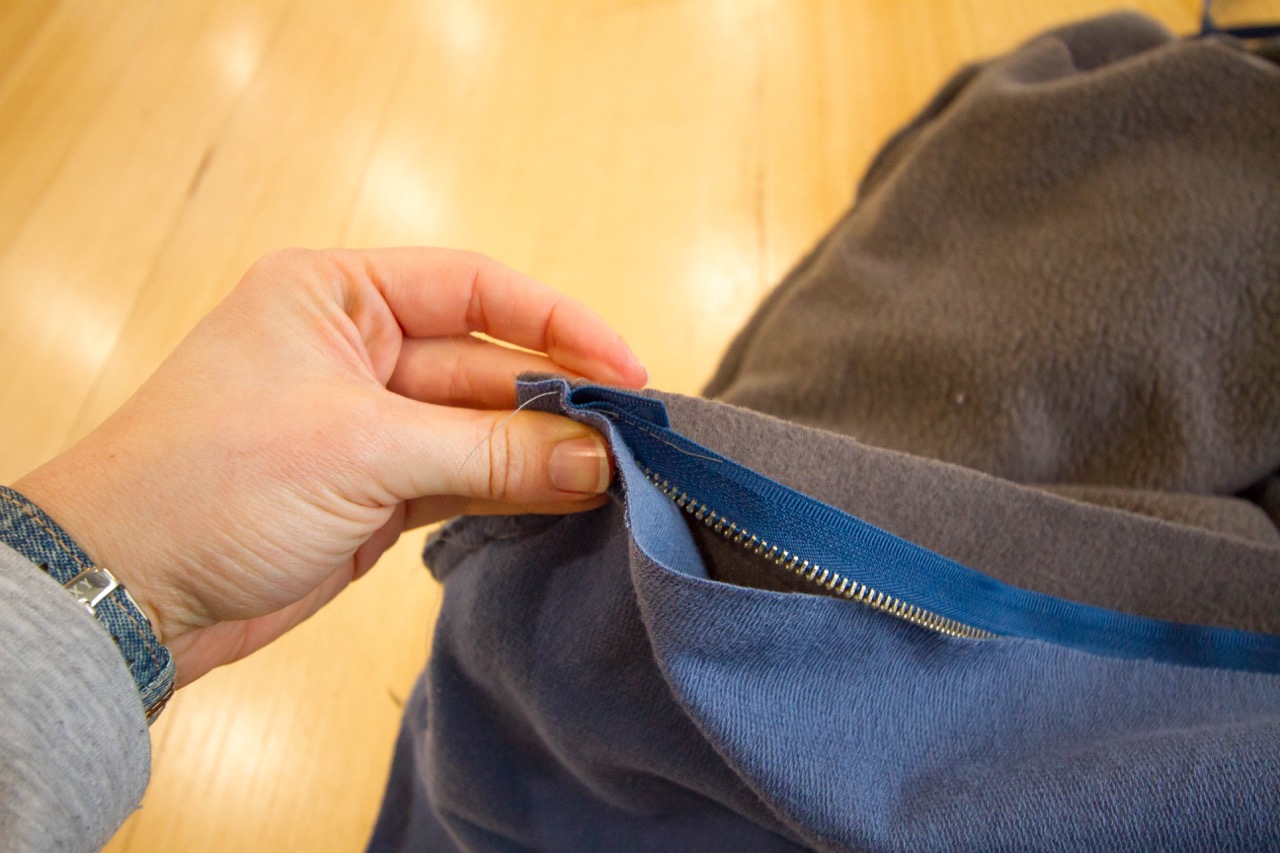
 Look at the inside of your vest and, ta-da! A completely concealed zipper!