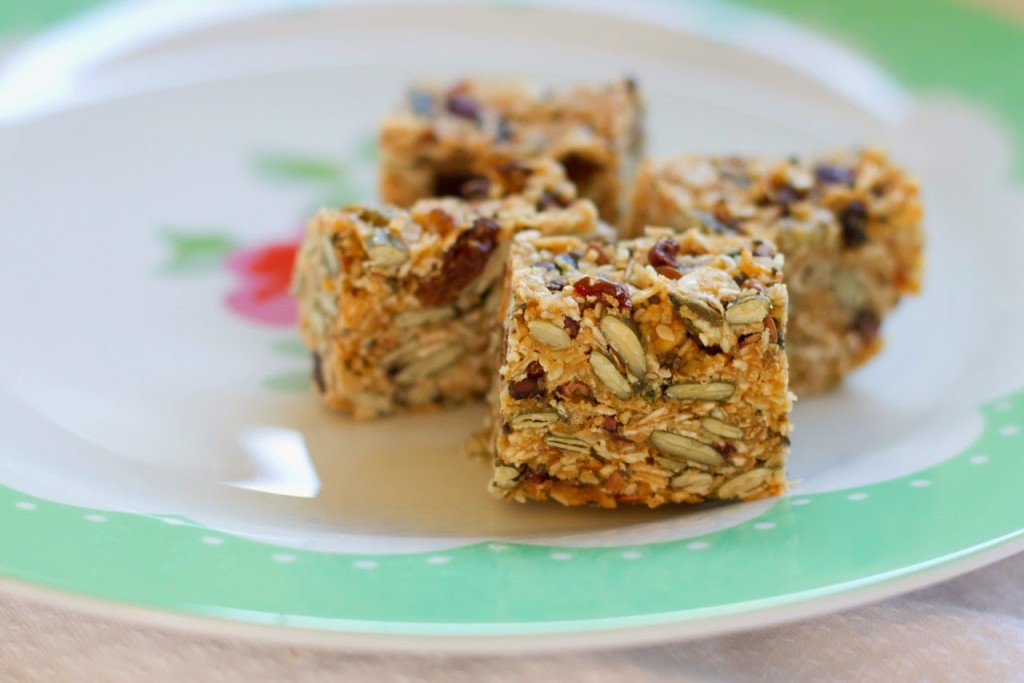
Sharing a recipe for Birdseed Bars today – with no refined sugar! And they can be nut, dairy and gluten free too if you make some simple changes. These homemade muesli bars are sweet and chewy with tonnes of flavour. I can even manage to get my pickiest kids to have a little piece with afternoon tea so that makes it an instant winner in my books!
There are lots of recipes for homemade muesli bars out there, but most of them are laden with sugar, honey and peanut butter. Probably better than a store-bought bar, but still not ideal. These are much tastier and filling than anything you will buy in a box! The best thing about them is that you can make them with pretty much any dry ingredient you have around or want to add in…leave the oats out and replace with lots of chopped nuts, increase or decrease quantities of seeds, etc. Work with what you like to eat and what you have in the pantry!
This recipe is for Thermomix cooking, but you can easily make it on the stove too by toasting the dry ingredients in a dry pan (stir often and check that it doesn’t burn!) and then bring the wet ingredients to boil for 4 or 5 minutes in another pan.
Place dry ingredients (not fruit) into Thermomix bowl and toast for 5 minutes on varoma temperature, reverse speed 1. Remove from bowl and set aside. Place butter or oil and rice malt syrup into Thermomix bowl and cook for 6 minutes on varoma temperature, speed 4. Add toasted dry ingredients and dried fruit into bowl. Mix together for 20 seconds, reverse speed 3. Spread mixture into a square cake tin lined with baking paper. Press down firmly. Place in the fridge to set and cool completely. Slice. Best kept stored in a container in the fridge.
VARIATIONS: To make gluten-free, leave out the oats and replace with more seeds, nuts, puffed rice, quinoa flakes, etc. As long as your dry ingredients measure about 400g, you can pretty much add anything you like to the mix! A small handful of cacao nibs are a delicious addition.
Christmas time always means a bit of naughty cooking. It’s the time of the year when you can cook up all sorts of yummies without feeling too guilty!
We have a family tradition, probably one of our favourites, to cook yummy treats, package them up then drive around doing a “knock and run” on the doorsteps of friends and family. Jaron and I love it even more now that the older kids are big enough to get themselves in and out of the car and are getting super speedy and stealthy in their tactics! They are getting caught less often and get such a thrill trying to stay out of view.
Usually we cook up a few batches of things like rocky road, coconut ice, chocolate truffles and shortbread for knock and run. There is always plenty left over, I make sure that it is all packaged up in the fridge so that I’m not tempted to eat it all and it always comes in handy for times when you need a quick gift for someone or friends drop in and you want to share a treat with them.
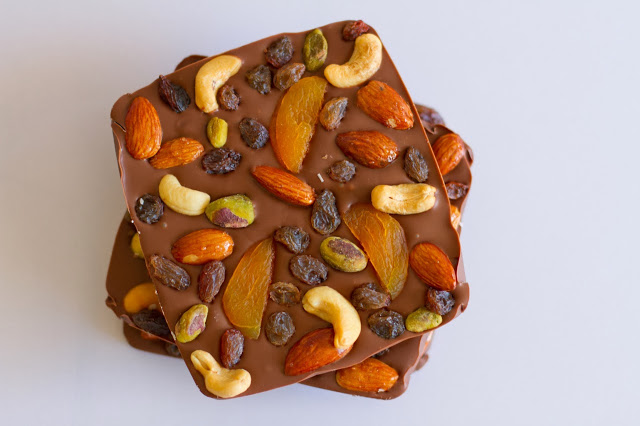
This year I decided to do something a little different and made up a ridiculous amount of what we call “Chocolate Slabs.” I guess the are similar to recipes you see around for chocolate bark but I made mine in rectangle slabs kind of like a little block of handmade chocolate.
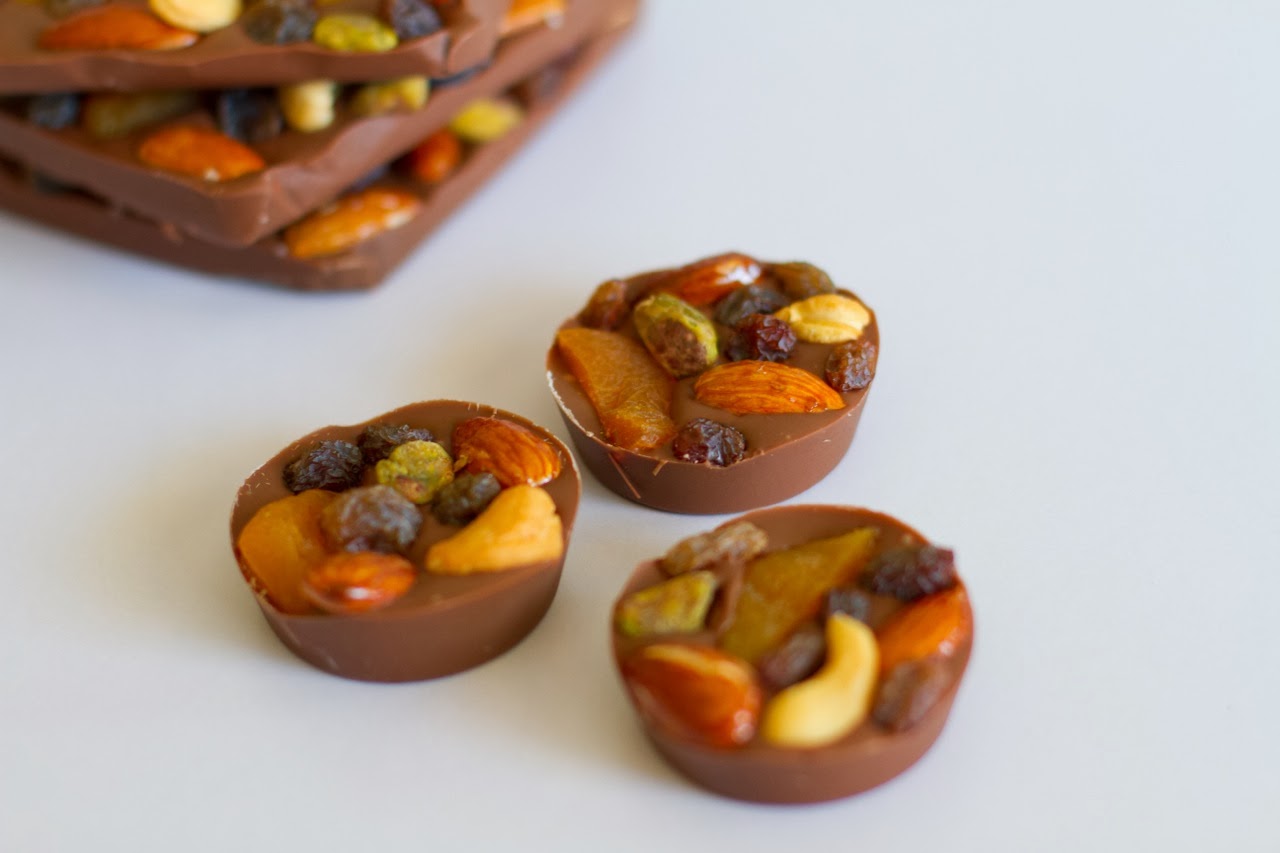
A recipe isn’t really necessary for these, if you can manage to melt chocolate then you are set! I had three rectangle Tupperware containers (these ones to be exact) that I used as a mould for my slabs. Make sure you line the base with baking paper, I didn’t bother lining two of the sides and because the sides of the containers are a little flexible the chocolate slabs came out without any troubles. So, after melting the chocolate I covered the base of the conatainers with a thin layer (about 5mm) of chocolate then topped the melted chocolate with what ever concoction of toppings I could come up with. I put mine in the freezer to set then took them out when they were hard and re-used the containers and baking paper over and over again. These ones were made using milk chocolate then topping with smarties, chopped clinkers and raspberry lollies that I had chopped in half. I think some lolly bananas would have been yummy in these ones too.
I also used this silicone muffin tray to make smaller, bite-sized chocolate slabs. They are really cute and looked great packaged up with the other flavours. I’m sure you could use any silicone muffin liners or ice trays though.
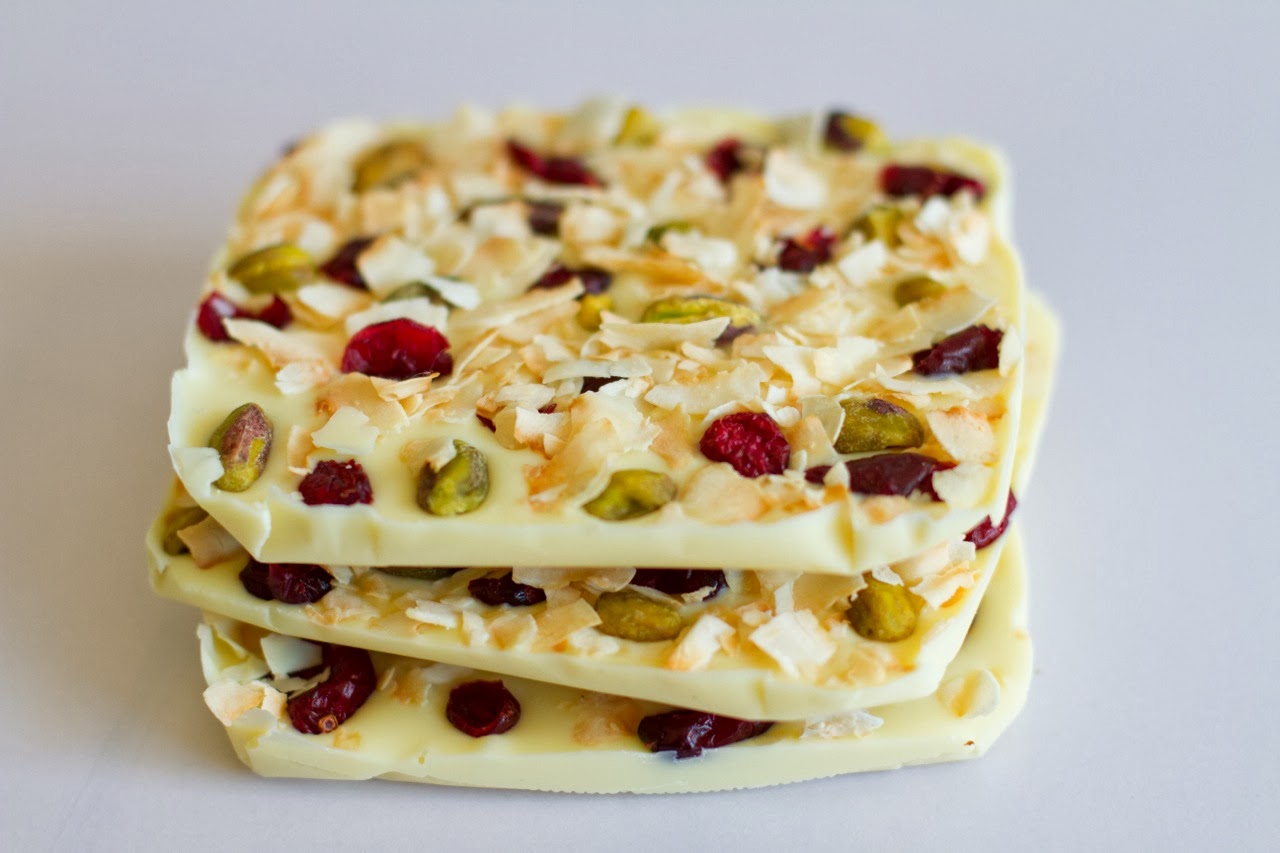
These ones are white chocolate with toasted coconut flakes, dried cranberries and pistachios.
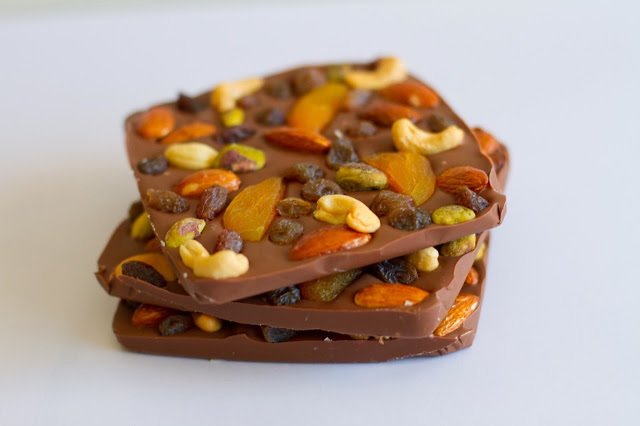
I took inspiration from fruit and nut chocolate with these ones and topped milk chocolate with dried apricots, sultanas, cashews, pistachios and almonds. It is delicious and would be yummy using dark chocolate too.
To make the almonds extra yummy, I spread them on a baking tray and drizzled them with rice malt syrup and sprinkled some salt over. Then baked them in a moderate oven for 10-15 minutes stirring 3 or 4 times. I call them “sweet and salty nuts” and they are so tasty. You could also use honey or maple syrup for these.
I love rocky road and didn’t want to miss out on some this Christmas so made a rocky road chocolate slab too. Milk chocolate is topped with mini marshmallows, raspberry lollies and sweet and salty almonds. Finished off with a drizzle of melted chocolate.
And finally another white chocolate slab topped with dried apricots, toasted coconut flakes and pistachios. I didn’t think I would like the white chocolate versions as much as I do, they are so yum!
So, if you have still got to do a bit of Christmas cooking or are looking for something tasty and unique to give away for gifts, get cooking some chocolate slabs. They are super easy, stress-free and taste amazing!
Make sure you package them up nicely for presents, we popped ours in some flat cellophane bags, sealed with a bit of washi tape and the kids made some cardboard toppers to put on the top of them. If you haven’t tried knock-and-run with your family before, go out one night after dinner and choose some friends or neighbours to do it to. It really is so much fun and your kids will love it!
I had a few more ideas for chocolate slab toppings that I haven’t tried out yet… – chopped up peppermint crisp bars – red & green m&ms – crushed candy canes – chopped oreos, tim tams or mint slice biscuits – lolly bag (lots and lots of different mixed lollies) – coconut and glace cherries
If you have any other good topping ideas, I’d love to hear them. Feel free to leave them in the comments for future reference!
Mmmm…this is the best chocolate cake ever. This is the one that we grew up on, the quick dessert when we were having people for dinner or on Sunday evening. It is moist as can be and feeds a crowd. Fuss-free to make (you don’t even need to get the beaters out) and any left-overs can cut into pieces and frozen for school lunches. It is always a winner and gets gobbled up though so left-overs aren’t likely. I’ve tried making this one in the thermomix, but it was a flop so if you’re thinking of giving it a go, try at your own risk!
Texas Sheet Cake
225g butter 1 cup water 4 Tbs cocoa 2 cup SR flour 2 cup sugar 1/2 tsp salt 2 eggs 1 cup milk 1 Tbs vinegar 1 tsp bicarb 1 Tbs vanilla
Place butter, water and cocoa in a saucepan. Mix over heat until melted and boiling. Place flour, sugar and salt in a large bowl. Combine eggs, milk, vanilla, bicarb and vinegar in a small bowl and whisk well. Mix all ingredients together in the large bowl. Pour mixture into greased cake pan and cook in a 200 degree celsius oven for 30-40 minutes.
For the icing, I put a bit of softened butter (maybe 4 Tbs?) into a bowl then add icing sugar and cocoa and milk to make enough. Mix with a spoon and spread over cooled cake.
If you follow me on Instagram (make_it_perfect), I did promise awhile ago that I would share some recipes for some healthier snacks that I’ve been cooking lately.
About a month ago I got all hard core and decided that I was going to quit sugar…I was awesome for about 2 weeks and then school holidays kicked in and Harvey stopped sleeping and I lost motivation. I felt great while I was doing it though and it really wasn’t as difficult as I thought it would be. I read “I Quit Sugar” by Sarah Wilson, it is a quick, interesting and motivating read and I highly recommend it to anyone wanting to make some healthier changes to their eating habits. Although her approach is extreme, even if you aren’t wanting to totally get rid of sugar there are a lot of good tips to take away and make little changes for good in your diet. She uses rice malt syrup a lot as a sweetner – you can get it at health food stores or the health food section in Coles. It is a little midler in sweetness than honey but really yummy especially drizzled over some greek yoghurt.
Another recommendation is “Sweet Poison” by David Wilson. I bought his cookbook and it has a whole heap of yummy sweet recipes that are all fructose free. David is an advocate for using dextrose (a form of pure glucose) in replacement of sugar in cooking, I managed to track some down in Coles but you won’t find it in the baking aisle – this stuff is used for brewing beer so look in the home brew section! In my experimenting I think that dextrose is best for cakes and muffins, not so good fro anything you want to stay nice and crisp like biscuits. Here’s a picture so you know what you are looking for:
So, if you are like me and a total sugar/sweet/chocolate addict, these two books and websites are great to help get you educated and make some changes…I’m trying to get motivated to get back on track before the silly season rolls in!
When it comes to eating well, I don’t have a problem with breakfast, lunch and dinner…it’s the snacking in between that kills me. Particularly if I’m really hungry, I always find myself reaching for a quick sugar hit to keep me going. I’m sure that there are lots of people out there just like me, so here are a few recipes that I’ve been using that are much healthier than the originals and taste just as good too!
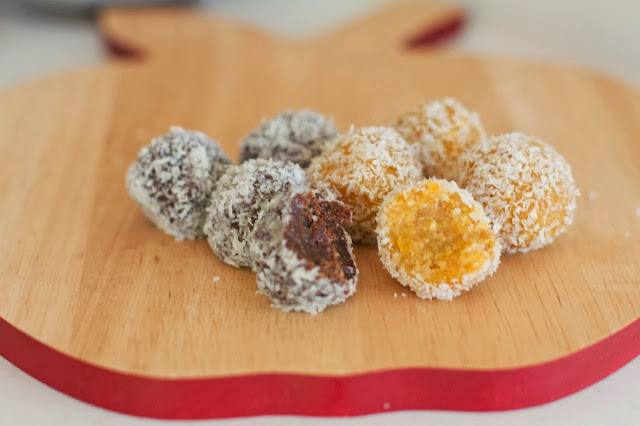
BLISS BALLS
If you do a google/pinterest search for bliss balls, you will come up with HEAPS of great recipe ideas. Basically they are made with a combination of nuts and dried fruit, plus other good things to give extra flavour.
The ones on the left are chocolate bliss balls made with: 1 cup cashews 2 Tbs raw honey or rice malt syrup 1 tsp vanilla 8 mejool dates 2 Tbs cacao or cocoa powder 2 Tbs coconut oil Place all ingredients into the thermomix or or processer/blender and process until smooth. Roll into balls and roll in coconut. Chill and store in fridge.
The ones on the right are apple and apricot bliss balls. I didn’t write down the exact measurements but I used dried apricots, dried apples, almonds, brazil nuts, coconut oil and rice malt syrup, then rolled balls in coconut.
CARAMEL POPCORN
This caramel popcorn has become one of our all-time favourites. I love that it is good for us and still just as yummy as a sugar-laden homemade caramel popcorn recipe.
1/2 cup popcorn kernels, popped 3 Tbs coconut oil 1/3 cup rice malt syrup 1/4 tsp salt pinch baking soda
Heat coconut oil, rice malt syrup and salt in saucepan until bubbly. Simmer for 3-4 minutes until it becomes golden and a bit thick. Add baking soda and mix quickly. Place popcorn in a large, greased baking dish. Pour caramel over popcorn, mix to coat. Bake in 140 degree celsius oven for 30 minutes, stirring after 15 minutes.
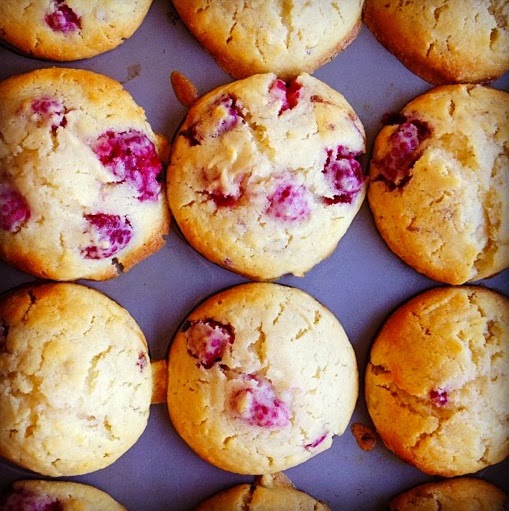
RASPBERRY & APPLE MUFFINS
This muffin base can be used for any fruit muffins – try replacing white sugar in cakes or muffins with dextrose. It isn’t as sweet as white sugar so the taste won’t be exactly the same. Also, dextrose soaks up liquid in a recipe so you might have to add a bit of extra liquid to get the mixture to the usual consistency.
2 cups SR flour
1 cup dextrose
2 eggs
3/4 cup olive oil
1 cup buttermilk (or milk mixed with a Tbs vinegar)
250g frozen raspberries
1 apple, grated
Place flour and dextrose into large bowl.
Whisk eggs, oil and buttermilk together in a sepearate bowl.
Add wet ingredients to dry and mix until just combined.
Stir thorough fruit.
Divide between 12 muffin holes and cook in moderate oven for about 20 minutes until cooked through.
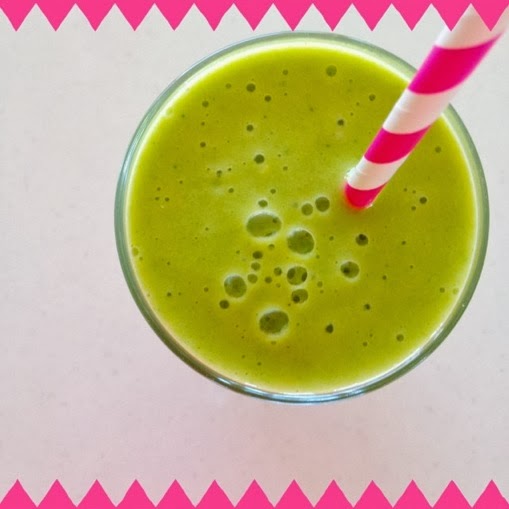
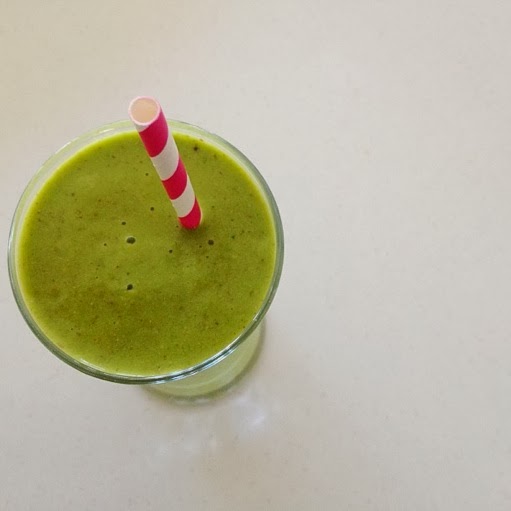
The one thing that has been an absolute lifesaver, especially when I get to that 3pm slump (and could easily devour a block of chocolate if I had one around!) is green smoothies. I tried making green smoothies ages ago and they were always yucky, I can’t remember what I did at the time to know why they were so gross, but I was really turned off! A friend shared some recipes and samples with us at a recent Relief Society activity and they were so good – I am hooked now and can’t do without my afternoon green smoothie! They are also great if I can’t be bothered cooking dinner (the kids have them with a piece of toast!) or I’ve been too busy to eat properly throughout the day.
You can add pretty much anything you want to a green smoothie, the key is to blend them like crazy because if you are left with any lumpy bits from the greens it can be a real turn-off! I blend mine for 1 minute on speed 10 in the thermomix, and sometimes a little longer if it needs it.
My favourite combination is: handful baby spinach handful baby kale 1 orange 1 lemon 1 cup frozen mango 1 banana coconut water (or water or almond milk)
YUM! There are heaps of recipes and ideas on this website, Simple Green Smoothies. I’ve played around with lots of different combinations, but I can’t beat the one above.
Hopefully these recipes and ideas help you out with some healthier snack options. I’m already feeling motivated to get back on track!
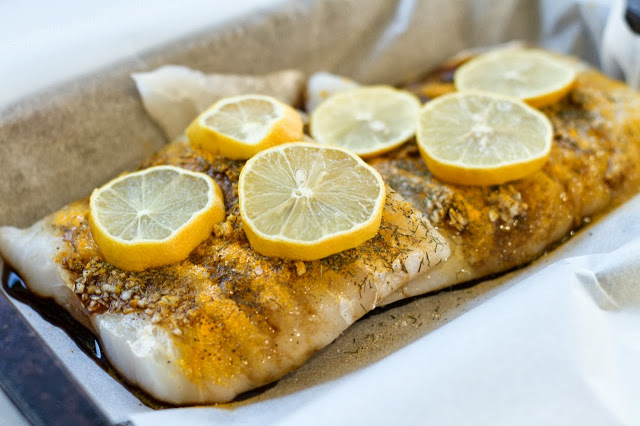
Here’s a favourite meal of ours. It’s quick and super easy to make and (most importantly) delicious. Even the kids will eat it which pretty much makes any healthy meal a winner in our house.
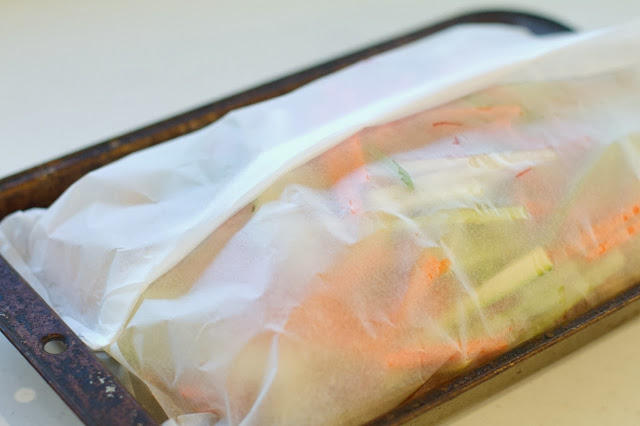
First, take a couple of pieces of good quality white fish. I used pink ling here. Place a big piece of baking paper (enough to wrap around the fish a few of times) in a baking dish and put the fish in the middle. Top the fish with lots of different seasonings and sauces – this always changes for me depending on what I’ve got around, but usually includes ginger, garlic, parsley, dill, tumeric, salt, pepper, soy sauce and honey. Then slice up a lemon and pop that over the top.
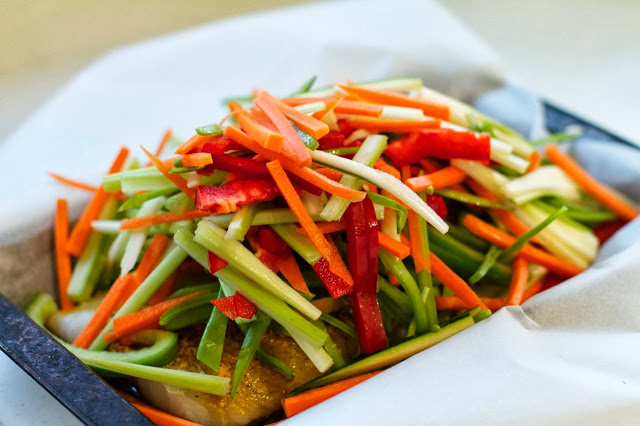
Next, chop up heaps of veggies into thin strips. Once again, depends what I’ve got in the fridge but usually includes red and green capsicum, zucchini, celery, carrots, spring onions, etc.
Pile the veggies on top of your fish.
Using the baking paper, wrap everything up and fold the edges over making sure that there are no gaps in the baking paper.
Bake in a moderate oven for 15-20 minutes until the fish is cooked through.
Remove from oven and serve fish and veggies with some couscous or rice. We like couscous that has been cooked in stock with some sultanas, pistachios and pepitas mixed through. Enjoy!


 Using the baking paper, wrap everything up and fold the edges over making sure that there are no gaps in the baking paper.