I’m guest blogging over at UCreate today, sharing a tutorial to turn an old sweater into a cute cardi…


I’m guest blogging over at UCreate today, sharing a tutorial to turn an old sweater into a cute cardi…
Lil’s birthday is coming up in a couple of weeks and I am trying to make more of an effort to only give the children things that I KNOW they will get great use out of and will not end up becoming clutter in our house.
After talking with my sister about it she convinced me that playsilks were the way to go. It made perfect sense. Out of everything that gets played with in our house, my fabric stash is always getting pulled apart and used as blankets, dress ups, picnic blankets, roads. I think I spend more time folding and putting my fabric away than I spend picking up toys at the end of the day! This website gives some great ideas and uses for playsilks.

So, I could have gone an purchased a set (these ones look great!) but after doing a bit of research, I discovered that plain white silks could be purchased online and then dyed with Kool-Aid. I’m a do-it-yourself girl, and if I can make it then I won’t usually buy it. Plus, it ended up heaps cheaper this way.

You can find instructions for dyeing playsilks lots of places on the internet, but I thought I’d share my “how to” with you.
First of all, you will need to buy some plain white playsilks. I ordered mine from here. They came really fast too. I was only planning on buying 7 or 8, but shipping was about $10 so I kept adding extra silks to my shopping cart until the shipping increased. I bought 19 silks and only paid $10 shipping. There are heaps of sizes to choose from, I got the 30″ x 30″. I know I don’t need 19 playsilks but I figured I would hang onto them for presents or something – my friend came to visit last week and bought a few off me, so that was an easy solve!!

You will also need Kool-Aid. I bought mine of Ebay as it is not readily for sale in shops in Australia. You will need THREE of each colour/flavour you wish to use.

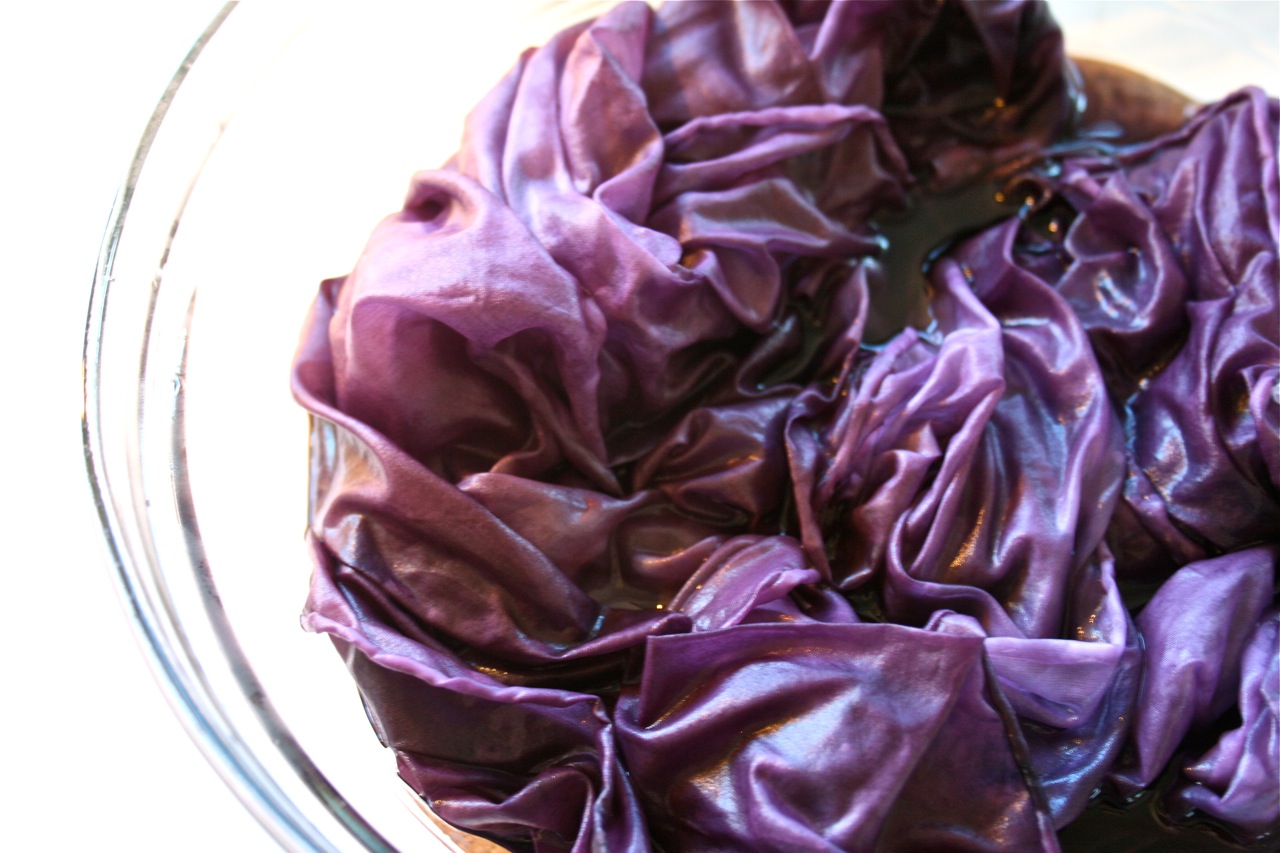
To prepare your silks for dyeing, they need to soak in a bowl filled with boiling water and about 1/2 cup vinegar for half an hour.

In a large glass or microwave-safe plastic bowl, mix together 2 cups boiling water, 1/2 cup vinegar and 3 packets of Kool-Aid. Place silks in Kool-Aid mixture to dye. I found that the dye clung to the silks really quickly and seemed to get sucked out of the water (it was pretty cool actually – can’t believe people drink the stuff!!!). Most of my silks ended up being a bit patchy in colour…I don’t think you can avoid this unless you are using a lot more Kool-Aid/water and a huge bowl. I did find that I could make it as even as possible by trying not to fold/scrunch the silk up and getting as much surface into the liquid as I could at the beginning. I actually dyed 2 silks each colour. For this ratio of Kool-Aid/water you couldn’t dye more than two 30″ x 30″ silks – there wouldn’t be enough liquid.
Put some plastic wrap over the top of the bowl and place in the microwave on HIGH for 3 minutes. Take out and rest on the bench for 3 minutes, then stir. Repeat this process two more times.
Place in a sink of cold water to rinse out any remaining dye.
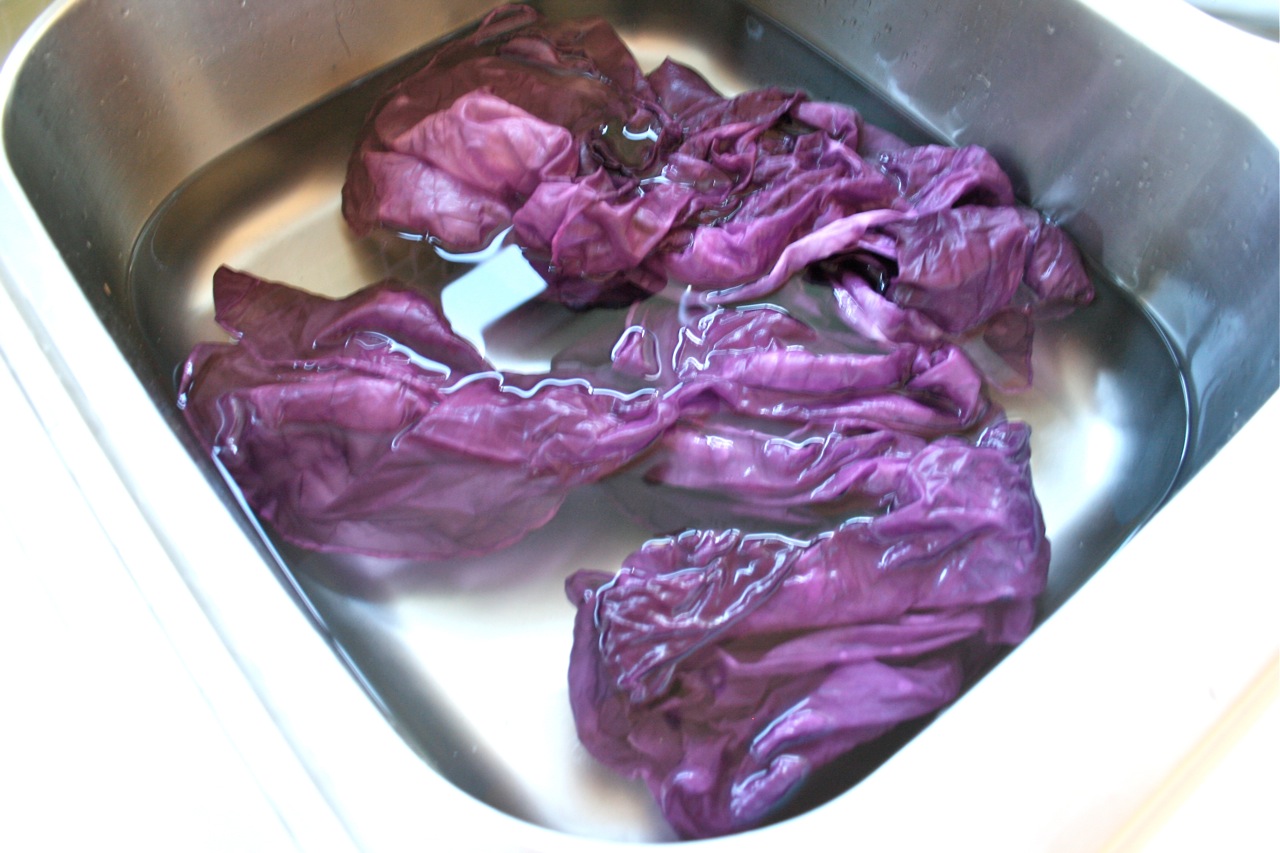
Hang on the line to dry and you are done!!!

I ended up with a lot of red silks because the set of Kool-Aid I bought had a few red coloured mixes in it. I thought some of them might come out more pink, but they all looked pretty much the same.
These are going into hiding until Lil’s birthday – I know she is going to love them though and will be sure to share later on 🙂
If you want to have a go at doing this yourself, I thought I’d share which Kool-Aid mixes I used to make each colour playsilk – hopefully will help to take the guesswork out of choosing which flavours to buy!
BACK ROW L-R:
Strawberry, Grape, Ice Blue Raspberry Lemonade
MIDDLE ROW L-R:
White…I didn’t dye this one, Cherry, Orange
FRONT ROW L-R:
Tropical Punch, Lemon-Lime, Lemonade, Pink Lemonade

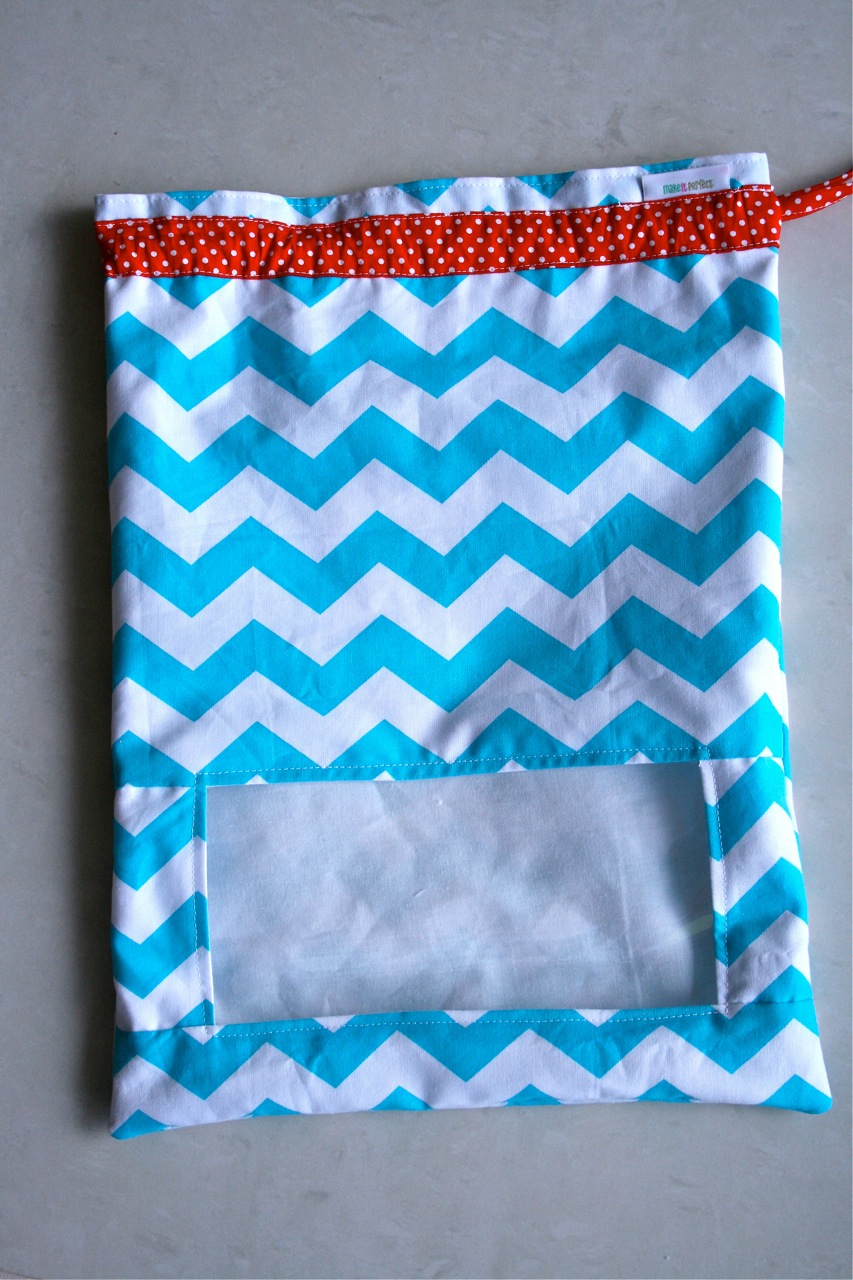
{Thanks for the Toy Sack-love 🙂 If you need an introduction to these toy sacks then read my previous post here.}
This is a long tutorial…stick with me…if you keep scrolling all the way down to the end, I’ve got a toy sack to GIVE AWAY! So if you aren’t a sewer or want a toy sack without any work, now is your chance to enter 🙂
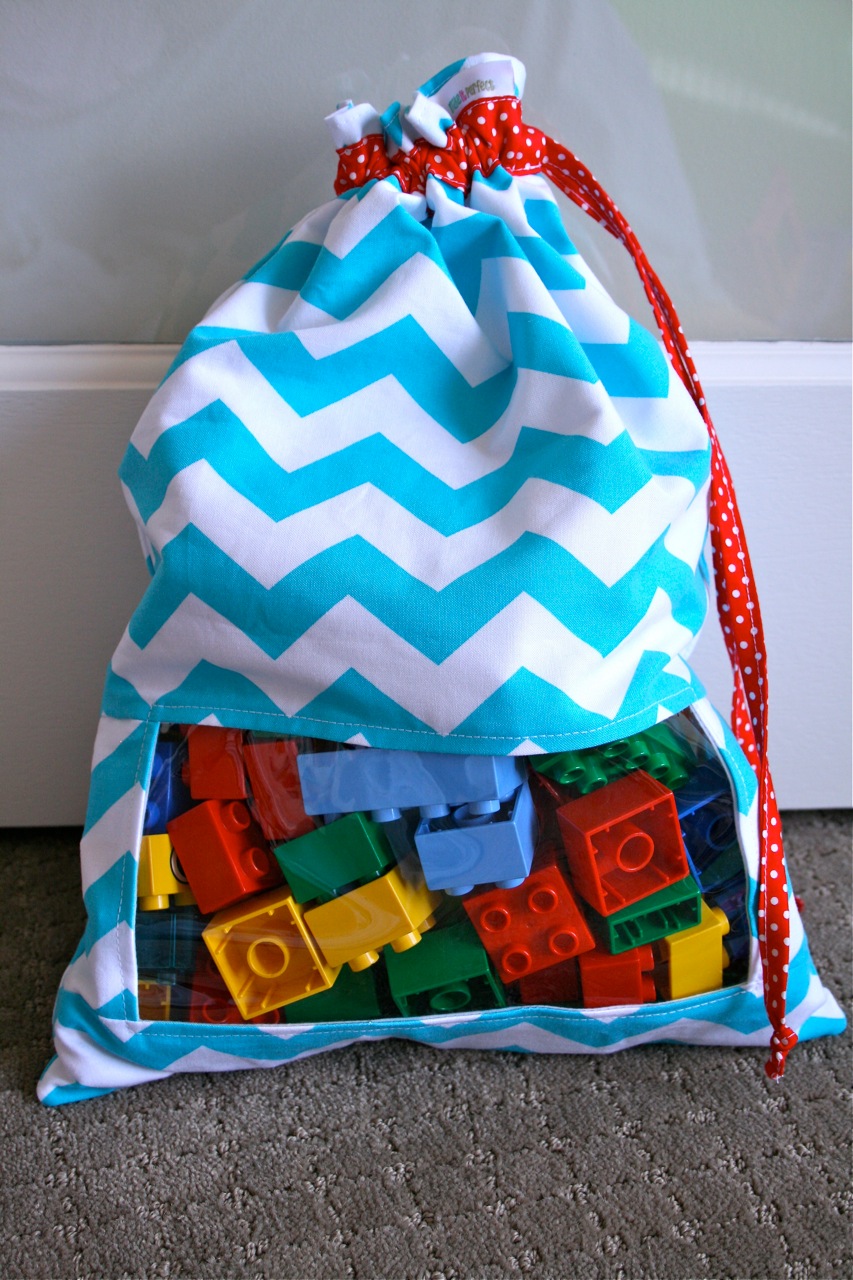
To make a “Peek-A-Boo” Toy Sack, you will need:
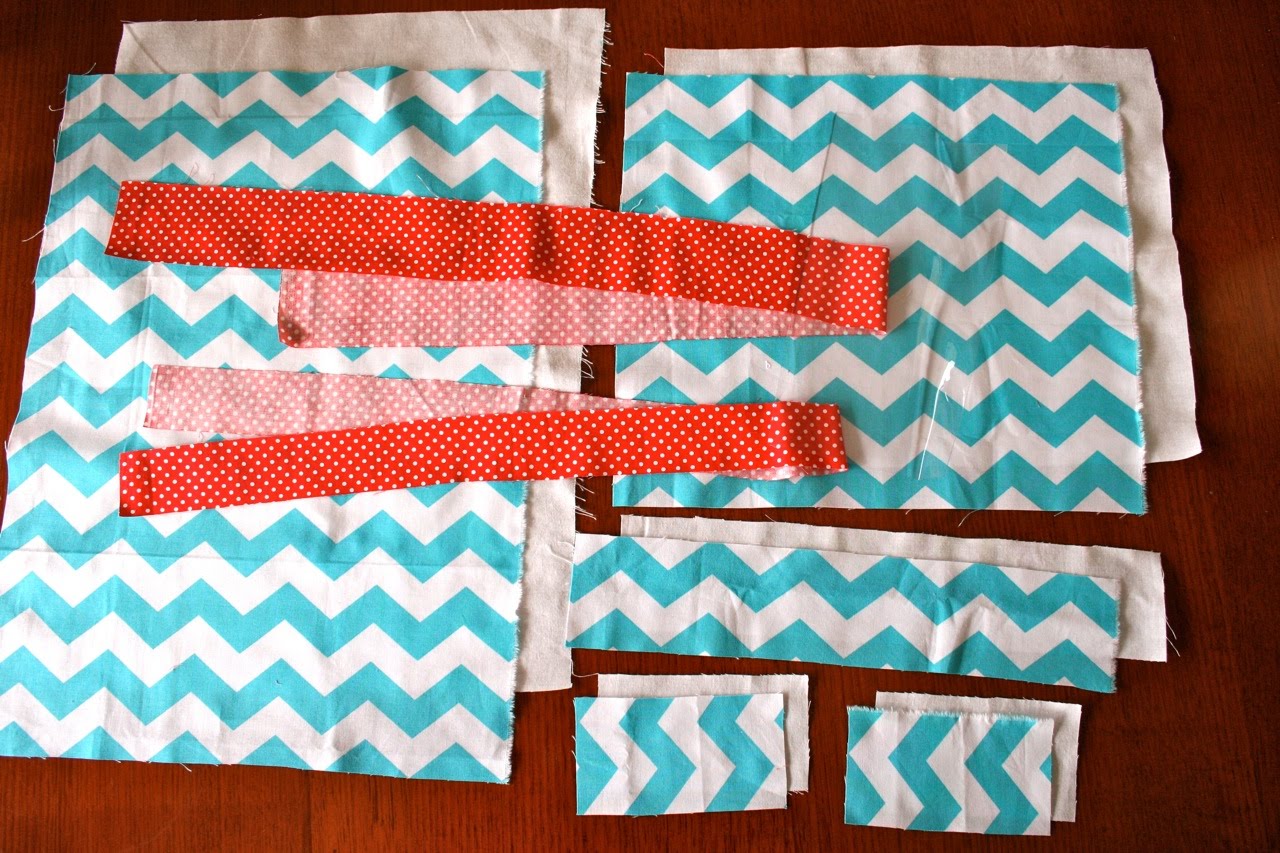
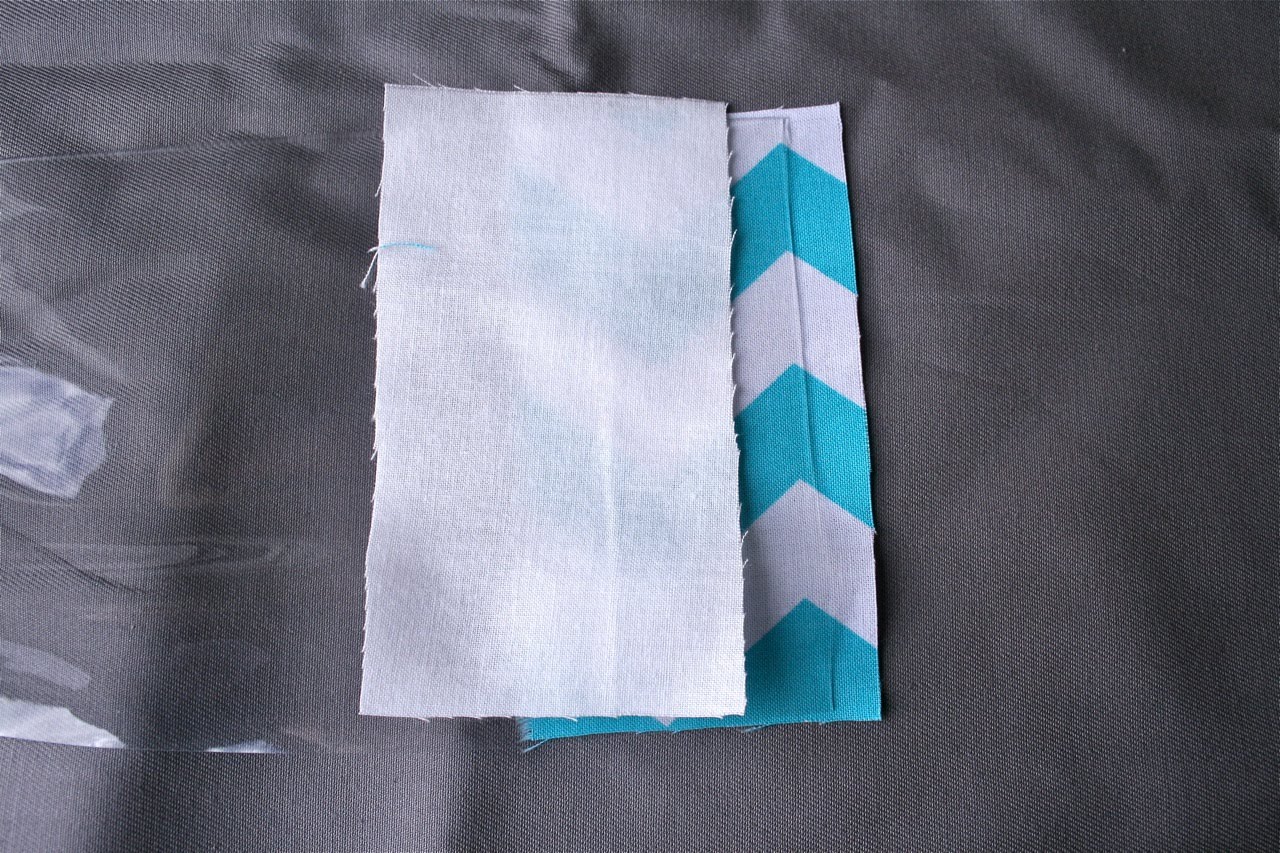
One 10 3/4″ x 12 1/2″ rectangle of fabric cut from exterior and lining for front of bag
One 2 1/2″ x 12 1/2″ rectangle of fabric cut from exterior and lining for front of bag
Two 4 1/2″ x 2 1/2″ rectangles of fabric cut from exterior and lining for front of bag
One 16 3/4″ x 12 1/2″ rectangle of fabric cut from exterior and lining for back of bag
One 4 1/2″ x 8 1/2″ rectangle cut from tablecloth plastic for window
One 1 1/2″ x width of the fabric (40″-44″) strip cut from contrast fabric for drawstring
One 2″ x width of the fabric (40″-44″) strip cut from contrast fabric for casing
FYI:
* Exterior fabric is blue/white zigzag
* Lining fabric is white
* Casing and drawstring fabric is red
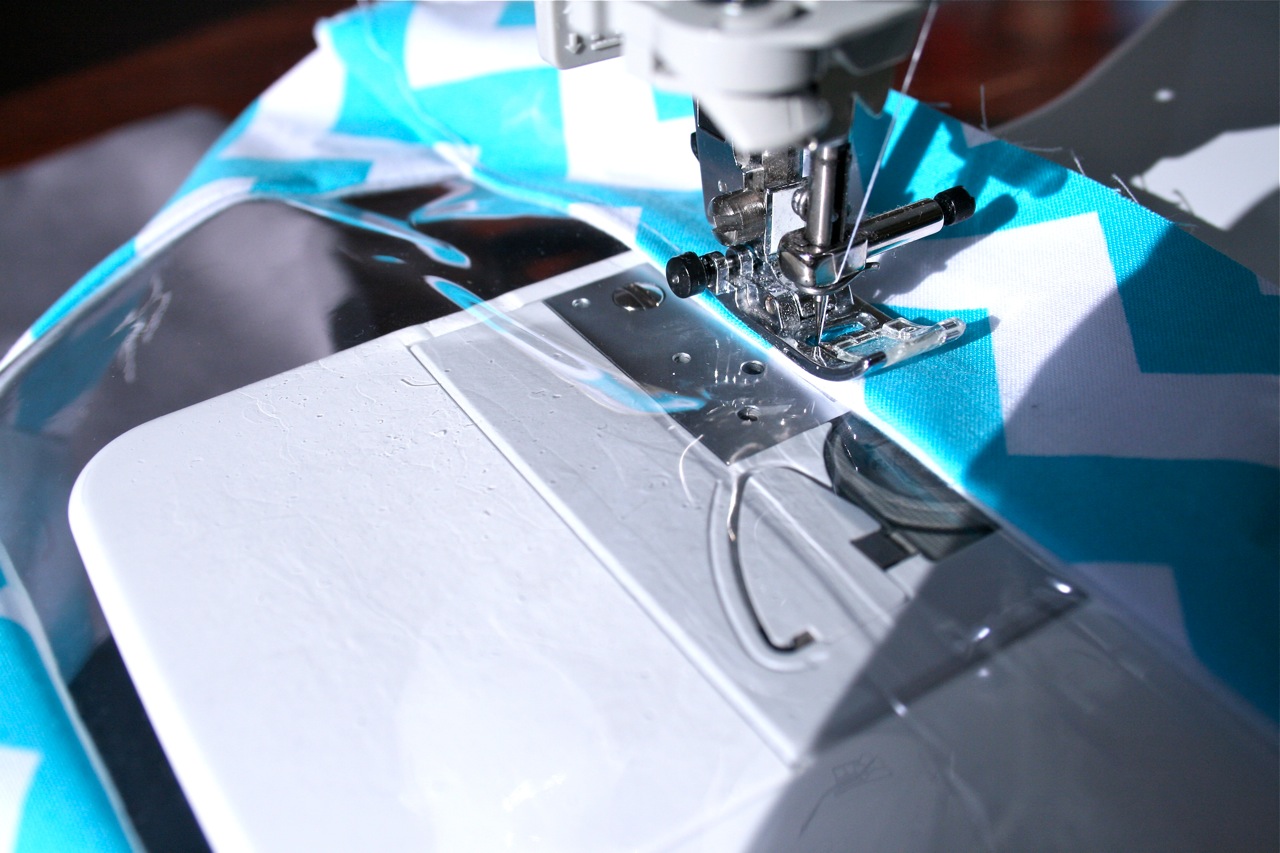
* Plastic window is clear PVC “tablecloth” plastic – this comes in 3 thicknesses (from Spotlight), I use the middle thickness because it is strong but thin enough to use your regular sewing machine needle on.
Step 1.
Take one of the 4 1/2″ x 2 1/2″ rectangles of fabric cut from exterior and lay on the table with right side facing up. Take your rectangle cut from plastic sheet and lay on top of exterior fabric, matching up short edge of plastic strip with long edge of exterior fabric. Take one of the 4 1/2″ x 2 1/2″ rectangles of fabric cut from lining and lay on top of the plastic sheet with right side facing down. Match up raw edges (the plastic sheet should be sandwiched between the exterior and lining fabrics). Using pins on the plastic sheet will make holes, to hold in place, use a few paper clips along the raw edge.
Sew together along paper clipped edge, using 1/4″ seam.
Repeat to attach other 4 1/2″ x 2 1/2″ rectangles of fabric cut from exterior and lining on the opposite short edge of plastic sheet. Fold fabric out so that wrong sides are touching. You can’t iron near the plastic sheet, so firmly press seams flat with your fingertips.
Step 2.
Take the 2 1/2″ x 12 1/2″ rectangles of fabric cut from exterior and lining and attach to the bottom long edge of the plastic sheet and side pieces of fabric in the same way you attached the side pieces. Match up raw edges and pin or paper clip into place. You can use pins where you are joining fabric to fabric.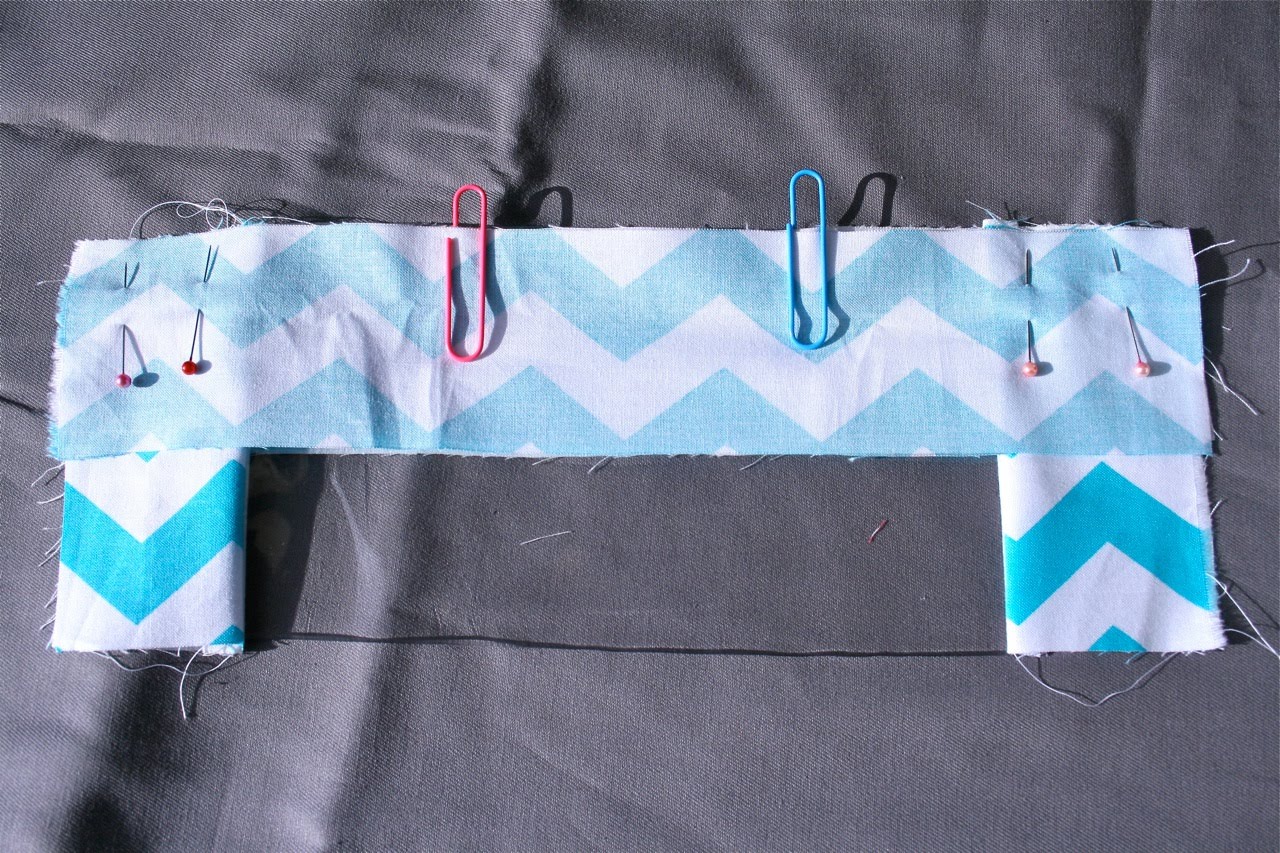
Sew along pinned/paperclipped edge using a 1/4″ seam. Open out fabric so that wrong sides are touching and firmly press seams flat using fingertips.

Step 3.
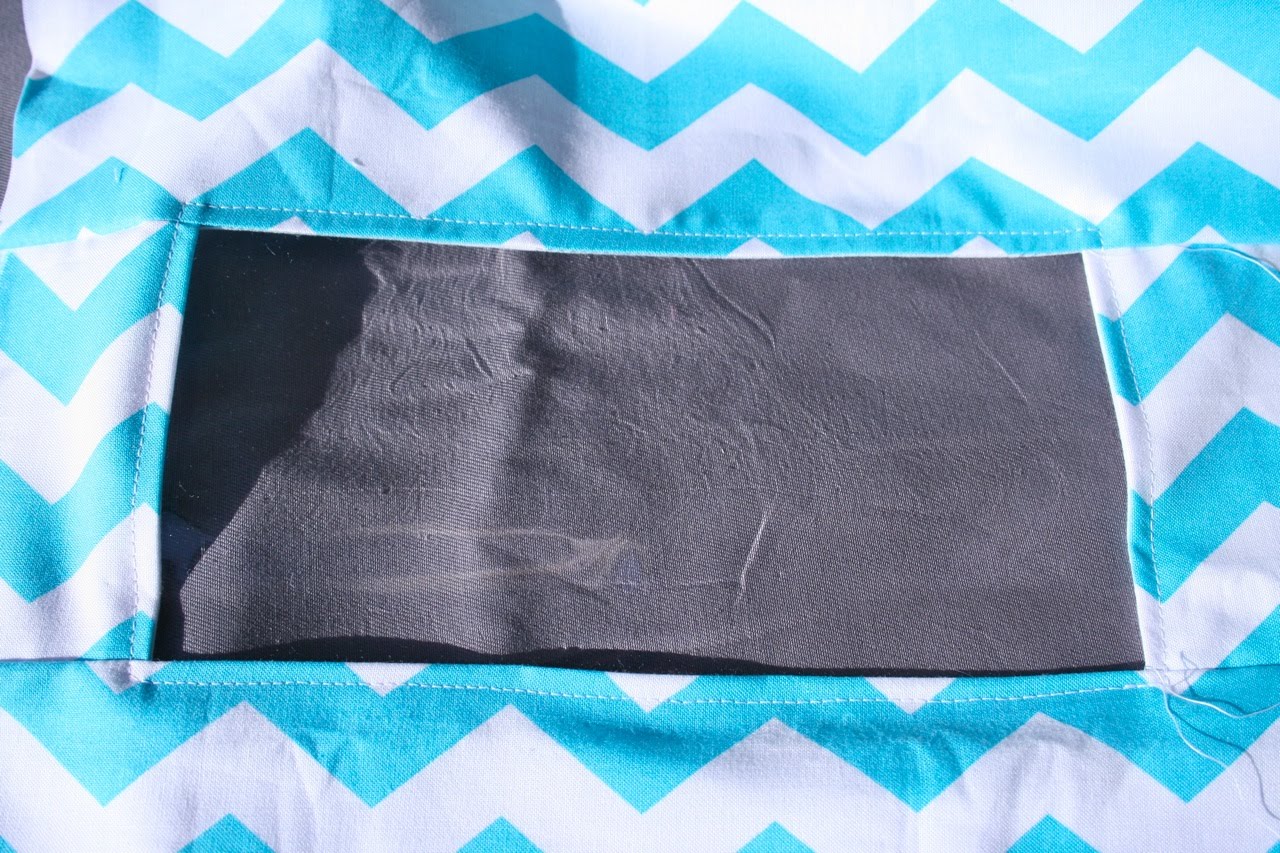
Take the 10 3/4″ x 12 1/2″ rectangles of fabric cut from exterior and lining and attach the top long edge of the plastic sheet and side pieces of fabric in the same way you attached the bottom piece. Open out fabric so that wrong sides are facing and firmly press seams flat using fingertips.
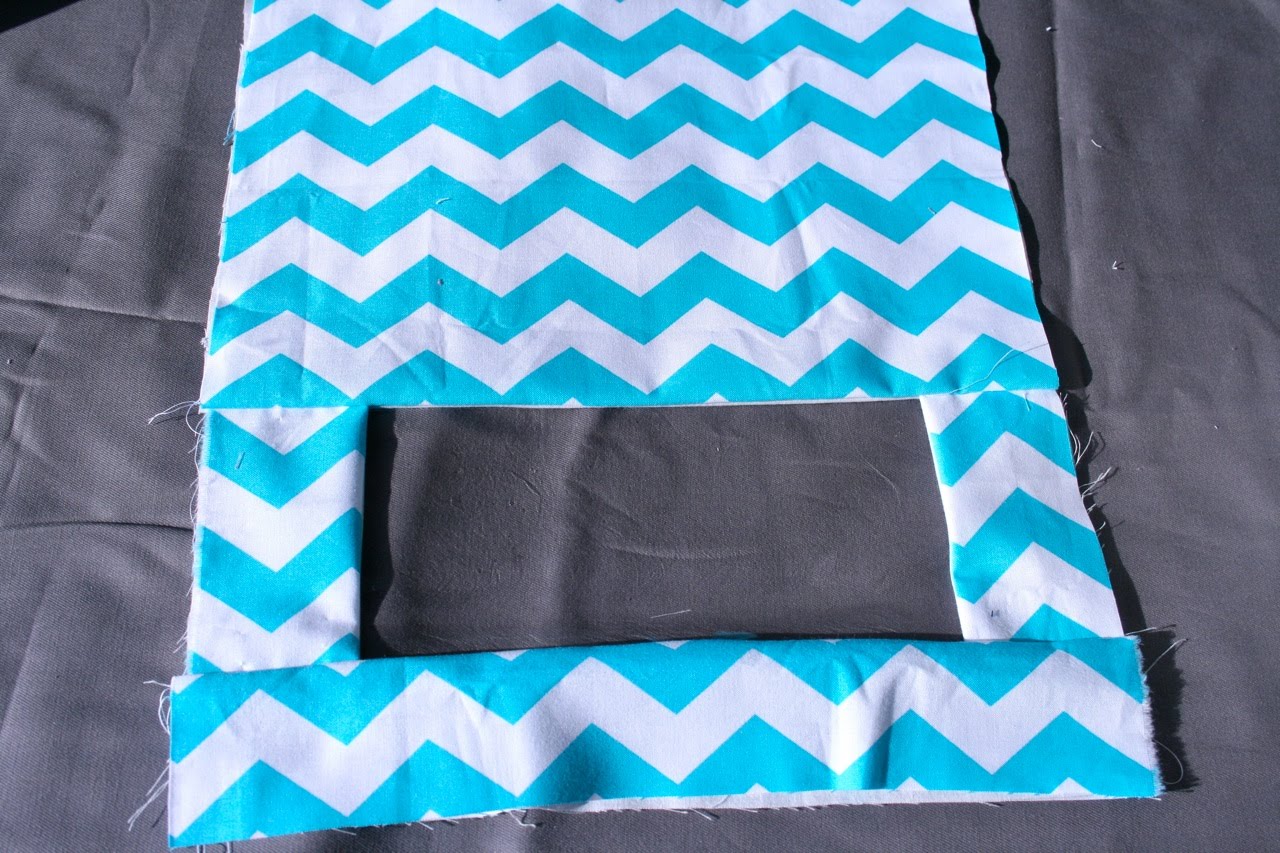
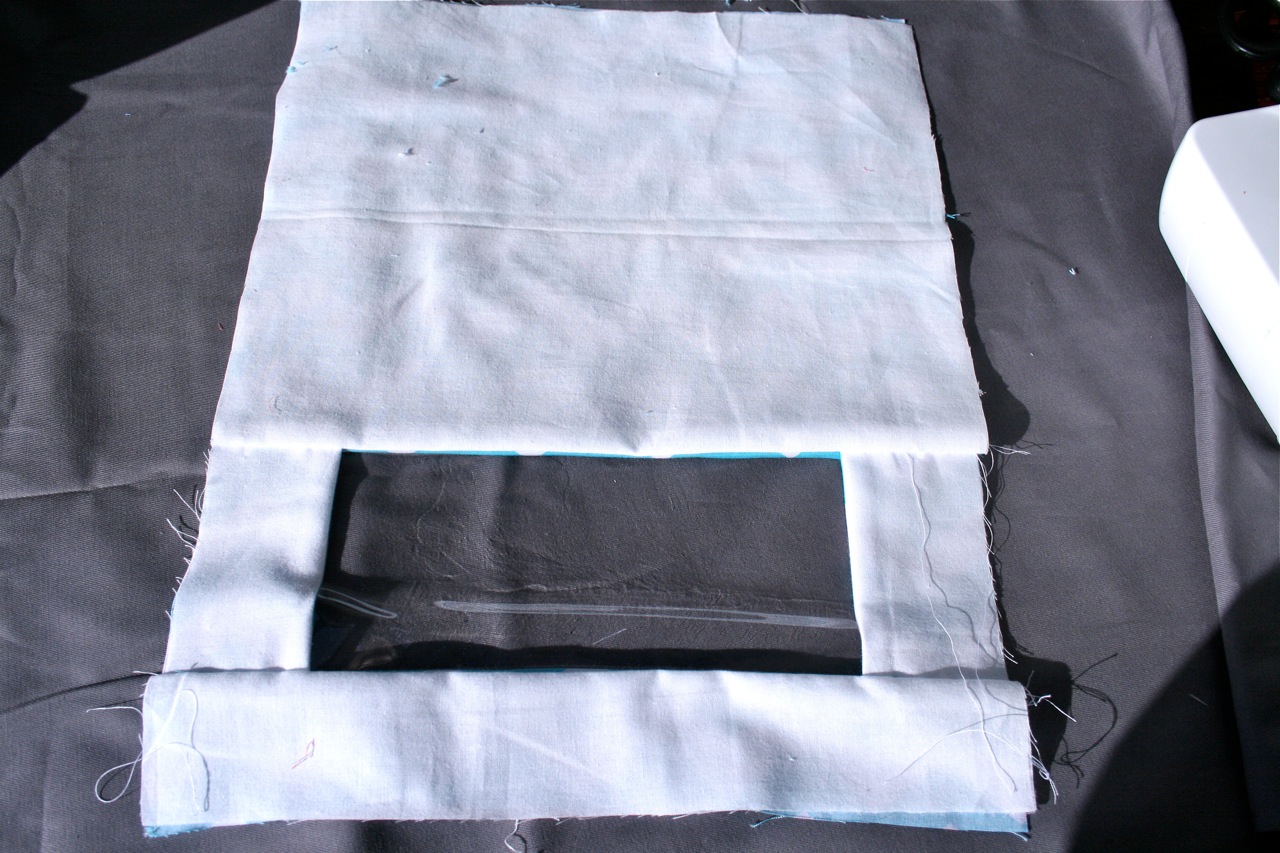
Topstitch about 1/8″ away from the edge around the entire window.
Step 4.
Make a hem at the top of the sack by taking front of sack and folding the right side of the top raw edge of exterior and lining fabrics under 1/2″. Take the 16 3/4″ x 12 1/2″ rectangles of fabric cut from exterior and lining and fold the right side of the top raw edge of both pieces of fabric under 1/2″.
Take lining back piece and lay on the table with right side facing up. Place front of sack so that exterior is facing up and front lining is facing back lining piece . Take exterior back piece and lay on top of the stack with wrong side up so that right sides of exterior fabric are facing.

Match up top folded edges of all four layers of fabric so that they are perfectly aligned (this will ensure a neat finish to the top hem of your sack.) Match up raw side and bottom edges of sack and pin into place. You should have four layers of fabric pinned together.

Sew together around pinned edge using a 1/4″ seam. Trim bottom corners off sack, making sure not to clip your stitching.
Turn bag right sides out, pushing lining fabric inside exterior. Match up top folded edge of sack and pin front exterior and lining pieces together and back exterior and lining pieces together. Sew around pinned edge, close to the folded edge of the fabric.

Step 4.
Take strips cut from contrasting fabric for casing and drawstring and make a center fold by folding in half, length ways, so that wrong sides of fabric are touching. Open out and fold both long raw edges of fabric in towards the center fold.
A much, much easier way to do this is to invest in a couple of bias binding makers…they are GREAT! Very affordable (I think about $10 each?) and make light work of making binding. The two I used for this project are made by Clover. The pink one – 18mm is used for the 1 1/2″ wide strip of fabric and is the size I use most often when making clothing. The blue one – 25mm is used for the 2″ wide strip of fabric. (Nicole Mallalieu has a great tutorial showing how to use these cool gadgets on her blog).
Set thin drawstring strip aside for now.

Step 5.
Take thicker strip for casing and fold one short raw edge under about 1/2″. Press.

Align folded edge of strip with side seam of sack. Position strip so that it is sitting about 1/2″ from top edge of sack and pin into place. Continue pinning until strip has made it’s way around the entire sack.
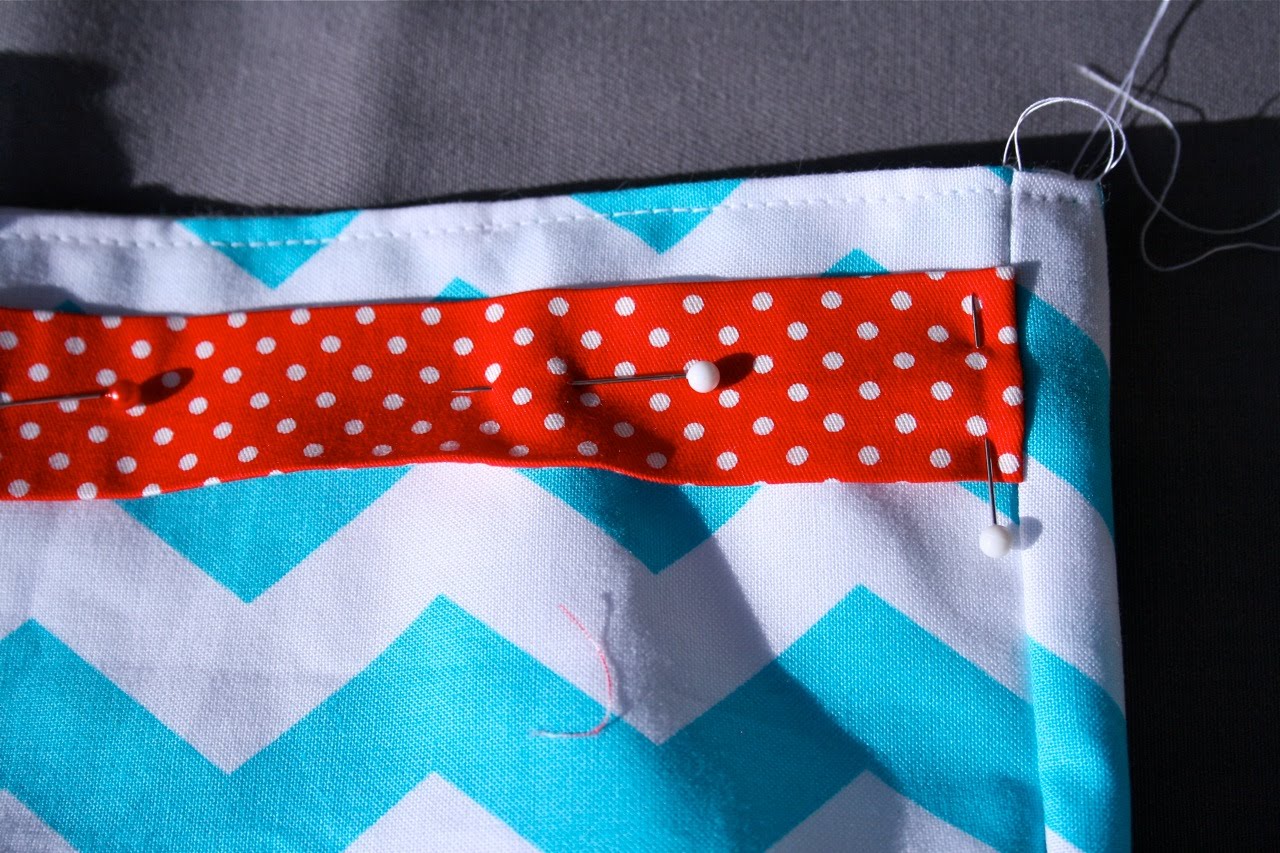
When you get back to the side seam you started at, trim the strip so that it overlaps the beginning of the strip about 1/2″, then fold short raw edge of the end of the strip under 1/2″ and align folded edge with the side seam of the sack. There should be an opening between the two folded ends of the strip, this is where you will insert your drawstring. Pin into place.
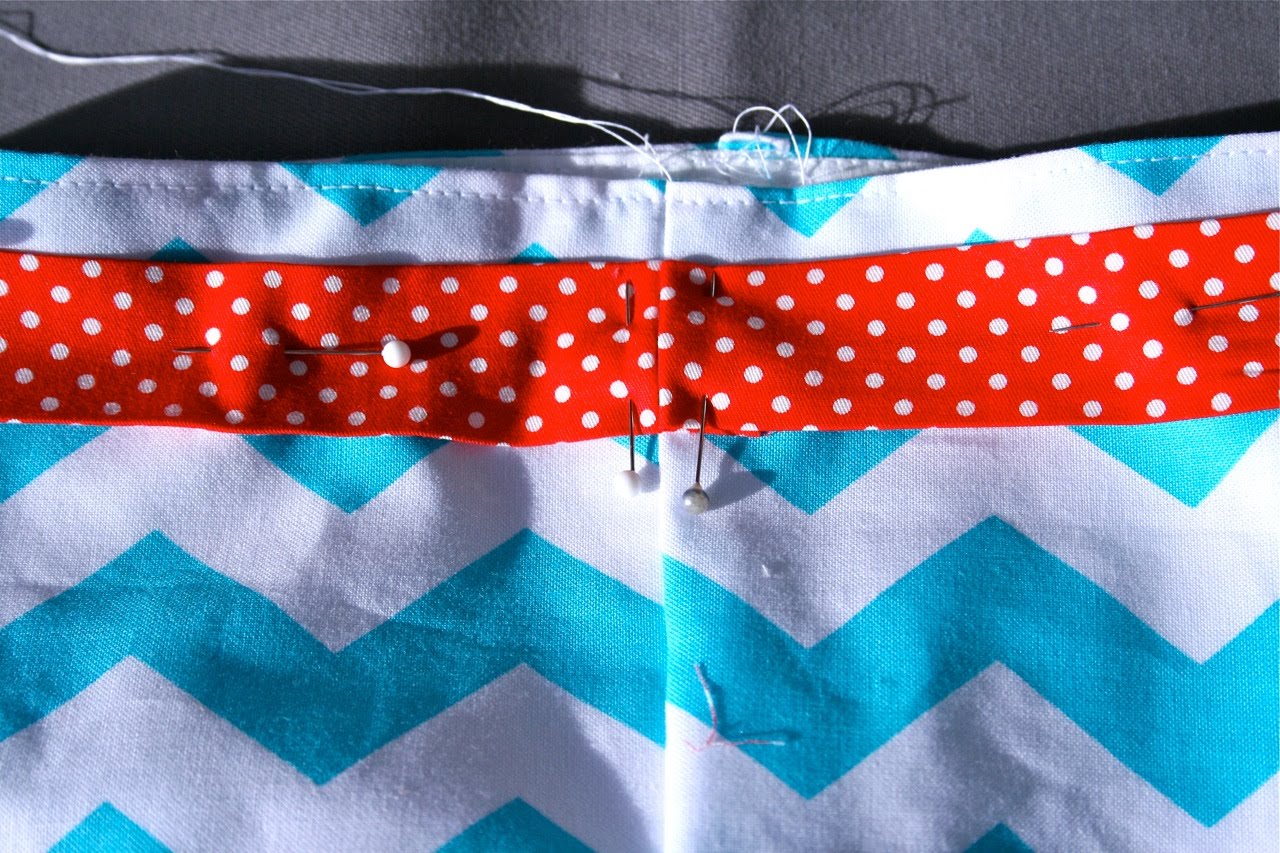
Sew around the top and bottom edges of the strip, close to the edge to secure strip into place and form casing for drawstring.

Take thin drawstring strip and fold in half, length wise once again so that raw edges of the strip are enclosed. Sew down opened edge of the strip, close to the edge to secure.

Attach a safety pin to one end of the drawstring and thread through the casing. Tie a knot at each end of the drawstring.
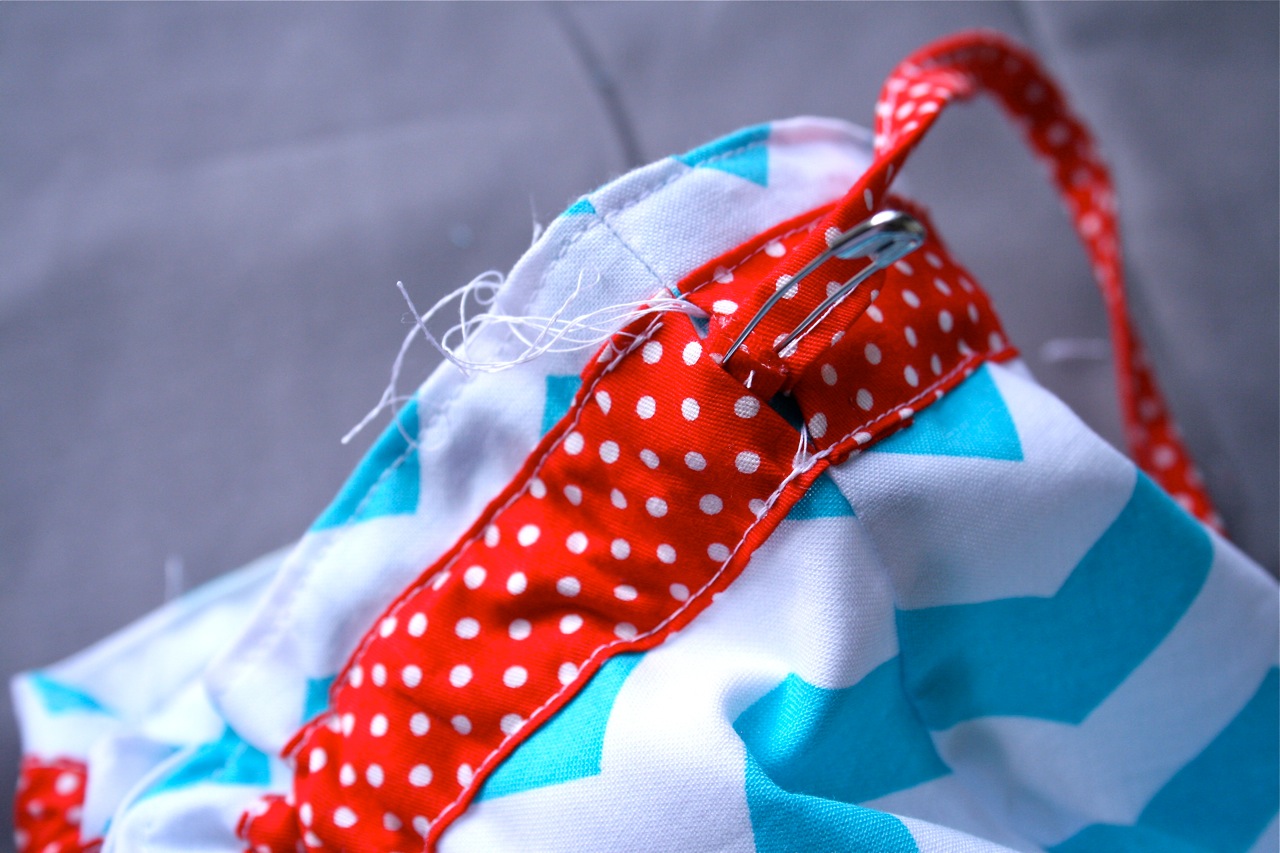
Snip stray threads and you are done!!
If you make a “Peek-A-Boo” Toy Sack, I would love to see it! Send me an email or add your photo to the Make It Perfect Flickr Group.
Okay – for the giveaway…
To win THIS “Peek-A-Boo” Toy Sack (made from Paula Prass, Summer Soiree, Chevron in Aqua) as well as eight 10″ x 12″ squares of Ta Dot fabric (used in my toy sacks) leave a comment on this blog post and share what else you could use a toy sack for besides organising toys…
For an extra entry, become a follower of my blog and leave a separate comment to tell me that you follow. If you are already a follower, leave a separate comment telling me so and you will receive an extra entry too.
The giveaway winner will be draw randomly next Monday evening, 28th June and is open to everyone 🙂
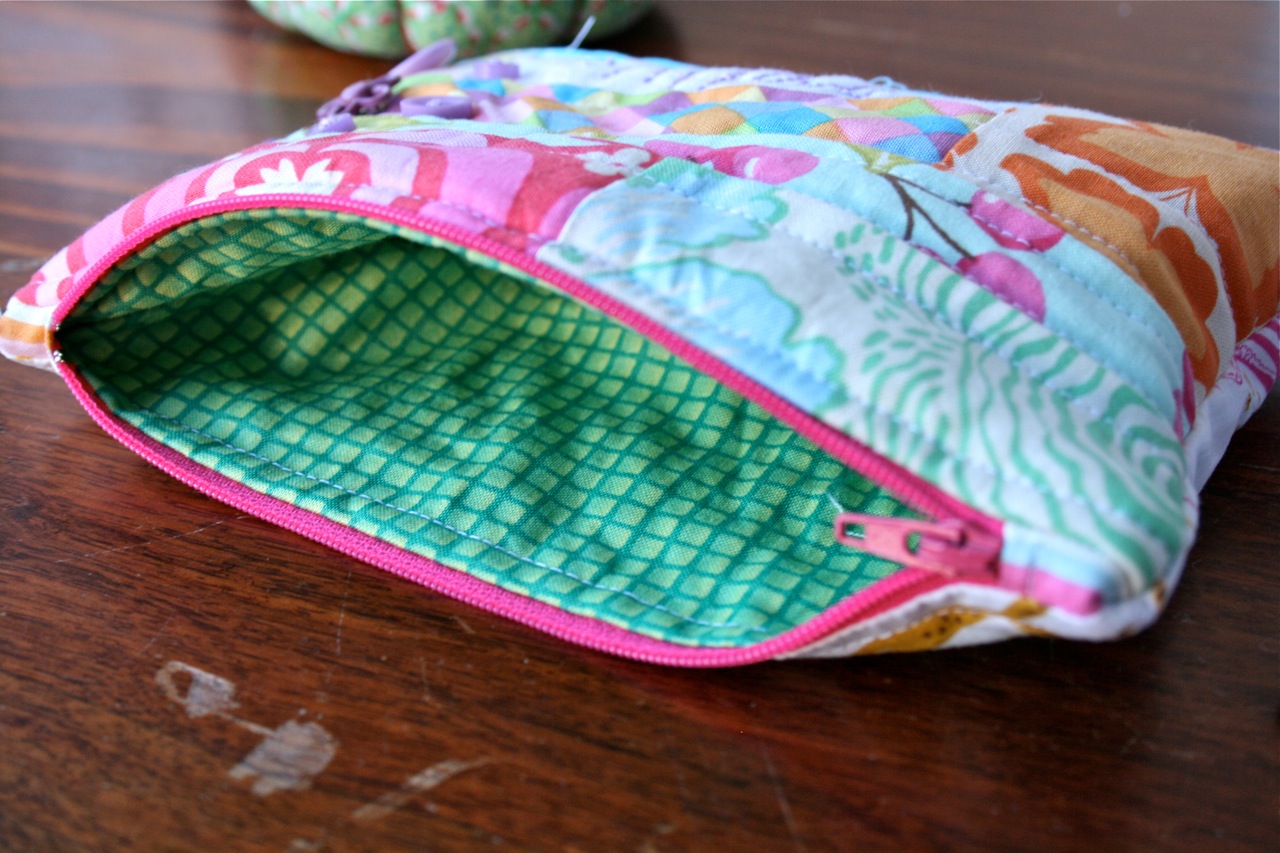
I’ve got some big stuff going down on the blog in the next few days…I FINALLY got around to making another zippered pouch and taking photos along the way to put together a tutorial for you…I’ll be releasing a new pattern on the weekend (yay!) and I’m participating in the Sew Mama Sew May Giveaway Day on Monday with some lovely goodies up my sleeve to give away!! So stay tuned…lots of fun stuff to make and see and WIN 🙂
Lets get this tutorial started then! After making Oishii and then the abundance of zippered pouches that followed I had so many people write to me saying that they are scared of zips! Well, fear zips no more…they are actually quite simple. This is a great beginner zipper project, so gather yourself some materials and lets get sewing 🙂

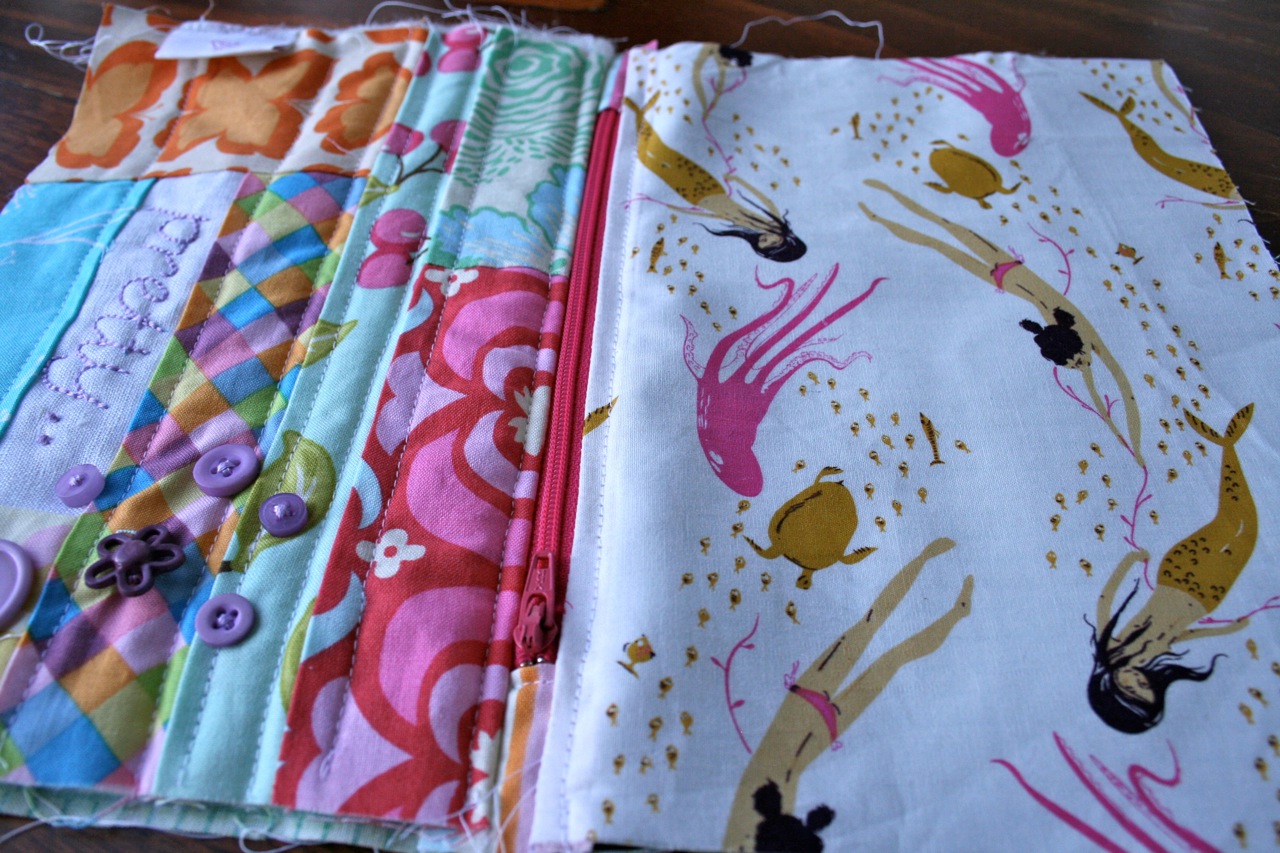
I’m not going to give instruction on how to make the patchwork panel that I use for my pouches…the instructions will vary depending on the size of your scraps and the way you lay them out. A quick run-down though in case anyone wants to get nitty-gritty…I cut and join my little scrap pieces until I get a rectangle which measures 9″ x 6 1/2″ making sure I get a piece of plain white fabric in there somewhere. Then I cut a piece of pellon or quilt wadding to the same size and adhere to the wrong side of the fabric by ironing on if using pellon or pinning around the edges if using wadding. Sew a few rows of stitching above and below seams joining fabric strips (I don’t sew on the white fabric). Using an erasable fabric marking pen, write a word on the white piece of fabric then embroider using 4 strands of cross-stitch thread. Sew on a little collection of buttons.
Okay, so that is a speedy how-to make the patchy panel! Of course you can also just use a single piece of fabric (WAY faster if you do that!) It is up to you if you want to use any wadding on the front or back of the pouch. I used wadding on the front but not on the back…depends on the look/feel you are going for. You could also use a piece of stiffener fabric (e.g. Shapewell) if you want a bit of extra strength or stability.
To make a Zippered Pouch, you will need:
One 9″ x 6 1/2″ rectangle of fabric for front exterior (patchwork pieced)
One 9″ x 6 1/2″ rectangle of fabric for back exterior (mermaids)
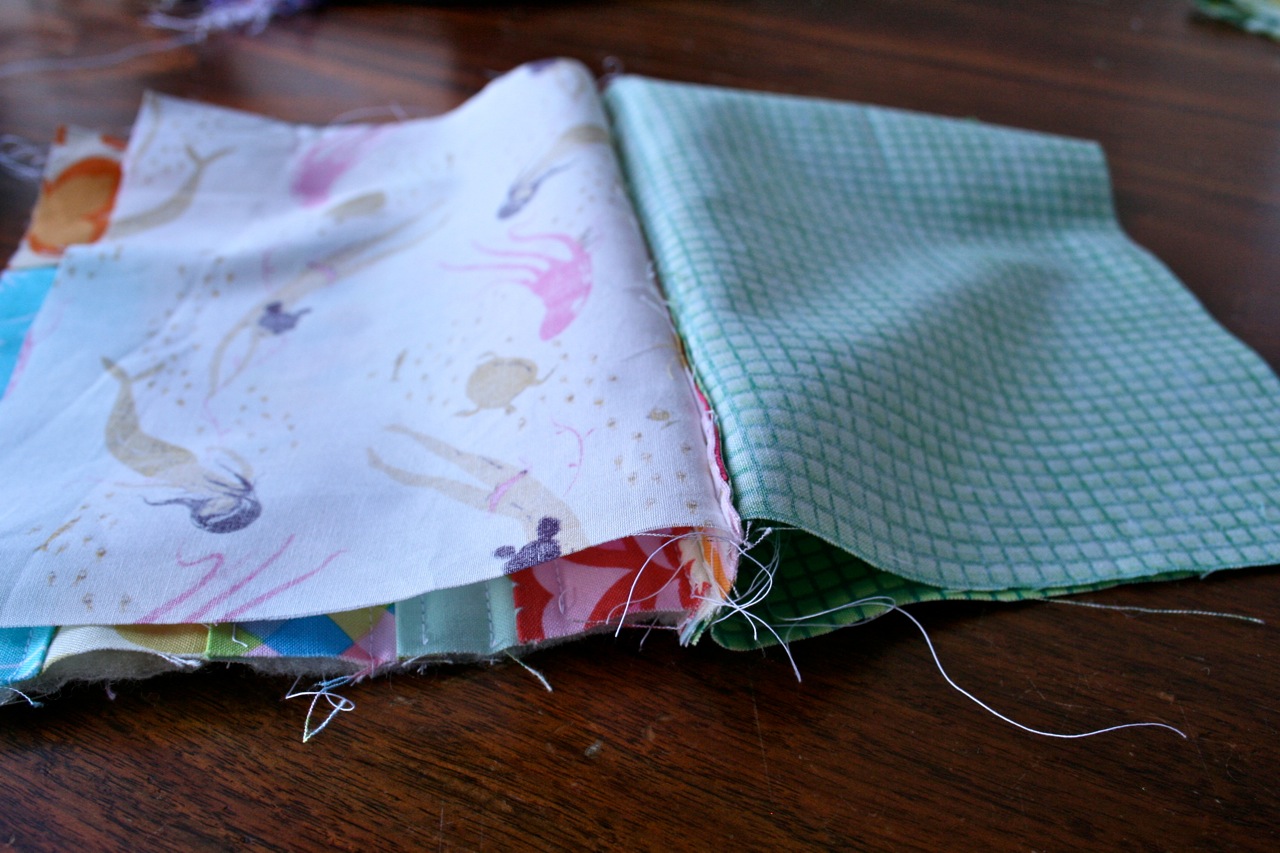
Two 9″ x 6 1/2″ rectangles of fabric for lining (green check)
Two 4″ x 2″ (approx) rectangles of fabric for zipper ends (pink/blue stripe)
One 7″ dress zipper

Step 1.
Take the two small rectangles of fabric for zipper ends and fold in half so that short ends meet. Press.
Place the folded edge of the fabric just over the metal stopper on the end of the zipper and pin into place. Sew about 1/8″ from the folded edge of the fabric (be careful not to sew on top of the metal stopper here…your sewing machine will not like it!!).

Do the same with the second piece of fabric on the opposite end of the zipper (it is easier if you open your zipper a bit before sewing so that the zipper pull doesn’t get in the way).
 Step 2.
(Don’t think too hard about the next couple of steps because they kinda don’t make sense until you actually follow them!)
Take your front exterior piece and lay on the table with right side of fabric facing up.
Take your zipper and, with right side of zipper facing right side of fabric, place edge of zipper tape along the TOP edge of your front exterior piece. Pin a few times to hold in place.

Now take one of your lining pieces and lay it on top of the front exterior piece with right sides facing. The zipper should be sandwiched between the two pieces of fabric.
Match up top edges of fabric and edge of zipper tape and pin together. (You can remove the pins that were put in earlier to hold the zipper to the front exterior piece now).

Pop a zipper foot on your sewing machine and sew along the pinned edge, about 1/8″ away from the zipper teeth. It can sometimes be tricky to sew close to the edge of the zipper when you reach the zipper pull…make sure your needle is in the down position, lift up your presser foot and slide the zipper towards the back of the sewing machine so that it is away from your needle, then keep sewing.

Step 3.
Fold the exterior front and lining pieces back away from the zipper so that right sides of both pieces are facing out. The zipper should be sitting with one side of the zipper tape sewn between both of these pieces and the other side of the zipper tape left free.

Now take your remaining lining piece and place it on the table with right side facing up. Place the free side of the zipper tape along the top edge of the lining piece. Pin into place if you need to (I usually don’t bother).
Take your exterior back piece and lay it on top of the edge of the zipper/lining with the wrong side of the exterior back piece facing down. The zipper and exterior front/lining pieces should be sandwiched between the exterior back and lining pieces.

Match up top edges of fabric and edge of zipper tape and pin together like you did in step 2 and sew along the edge.

Trim the overhanging raw edges of the zipper end fabric.

Step 4.
Fold exterior and lining fabrics out so that wrong side of one lining piece is touching wrong side of exterior front piece and wrong side of second lining piece is touching wrong side of exterior back piece. The zipper should be sitting nicely in between the front and back fabrics. Press and pin.
With the zipper foot still on your sewing machine, topstitch about 1/8″ away from the folded edge of the fabric down both sides of the zipper.

Step 5.
Open the zipper and leave opened for the following step.
Now open out the fabric pieces and position so that the right sides of the exterior front and back pieces are touching and the right sides of the lining pieces are touching.
Match up raw edges and pin around the entire pieces. When you get to the seam in the middle where the zipper is sewn in, it will be a little bulky. Fold the short end of the zipper and attached fabric so that the fold is facing the lining.

Sew a 1/2″ seam around the pinned edge, leaving a 2″ gap along the bottom edge of the lining pieces for turning. Clip corners and cut a curve into the seam where the zipper is to reduce bulk. Make sure you don’t cut your stitching!

Pull fabric through the opening in the lining until pouch is right sides out. Push the lining into the exterior pouch.
Use the pointed end of a closed pair of scissors to push the four corners of the pouch out.
Slip stitch the opening in the lining closed, snip all stray thread and you are DONE!


I’d LOVE to see any zippered pouches you create using this tutorial! Make sure you leave a comment with a link or email me some pics so I can check it out 🙂
If you find any mistakes or don’t understand anything, let me know and I’ll fix it up!

 My scrap box is getting WAY too big. Trouble is, I have a really hard time throwing scraps away…but I need to start doing something with them!
Fabric Scrap Cards! They are all over the internet, but I haven’t been able to find instructions or a tutorial that is really quick and simple (i.e. NOT using fusible webbing, that’s a bit too much fuss for a card!) – so, I had a play around and this is how I do it…would be fun to make Christmas cards or gift tags to go on your presents this time of the year!


