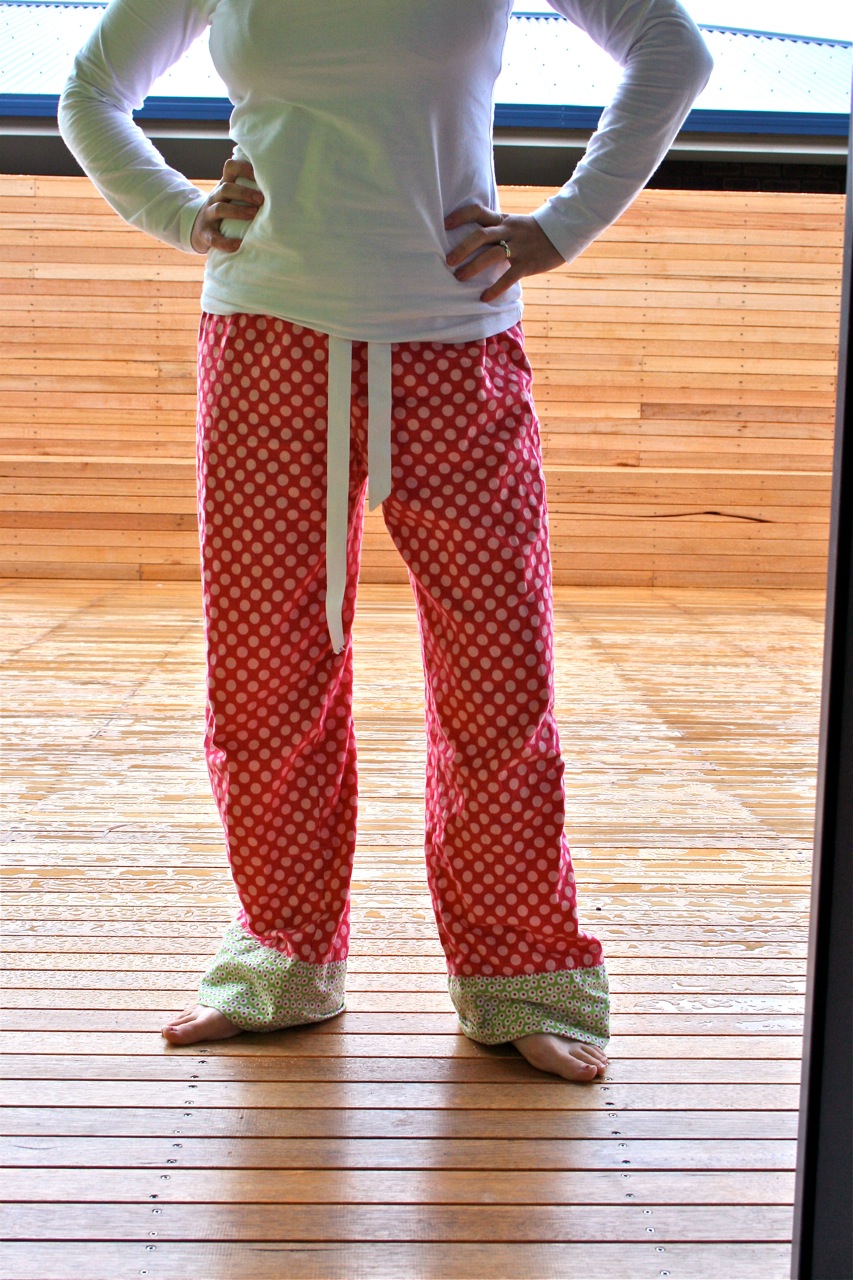
These pics have been a long time coming. Mostly because the two pairs of flannel Sweet Dreams PJs I have made for myself are in constant rotation and one pair always seems to be in the laundry basket or drying on the line! Plus, I need Jaron around to take the photos for me and it is always dark when he gets home. I did manage to pin him down to take some over the weekend, but it was raining and we didn’t want to get wet so they are horribly dark – but good enough for you to get the idea 🙂
So, my love affair with flannel this winter just seems to be getting stronger and stronger…it is so cosy and warm. And here are my two new pairs of PJ pants – they are worn constantly and making them was great incentive to get rid of some of old, old, threadbare PJ pants that I have been wearing previously.
And while I’m loving my flannel PJs for winter, I’m also getting myself geared up (e.g. purchasing MORE fabric) to make some cotton ones for summer 🙂
SUPPLIES: Make It Perfect, Sweet Dreams pattern Riley Blake, Summer Song, Summer Dot in Pink (flannel) Riley Blake, Summer Song, Mini Blooms in Green (flannel) Amy Butler, Love, Tumble Roses in Pink (flannel) Amy Butler, Love, Sunspots in Mint (flannel)
This Giveaway is now closed – feel free to share your comments with us though…we love to read them 🙂
Remember back in April when I asked for your feedback about releasing Make It Perfect kids patterns in bigger sizes? It seems that the need is out there – I had heaps of comments and emails asking for lots of my patterns to be released in bigger sizes…you spoke and I listened 🙂
And then when I got an email from my friend and pattern tester, Karen a few weeks ago asking me if I was going to up-size Uptown Girl for this winter because she wanted to sew jackets for her older girls, the pressure was on 😉 It was just the motivation I needed to get my act together and do some re-drafting and pattern writing.
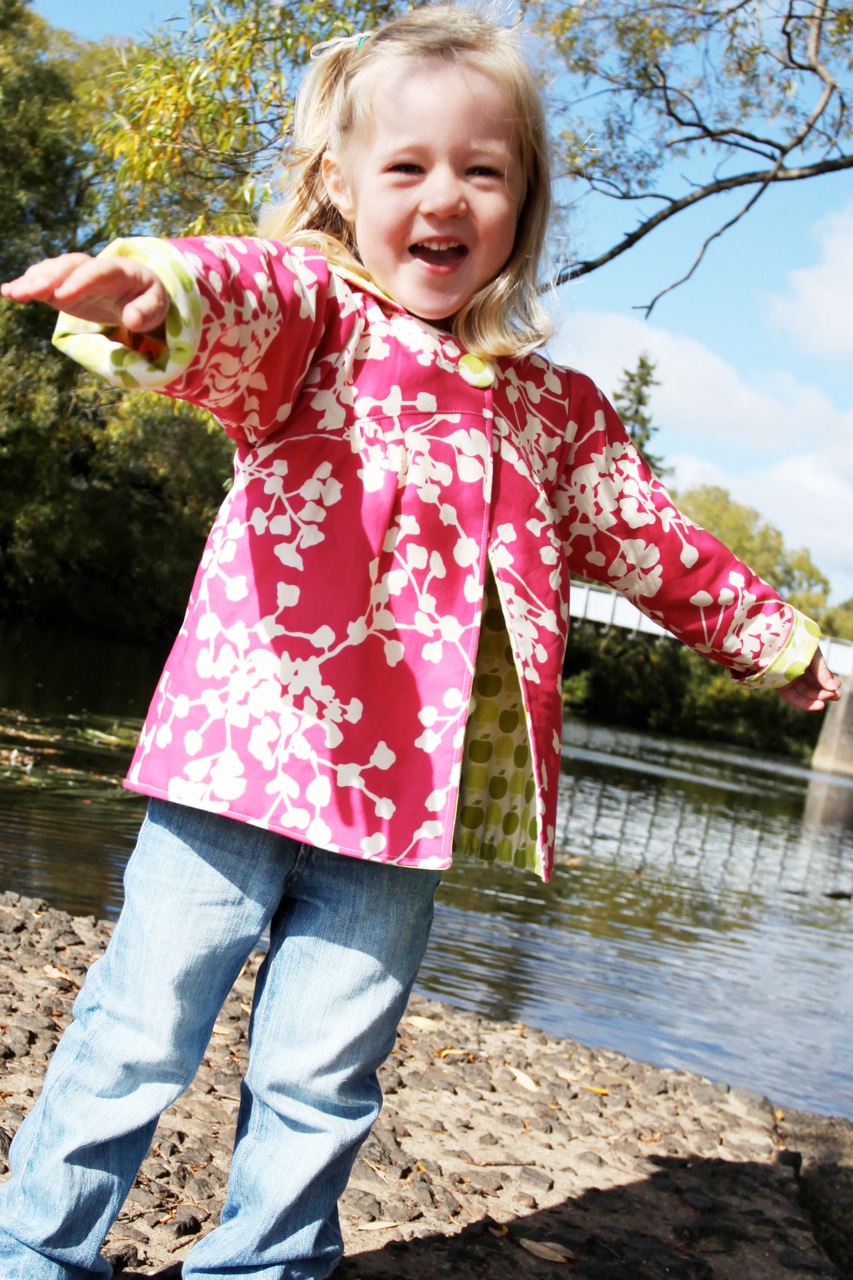
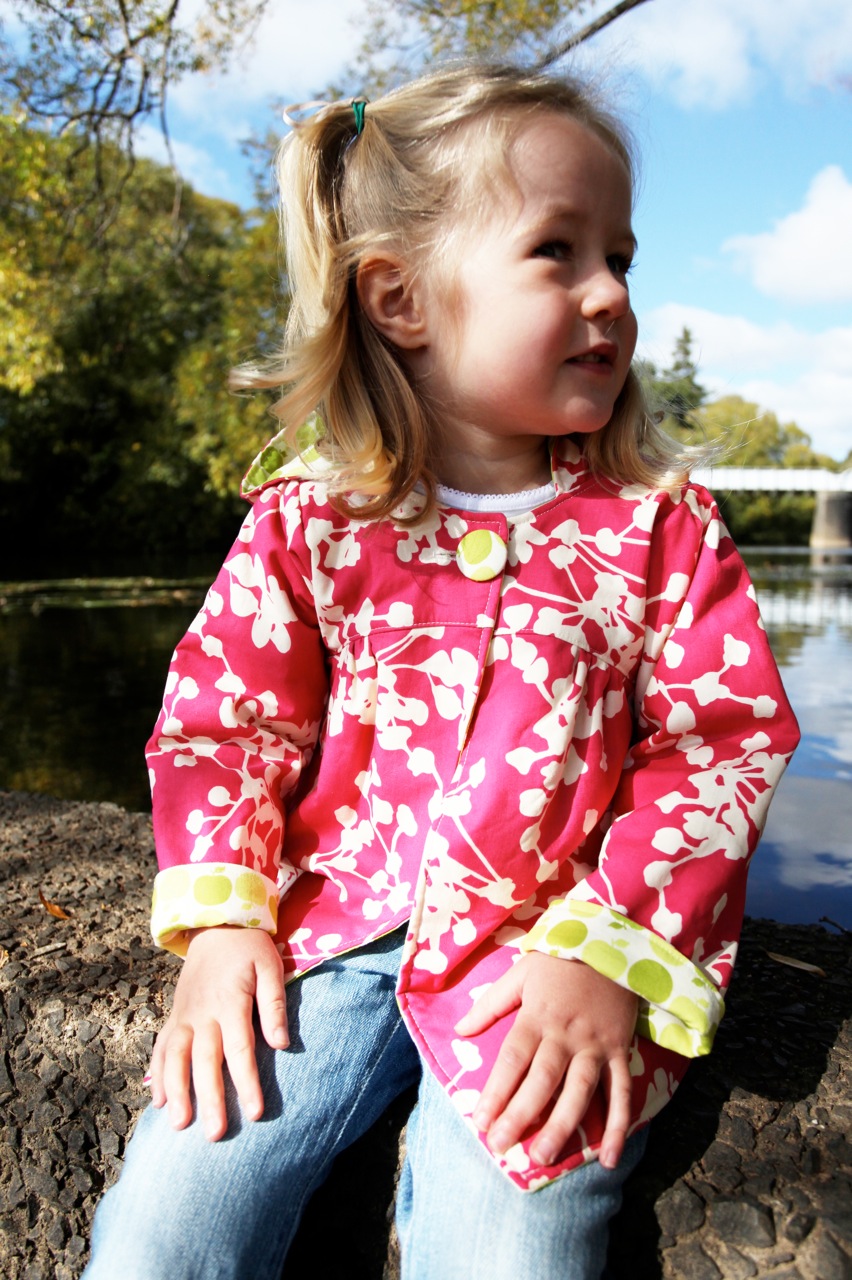
So, without further ado…due to popular demand, the Uptown Girl jacket you love is now available in larger sizes!!!
I’ve tried to keep things as clear as possible and am hoping there won’t be any hiccups along the way…this is how the new sizing will work:
The old/original Uptown Girl pattern remains the same, but will now be called LITTLE Uptown Girl – including sizes 6 months – 5 years.
The new pattern, BIG Uptown Girl is EXACTLY the same jacket design, only the size range is 6 years – 10 years.
Little Uptown Girl and Big Uptown Girl are two separate patterns, both featuring the exact same design, for two different size brackets. To avoid confusion about the pattern design, I have decided to keep the same cover picture for both patterns. Got it?!
So, you mothers, grandmothers, aunties and friends with older girls to sew for can get cracking on new winter jacket sewing!
And, yes, I do plan on up-sizing other kids patterns in my range from time to time…if you have any specific requests, please send them my way as I am more likely to up-size a pattern if I get a decent amount of people asking for it.
You can find out fabric requirements for Big Uptown Girl on the website. If you have a store and want to stock this or any other Make It Perfect patterns, contact Creative Abundance to place an order.
If you would like to purchase a copy of Big Uptown Girl for yourself, they should be popping up in retail stores very soon. Ask your favourite store to get one in for you!
As this is technically a new pattern release, I’m going to be giving away a copy of Big Uptown Girl to one lucky winner! Leave a comment on this post to be in the running! For a bonus entry, post about this giveaway on your blog, then come back and leave another comment telling me you have blogged about it. Easy!
(Giveaway will close Friday 23rd July and winner will be drawn via a random number generator.)
You may have heard about the Art Exchange Project: Art Swap that is floating around the blog world at the moment…I was contacted by another seller on Made It and asked if I would like to participate. It sounded like a lot of fun and not too much hard work, so I have accepted the offer and am now looking for six people who would like to join with me. Rather than ask individuals, I thought I’d open it up to readers on my blog and see if anyone would like to join up?
It is a never ending art swap…all you have to do is send 1 handmade package (it can be ANYTHING handmade) and you will receive 36 pieces of art in return! Sounds simple enough and I’m excited to see how it turns out – of course it will only work out if people stick to their end of the bargain, but even if I only get a couple of packages, that would still be exciting!
So…anyone out there want to join me? I need 6 willing participants – feel free to leave a comment with your email address or send me an email if you want to take part and I’ll send you the details. If I happen to get more than 6 responses, I’ll be sure to pass your details onto other people who are looking for participants.
Lil’s birthday is coming up in a couple of weeks and I am trying to make more of an effort to only give the children things that I KNOW they will get great use out of and will not end up becoming clutter in our house.
After talking with my sister about it she convinced me that playsilks were the way to go. It made perfect sense. Out of everything that gets played with in our house, my fabric stash is always getting pulled apart and used as blankets, dress ups, picnic blankets, roads. I think I spend more time folding and putting my fabric away than I spend picking up toys at the end of the day! This website gives some great ideas and uses for playsilks.
So, I could have gone an purchased a set (these ones look great!) but after doing a bit of research, I discovered that plain white silks could be purchased online and then dyed with Kool-Aid. I’m a do-it-yourself girl, and if I can make it then I won’t usually buy it. Plus, it ended up heaps cheaper this way.
You can find instructions for dyeing playsilks lots of places on the internet, but I thought I’d share my “how to” with you.
First of all, you will need to buy some plain white playsilks. I ordered mine from here. They came really fast too. I was only planning on buying 7 or 8, but shipping was about $10 so I kept adding extra silks to my shopping cart until the shipping increased. I bought 19 silks and only paid $10 shipping. There are heaps of sizes to choose from, I got the 30″ x 30″. I know I don’t need 19 playsilks but I figured I would hang onto them for presents or something – my friend came to visit last week and bought a few off me, so that was an easy solve!!
You will also need Kool-Aid. I bought mine of Ebay as it is not readily for sale in shops in Australia. You will need THREE of each colour/flavour you wish to use.
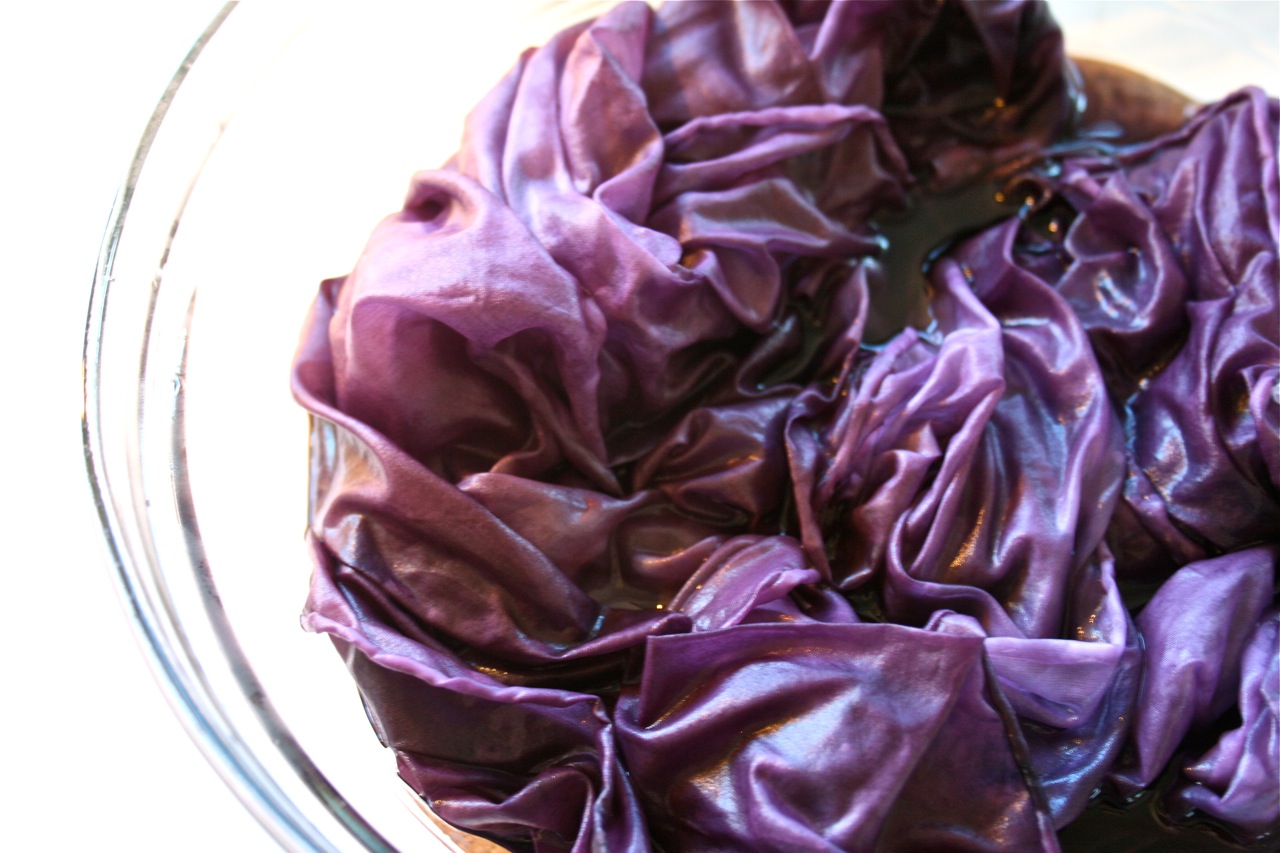
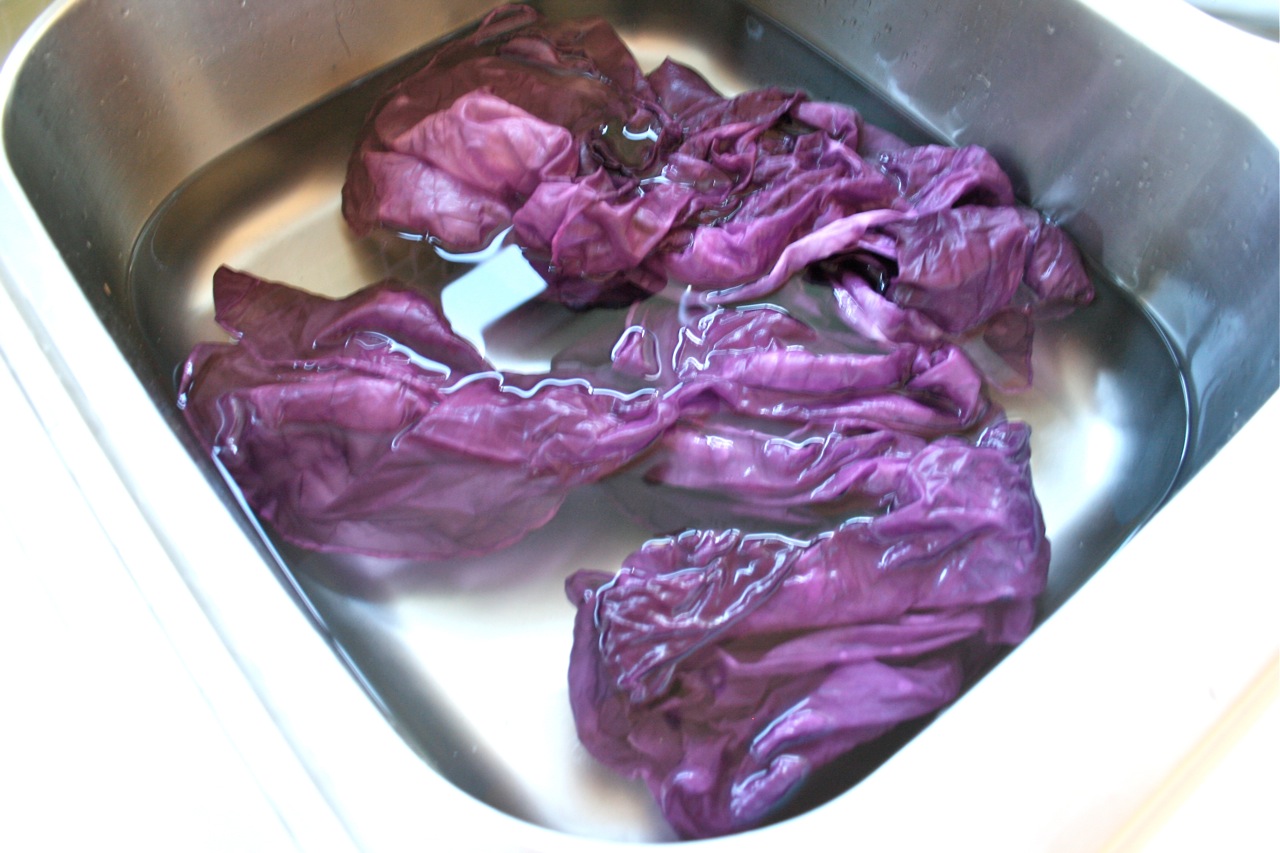
To prepare your silks for dyeing, they need to soak in a bowl filled with boiling water and about 1/2 cup vinegar for half an hour.
In a large glass or microwave-safe plastic bowl, mix together 2 cups boiling water, 1/2 cup vinegar and 3 packets of Kool-Aid. Place silks in Kool-Aid mixture to dye. I found that the dye clung to the silks really quickly and seemed to get sucked out of the water (it was pretty cool actually – can’t believe people drink the stuff!!!). Most of my silks ended up being a bit patchy in colour…I don’t think you can avoid this unless you are using a lot more Kool-Aid/water and a huge bowl. I did find that I could make it as even as possible by trying not to fold/scrunch the silk up and getting as much surface into the liquid as I could at the beginning. I actually dyed 2 silks each colour. For this ratio of Kool-Aid/water you couldn’t dye more than two 30″ x 30″ silks – there wouldn’t be enough liquid.
Put some plastic wrap over the top of the bowl and place in the microwave on HIGH for 3 minutes. Take out and rest on the bench for 3 minutes, then stir. Repeat this process two more times.
Place in a sink of cold water to rinse out any remaining dye.
Hang on the line to dry and you are done!!!
I ended up with a lot of red silks because the set of Kool-Aid I bought had a few red coloured mixes in it. I thought some of them might come out more pink, but they all looked pretty much the same.
These are going into hiding until Lil’s birthday – I know she is going to love them though and will be sure to share later on 🙂
If you want to have a go at doing this yourself, I thought I’d share which Kool-Aid mixes I used to make each colour playsilk – hopefully will help to take the guesswork out of choosing which flavours to buy!
BACK ROW L-R: Strawberry, Grape, Ice Blue Raspberry Lemonade
MIDDLE ROW L-R: White…I didn’t dye this one, Cherry, Orange
FRONT ROW L-R: Tropical Punch, Lemon-Lime, Lemonade, Pink Lemonade
Hi there! If you are looking for more information on how advertising on this blog works, please read on…
It is my aim that through offering money-free advertising on my blog, you will have the opportunity to advertise your store/product in a way that is not going to be a great financial commitment to yourself.
Traffic to the Make It Perfect blog grows every day. We have over 1000 subscribers to the blog and average 4-5 blog posts per week. Our current average visit per day is over 1000 visits.
Here’s how it will work:
Look at the right hand sidebar of my blog…I would love to put your button/logo under the “Cool Shops!” heading. Each month, I will have a maximum of 4 stores to advertise on my blog. The buttons for these shops will rotate weekly so that each store has a turn at being at the top of the list. Your button will also remain on the Make It Perfect Cool Shops! webpage forever.
I do not want any monetary payment for having you advertise on my blog. Instead, I would love to receive a product/service from your store and try it out for myself. As part of your Cool Shops! advertising package, I will write a review on my blog about your store and the product. If you would like to offer a giveaway at the same time as the review, I would certainly welcome that. You may alternatively like to offer a special discount or offer to my blog readers.
If you think this is something that you might be interested in, send me an email or leave a comment on this blog post and I can let you know the next avaliable spot and give you more information.
To check out some of the Cool Shops! reviews I have written so far, click here.
(Please keep in mind that products/services advertised on this blog need to fit into the niche of the blog and will need to be something that my readers/myself will be interested in…if you’re not sure – ask!)
And because I like a blog post with something good to look at…aren’t these pink stairs unreal?!