Browsing Category

Cooking

Cooking, Thermomix

.Thermomix Cooking – Lemon Bar Cookie Cups.

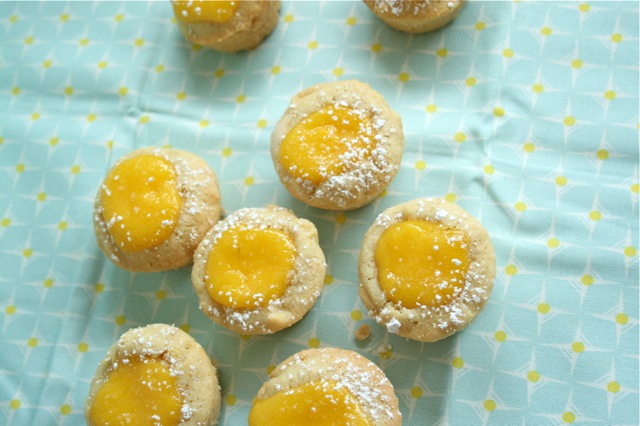
I’m not sure how to best describe these tasty little morsels, except for DELICIOUS!  In honour of my love for all things lemon, I couldn’t pass this recipe by without having a try, and have converted it to the Thermomix while I was at it.  

Have you ever tried a lemon bar/slice with a soft, cakey base and tangy lemon curd filling?  These cookie cups are a take on the very popular slice – but with the ease of not having to cut the slice and making them very easy to serve and pop into your mouth!

I found the original recipe here (if you want to make them without using a Thermomix)…and the curd recipe was from here.

Lemon Bar Cookie Cups

For the lemon curd:
100g butter
zest of 1 lemon
juice of 2 lemons 
2 eggs
1 egg yolk
150g caster sugar

For the cookies: 
120g butter
110g sugar
180g icing sugar
100g canola oil
1 egg
1/2 tsp vanilla essence
260g plain flour
85g wholemeal plain flour
1/2 tsp salt
1/2 tsp bicarb soda
1/2 tsp cream of tartar

To make lemon curd:
Place all ingredients into the TMX, chop on speed 7 for 5 seconds.
Insert butterfly, cook for 8 minutes on 80 degrees at speed 3.
Pour into jars, store in fridge.
Allow to cool before adding to cookies – mine was in the fridge overnight so not sure how warm curd would go?

To make cookies:
Place butter, sugar and icing sugar into the TMX, cream on speed 3 for 1 minute.
Add oil, egg and vanilla, beat on speed 4 for 20 seconds.
Add flours, salt, bicarb and cream of tartar, mix until just combined on speed 3 for 15-20 seconds.

Place 1 tablespoon of cookie mixture into greased mini muffin tin.
Bake in moderate oven for 8 minutes.
Remove from oven and make a deep indent into each cookie using the end of a wooden spoon or your finger.
Fill with about 1 teaspoon of lemon curd.
Put back into oven and cook for a further 4 minutes or until edges are starting to go a light golden brown.
Cool in tin for 10 minutes, then gently remove and place on a cooling rack.  Dust lightly with icing sugar before serving.

Makes 30.

Cooking

.Homemade KFC.

This recipe is seriously good!  
I should start off by making it clear that I didn’t make it up myself.  I came across it on Pinterest (proof that I don’t just pin…sometimes I make stuff I pin too!), and the original recipe comes from Our Life Uncommon.
We’ve eaten it two times in the last two weeks and it gets the big thumbs up from all 5 members of the family.  Aussie readers might find this version of the recipe easier as I’ve clarified things in our measurements.
Should also note that the kind of butter/margarine you use will make a difference in the end result – I used salted butter the first time and the whole dish was really salty, so next time I used unsalted butter and left the salt out of the coating, but it could have done with a little more salt.  So, if you are using salted butter, leave salt out of the coating…unsalted butter, add salt to the coating – got it?!
Anyways, we don’t eat takeaways very often, but I think everyone loves themselves a bit of good old KFC chicken.  I always feel gross after it though, this chicken tastes just as good – and even better knowing that you are using lean chicken breast with no skin and no gristly bones to battle with either.
I’ve rambled long enough…let’s get onto the recipe!  And if you don’t have plans for dinner over the weekend, give it a try – it is sooo quick and easy and I can guarantee there will be no leftovers!
 
HOMEMADE KFC

500g chicken tenderloins or chicken breast
milk
1/2 tsp salt
1 Tbs season all
3/4 tsp pepper
1 cup plain flour
2 tsp paprika
70g butter

Take 500g of chicken tenderloins or chicken breast.  If you are using chicken breast, cut up into strips or chunks.  Place in a bowl and cover with milk.  Leave to soak for at least half an hour.

Preheat oven to 180 degrees celsius.  
Place butter in shallow baking dish and put in oven to melt. 

While butter is melting take plain flour, pepper, season-all, paprika and salt (if using)…

…and pop it into a big snap-lock bag.  Seal and toss to combine.

Remove chicken from milk and add to seasoning in snap-lock bag.  Seal and shake to coat.  I use my hands to gently squish everything around and make sure that all of the chicken is well coated. 

Remove tray from oven.  Tilt tray to make sure that butter is evenly distributed over the base.
Place coated chicken strips in a single layer onto the tray.
Put tray in oven and bake for 10 minutes.  Turn chicken and cook for another 10 minutes or until cooked through.

And there you have it!  We like to have ours on some flat bread with heaps of salad…delish!

Cooking

.Roast Vegetable Salad.

Oh dear, this blog is feeling very quiet at the moment.  As always, the reason is because I’m madly sewing behind the scenes trying to finish up a few new patterns to release at AQM in a few weeks.  I’m almost there and looking forward to chilling out soon!
 
For now, let’s check out one of our most favourite dinners at the moment – Warm Roast Vegetable Salad!
No meat involved (although sometimes we will have it as a side with something meaty), very filling, good for you and yummy to the max!
I’m not sure that you need an actual recipe to follow for this, but here’s a general “how we do it” just incase…
First of all, pull out every single vegetable you can find in your fridge/pantry – pretty much any vegetable you would eat warm works well.  We usually have potato, pumpkin, carrot, red and green capsicum, mushrooms, cauliflower, broccoli, asparagus, onion, garlic…the more you can find, the more interesting and tasty your salad will be.
I always steam  my vegies (in my Thermomix varoma) first to make roasting in the oven quicker.  I’ll start with the harder vegies – potato, carrot, pumpkin – and when they are starting to soften a bit I”ll throw in everything else for 10 minutes.  I like to steam my vegies until they are soft to touch, but still nice and firm – it doesn’t really matter though as you finish off cooking them in the oven. 
Throw your vegies into a tray lined with baking paper and drizzle with a little olive oil and season with some salt and pepper.  (Don’t steam mushrooms, just throw them in the pan now). 
Roast in a hot oven (around 220) turning once or twice until everything is nicely browned and cooked to your liking. 
There are a couple of extras that we always throw in to make your salad taste amazing…first – a punnet of cherry tomatoes.  Pop them into the oven with the rest of the vegies for the last 10 minutes of cooking time.  They just need to be in there long enough to get hot and start to soften a little.
And take a small handful of pine nuts and pumpkin seeds and toast them in a separate tray in the oven for a couple of minutes until they are golden and crunchy.
All that is left to do is pile everything on top of a bed of baby spinach and season with a squeeze of lemon juice and a little more salt and pepper and enjoy!

You can also throw in a can of chick peas and crumble some feta cheese through the salad for an extra treat.  A seriously delicious meal and the perfect last minute dish to prepare when you can’t be bothered cooking up a storm but want more than baked beans or cheese on toast for dinner! 

Cooking, Thermomix

.Thermomix Cooking – Oat & Apricot Slice.

I’m on a bit of a health kick at the moment – trying to curb a few bad snacking habits and get myself ready for Summer!  I still love baking though and have been making a few things for Jaron and the kids to eat but recently came across this healthy recipe for Oat & Apricot slice that I can enjoy too!  It is really filling, full of lots of good for you ingredients and great for breakfast or lunch on the run with a piece of fruit or tub of yoghurt.  Of course, making them is a breeze in the Thermo – if you don’t have a Thermo, just combine everything in a bowl with a wooden spoon!
 
(P.S. If you have any favourite healthy baking or snacking recipes or ideas – send them my way!)
 
Oat & Apricot Slice

170g wholemeal plain flour
1tsp baking powder
120g brown sugar
50g quick oats
15 chopped apricots
20g sunflower seeds
20g butter
2 small eggs, beaten

Combine butter and eggs in TMX, speed 8 for 4 seconds.
Add remaining ingrediends.  Knead on interval speed for 30 seconds to combine.
Press into a greased 20cm square tin and smooth top with back of spoon.
Bake in 170 degree oven for 25 minutes.
When completely cool, cut into 8 slices.

Cooking, Thermomix

.Thermomix Cooking – CADA for breakfast.

I know I’ve mentioned on my blog before that I have a hard time with choosing foods to eat for breakfast.  Usually I’ll quickly down one weetbix to get it over and done with, but by 10am, I’m hungry again.  
Recently Cyndi O’Meara (nutritionist and author of Changing Habits, Changing Lives) visited our state holding workshops and information evenings.  Unfortunately I wasn’t able to attend any of them, but a friend shared with me this delicious breakfast recipe.  I’ve been eating it each morning for about a week and absolutely love it – fresh and easy to eat.  It doesn’t leave me feeling bloated or flat and the best part is that I feel full until well after lunch time!  Each letter of the name, CADA, corresponds with an ingredient so you won’t even need to pull out your cookbook for this one!
 
CADA

small handful coconut (I use 1 Tbs)
1 apple, quartered, core removed
small handful dates (I use 2 fresh or 3 dried)
small handful almonds (I use 7)

Place all ingredients in Thermomix.  Close lid and press TURBO button a few times until mixture is to desired texture.
Serve over natural yoghurt and top with berries or other fruit if desired.