Search results for

consealed zipper

Ottobre

.Sewing for baby: little suits.

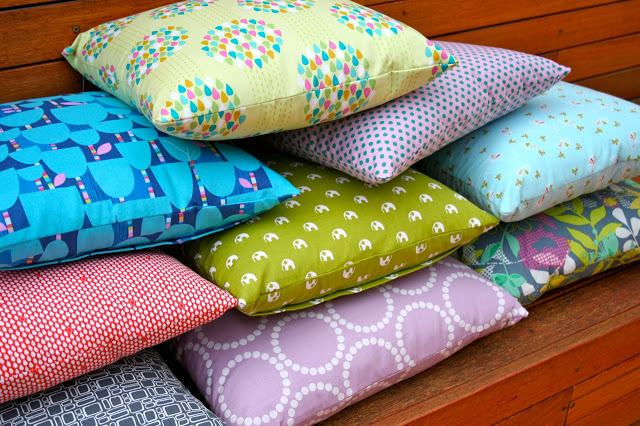
Two new patterns experimented with. Two more little suits.

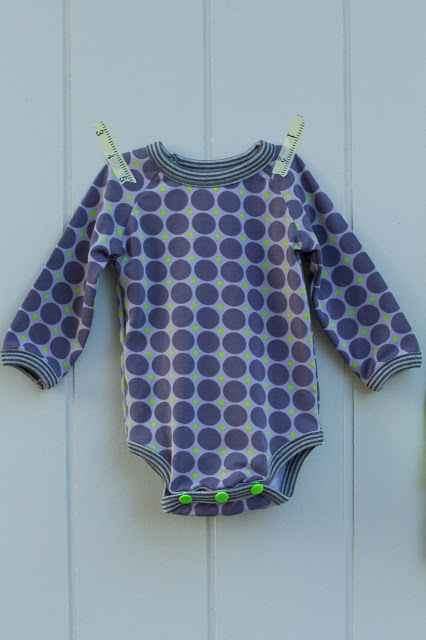
This suit comes from Ottobre 1/2012 “Waldo Coverall”. If you are wanting some great baby patterns, I’d highly recommend this issue as I’ve used it to death. The pattern actually used a lot of the same pieces from the viking suit I’ve already made. Because the viking suit looked a bit wide around the body, I slimmed the pieces down a bit for this one and it looks much better.

I used some towelling knit as the main fabric and thought it might look too much like a towel, but the Farbenmix Primera towelling is beautiful and soft and the loop is really small. I sewed some little elbow patches as an afterthought to match the knee patches on the front – love knee and elbow patches on kids clothes!

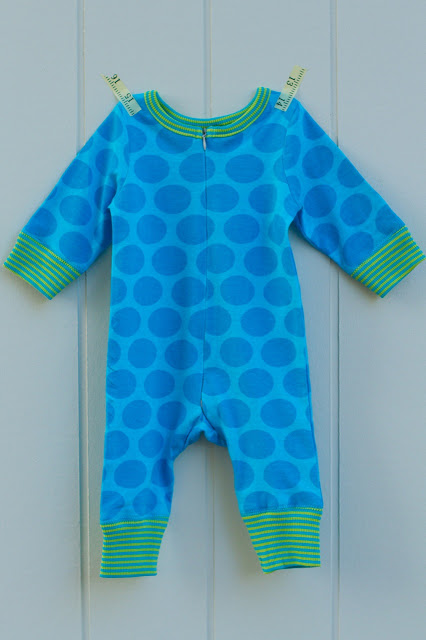
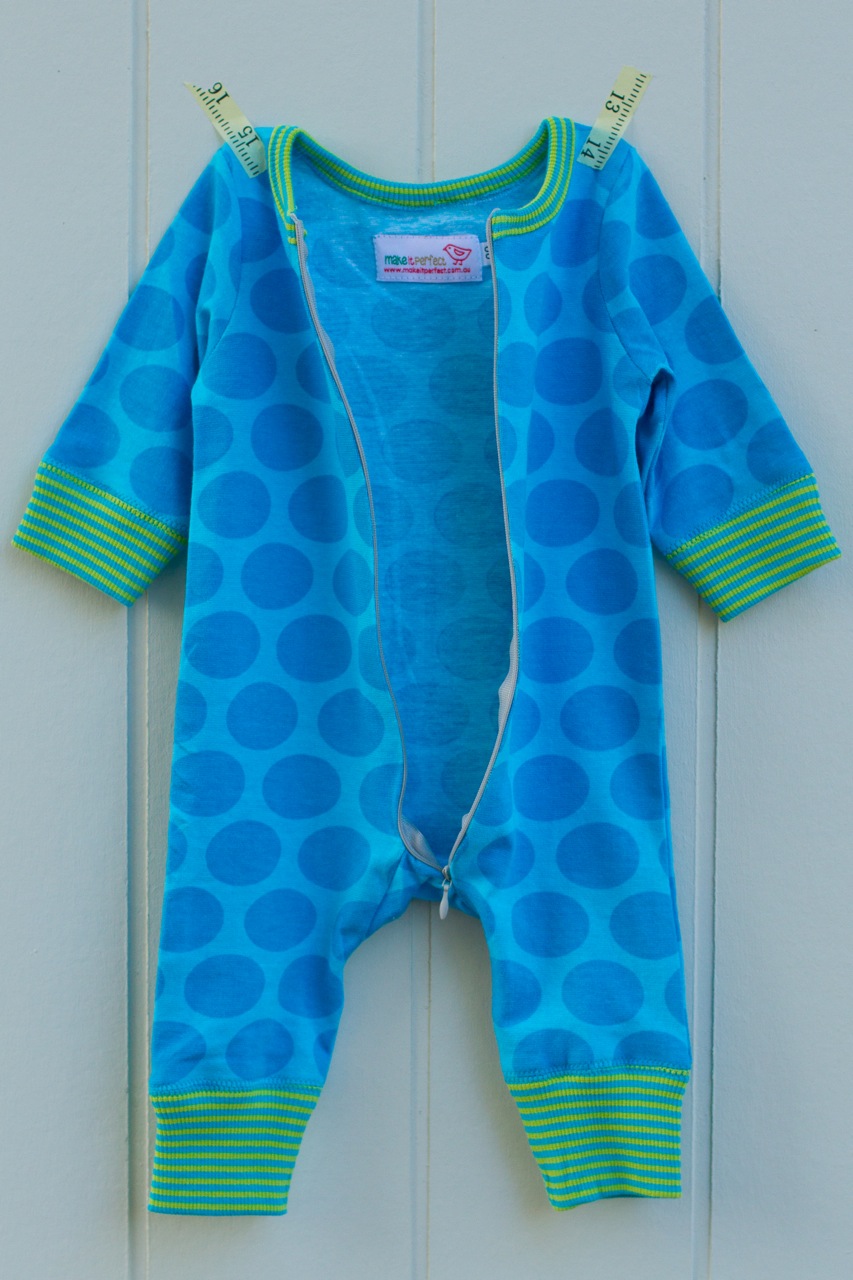
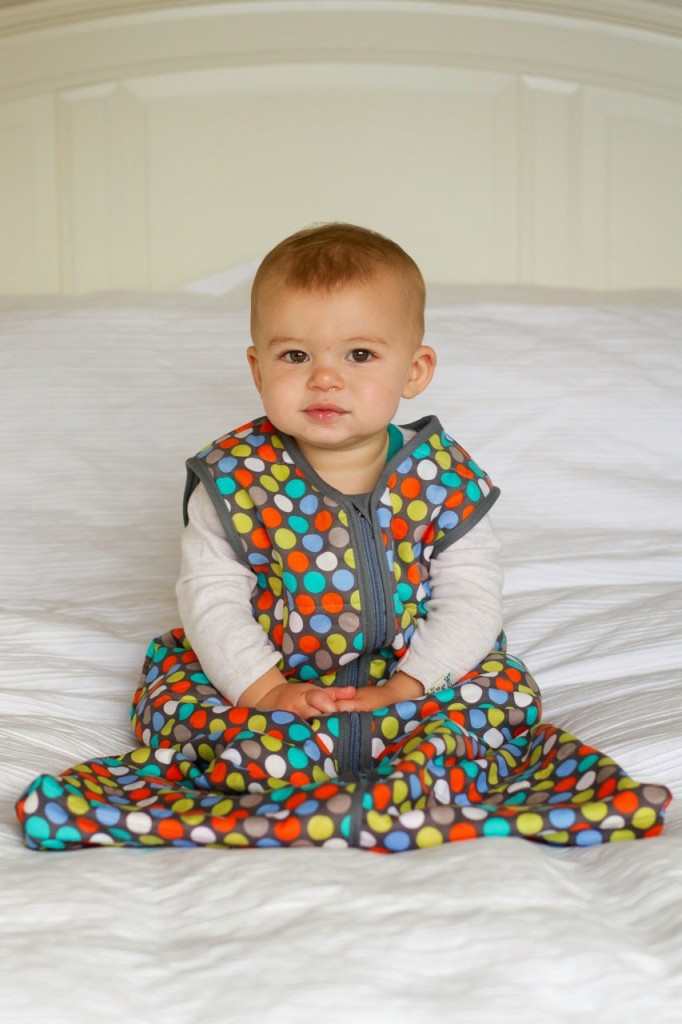
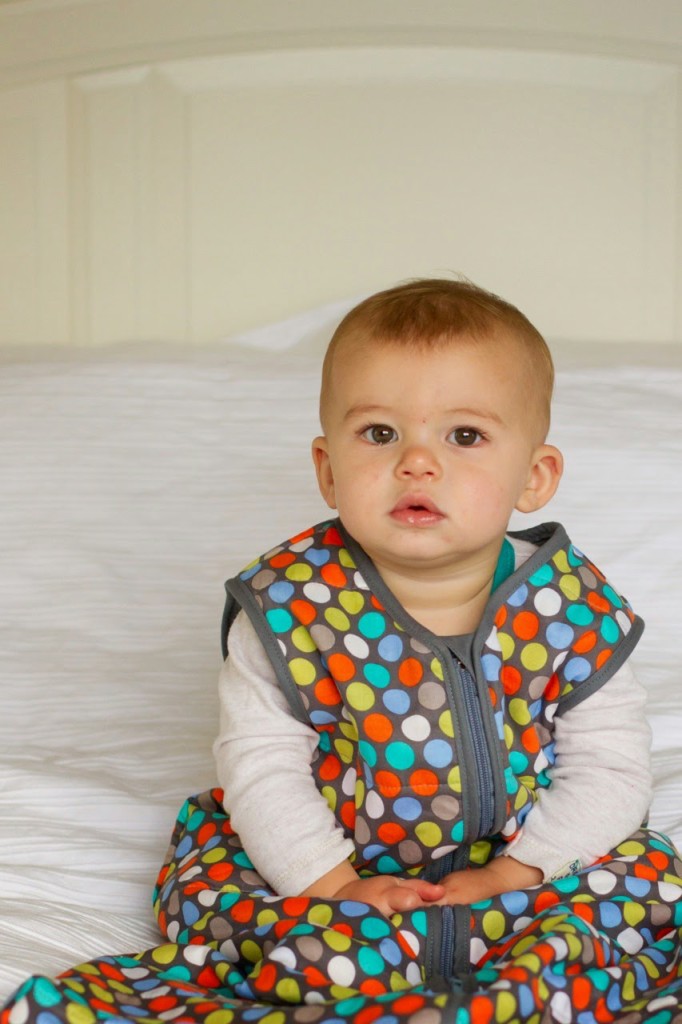
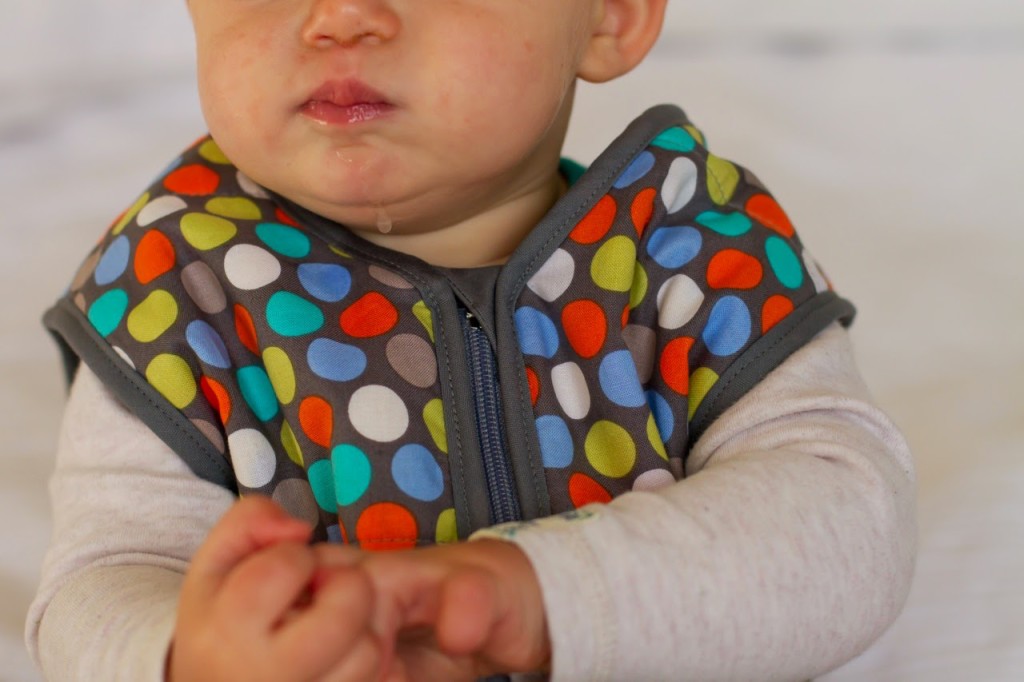
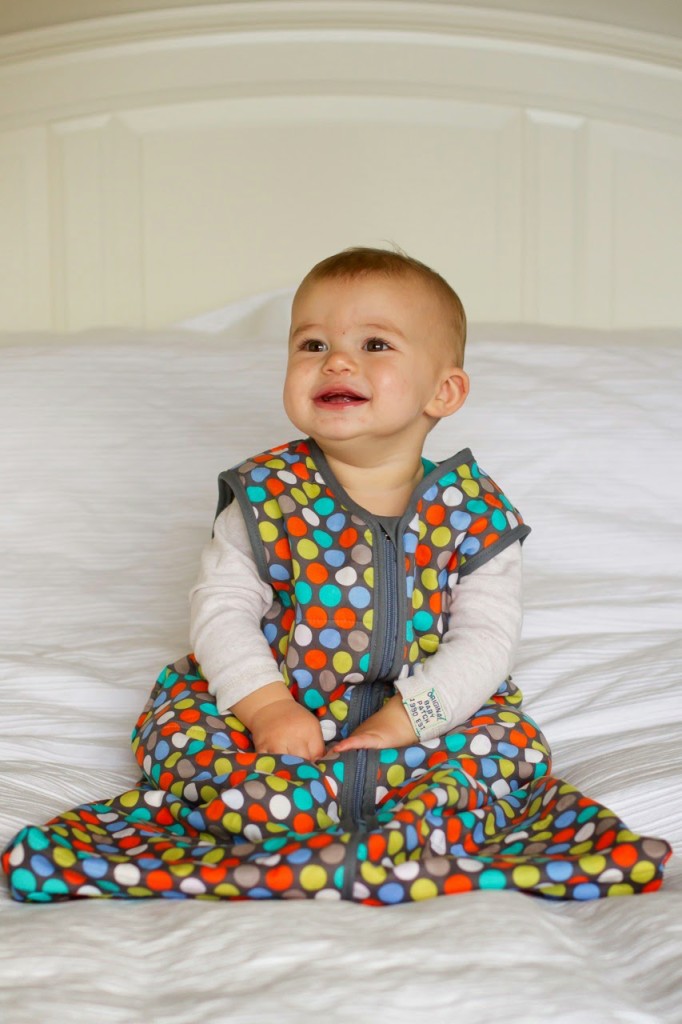
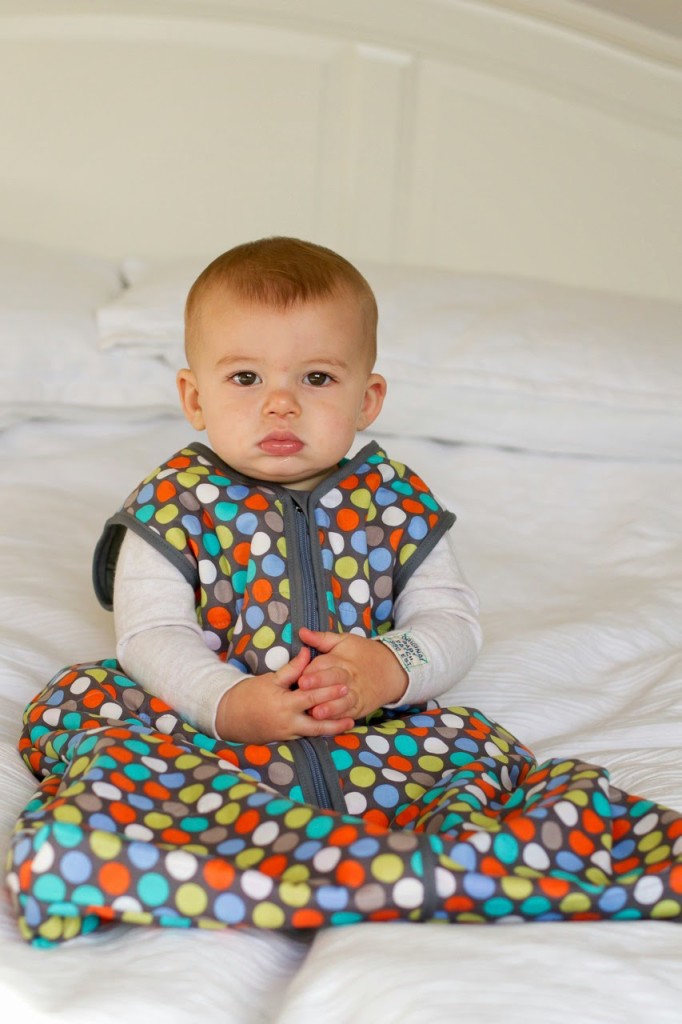
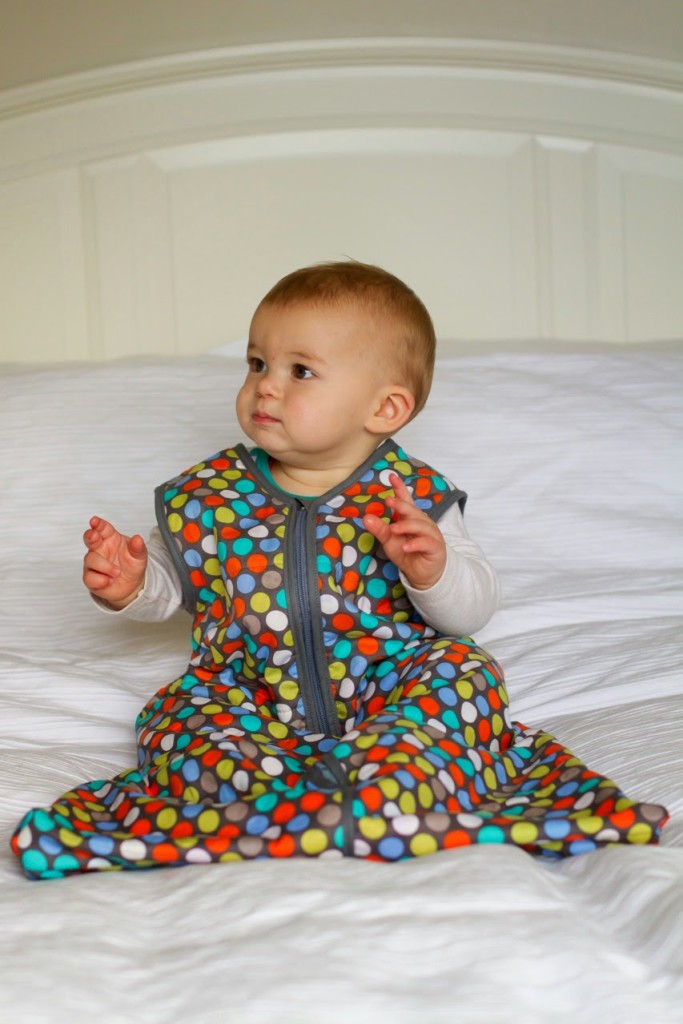
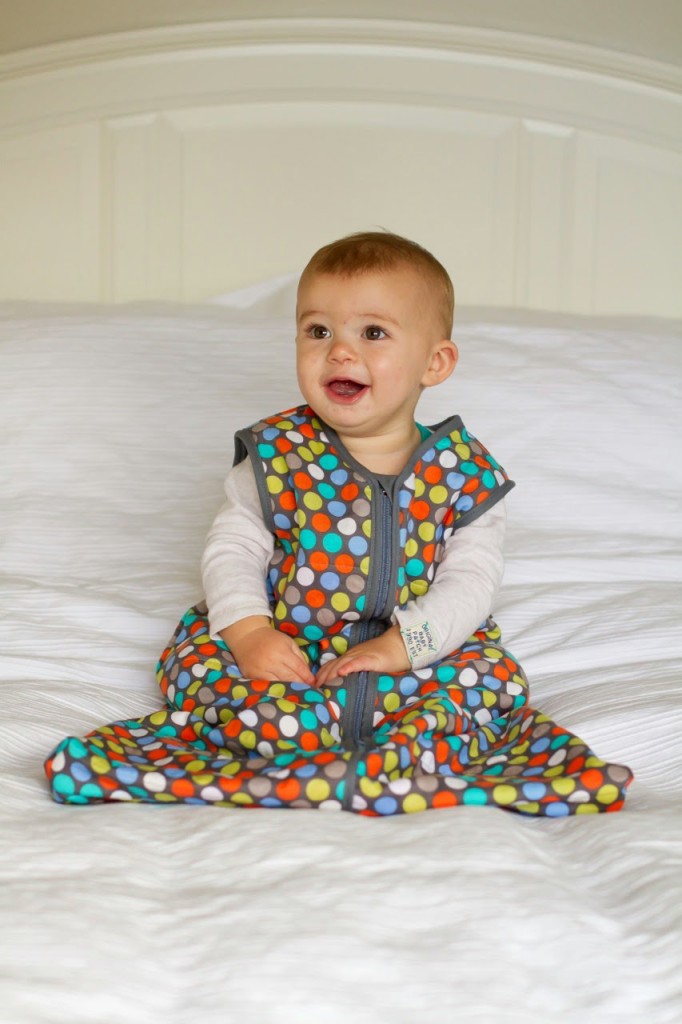
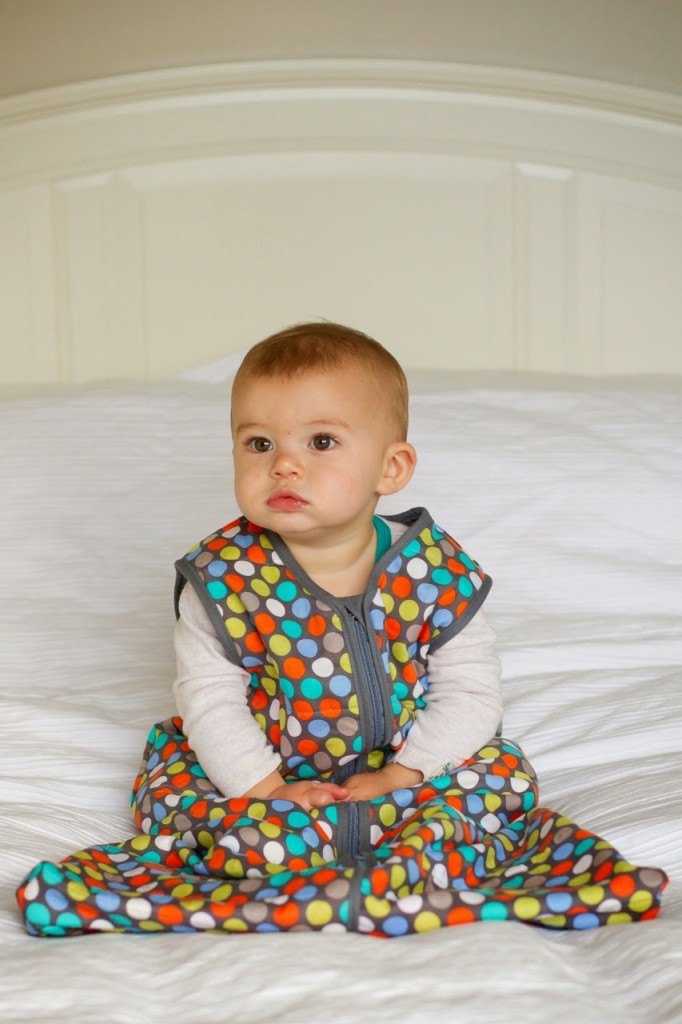
I’d been eyeing off this pattern in Ottobre 6/2012 “Nukkumatti Baby Sleeeper” since I first started sewing the baby clothes, but was scared of sewing the invisible zipper into a knit fabric. I thought it would stretch and move all over the place, but when I actually bit the bullet and had a go, it was waaaay easier than I had imagined and came together first go!

This one feels nice and snuggly and the zipper will make for super quick and easy changes. The pattern only starts at a size 56cm (looks like a 00 to me) so I’ll definitley be using it again as the baby gets older.


A+ Skirts

The classic A-line skirt is a staple to every skirt lover’s wardrobe.


A+ Skirts gives you the classic A-line plus a range of fun variations to create beautiful, one of a kind skirts for everyday elegance.


Sized to fit “tween” girls to the larger woman and with easy, peasy instructions for zipper insertion, A+ Skirts are a beginner-friendly pattern that you’ll find yourself making again and again.


(A+ Skirts are designed to fit “tween” girls from around 10 years of age.)


This pattern includes sizes from 3x-small – 2x-large.


Indie Sewing Patterns

.Super Tote.

I had no intentions to make myself a nappy bag. I’ve got lots of big bags hanging around that I was planning to use for the baby…until I saw Anna’s new Super Tote pattern. And then my plans changed.
 
Another project added to the list of things to do before baby arrives!! But I couldn’t resist, the bag is great – really roomy with four elasticized side pockets inside…

…and my absolute favourite part – the zipper! Nothing worse than having a choc-a-block full nappy bag with no closure at the top and having everything fall to the ground when your bag topples over. Actually, I think the zipper was what sold me!

As with Anna’s Sidekick Tote pattern, the Super Tote was simple to put together. Anna has really outdone herself on this one though simplifying lots of steps and features that seem like they should be really tricky to master. 

I’m trying really hard to dig into my ridiculously out of control fabric stash and use up what I’ve already got at the moment. I was tempted to lash out and purchase some new fabrics for the bag but made myself stick with what I had in the cupboard. I like the fresh combination of colours – especially the purple and aqua together.

So, I’m partly organised…nappy bag made, but still haven’t packed the hospital bags! Maybe a good job for today seeing as I’m due in 9 sleeps!? 

SUPPLIES:
Super Tote pattern by Noodlehead
Prints Charming cotton drill from Spotlight
Art Gallery, Urban Mod, Pointelle in Celeste
Alexander Henry, Heath in Metal
Grey/purple-toned cotton drill

Downtown Boy

This jacket is sure to keep your little man warm during the cooler months, it looks great worn during everyday play and can also be dressed up for going out.


Funky pockets on the front and sleeve of the jacket provide both practicality as well as masculine style.


Downtown boy can easily be made reversible with the use of a reversible zipper resulting in two cool jackets in one!


This pattern comes in two size ranges:

Little Downtown Boy: 0-5 years

Big Downtown Boy: 6-10 years


Make It Perfect

.Doilies to buy.

Are you sick of the doily posts?? This is the last one (for now)… I promise!!

Of course I had to do an Etsy search on “doilies” and these are a few of the awesome handmade goods I came across:

If I had my ears pierced, I would be wearing these for sure! At the moment, hoop earrings are just about pushing me over the edge to get them pierced!


Lovin’ this doily-embellished tote:


Cool doily-framed silhouette:


Almost can’t resist this coin purse:

And thinking I need to make one of my zippered pouches using some natural fabrics and doilies like this one:


Paper doilies are totally in again 😉


And I had to save my VERY favourite till last….How awesome is this doily clock???? I want one for my studio SO BAD!

Coastal Breeze

Meet the dress that feels like a t-shirt…Coastal breeze is the ultimate holiday frock.


Made from super comfy stretch fabric and with a classic scoop-necked shape, you just need to pull it on and go!  A lifesaver for those mornings when you are racing the clock to get out the door.


Featuring a flattering empire-line, tummy-friendly pleats and with no zippers, darts, buttons or other fiddly bits, you will have so much fun sewing coastal breeze that it will feel like you are taking a holiday!


Sized to fit “tween” girls to the larger woman, Coastal breeze is casual enough to wear when you are kicking back at home, or you can slip on a pair of fancy heels and feel a little more special.


This pattern includes sizes from 3x-small – 2x-large.


Hero Vest, Make It Perfect

.Women’s Hero.

Women's Hero VestWomen's Hero VestWomen's Hero VestWomen's Hero Vest Women's Hero VestI’m not sure how I feel about blogging at the moment…gone are the days where I would sew up something new, head out and take photos straight away and then sit down and blog about it all. I’m not sure what it is exactly – probably a combination of busyness and trying to stay away from the computer (time sucker!) but I really think that social media is creeping in and taking over a big part of what a blog used to be about.

For me, Instagram is my favourite social media platform. I love all of the inspirational images and how easy it is to keep in contact with family, friends and other crafters and I especially love that you can get a quick snapshot of what has been going on without having to visit loads of individual blogs. It is a really convenient place to have a quick chat with other people too – ask questions, give feedback, etc. I find it much easier to be personable there than on the blog. However, I also recognise that Instagram can never fully replace the blog with more detailed photographs and information about projects or events that can be helpful and give insight to readers.

I still have a pile of unblogged projects (and an even bigger lot of unphotographed ones!) and I do want to get up to date eventually, but at the moment “plodding along” seems to be the best way to describe my blogging frequency! And now that I’ve written that, perhaps I’ll prove myself wrong and get stuck into blogging more frequently again!

Back when I released the Women’s Hero Vest, I made myself a few more to test of different fabric combinations and this is one of them. It isn’t my favourite vest, mostly because of poor exterior fabric choice but I still really like it and wear it often. This one seems to get worn to the gym a lot, it is thick and warm but extremely soft and light to wear.

The exterior fabric really let me down here – no fault of the fabric, just a bad choice made by me but I did want to see how it would turn out so used it as a trial run. This fabric is a semi-sheer french terry knit. I liked the speckled blue pattern on the white background though and decided to give it a go. Everything about it is okay except the pockets are really thin – you can see in the photo above how my hands can be seen through the pocket when I put them in there. If I was thinking ahead, I should have lined the pockets – they would have been particularly nice lined in the same fabric as the fleecy interior. As they are now, I try not to actually use them as I am worried if I stretch or pull on them too much that they will tear at the seams or circular stitching.

I do love the lining of this vest though. I used this minky cuddle sherpa and it is really soft and fluffy and cosy to wear. My kids love snuggling in it, I actually made Lil a new Uptown Girl jacket and lined it with the same fabric after I finished this vest because it is so snug. I think the blue ribbing finishes off the vest nicely and gives definition to the edges which could otherwise look washed out of it was finished in a lighter colour. And I inserted my zipper using the concealed zipper method – huge big winner, I don’t think I will make a vest without the concealed zipper again. Once you get the hang of it, it really doesn’t take much longer than the method described in the pattern.

So, overall this vest gets a tick…I love everything about it except for the fact that the pockets aren’t totally functional but it was a good experiment in fabric choice! 

High Flyers, Make It Perfect

.New BOY pattern – HIGH FLYERS.

I know that the sewing pattern world is lacking decent patterns for boys…so let’s do something to change that – check out my latest pattern, High Flyers:
 
High Flyers are a handsome pair of pants that can both dress up and go casual with ease.  With these cool and comfy trousers in your little guy’s wardrobe, he’ll always be looking shipshape.
 
Featuring an elastic-backed, adjustable waistband, slim fitting legs, loads of pockets and an easy-to-sew fake fly opening, High Flyers will suit just about any occasion.
 
High Flyers can be given a more casual feel with the use of contrast topstitching detail and when sewn with denim they make a great pair of jeans.

I breathe a big sigh of relief as I send this pattern out today.  It has been one of the most time-consuming patterns that I have designed so far.  I know that so many of you have been crying out for more boy patterns, but to be honest, there isn’t a lot of variety when it comes to boy clothing.  After a bit of research (read: rummaging through wardrobes and examining my boy’s pants!) I came to the realisation that if you want to sew for boys, you need to spend time on details.  It’s these details that will help create a quality pair of pants that look as though they’ve come from your favourite clothing store.  Girl’s clothing has the advantage of using beautiful printed fabrics to give them detail, but when it comes to boys we mostly stick with plains, checks, or other toned-down fabrics so unless sewn details are added then your elastic-waisted pants will look a little slouchy and more like a pair of pyjama pants.

Having said all of that, I can assure you that it is NOT hard to make a tailored pair of boys pants.  I’ve worked really hard to simplify some tricky sewing techniques and make sure that High Flyers has all of the detail of a store-bough pair of pants with minimum fuss.

And what about that fly, I hear you ask?  I have to admit, I was scared of sewing a proper zippered fly to begin with.  I got over it though and worked it out and it isn’t that hard, but still a little tricky for a less-confident sewer…so instead of a zippered fly, High Flyers features a fake fly opening (yes, it opens, not just pretty topstitching) that is sewn shut half-way down.  So the pants are still easy to get on and off, but look as though they have the real-deal fly, without the tricky zippered opening.  Besides, what little boy wants to remember to do up his fly all the time anyway?!

I think you’ll enjoy making these – and it is a great satisfaction to sew something for your boy that looks as though it came out of a shop.  

And I’m sure that your boy will dance some crazy moves in approval like my cool model Jake did!  Big thanks to my awesome photographer, Sally from Eden Lane Photography.  Her photos never disappoint – there are loads more on my website.  If you are looking for a photographer in the Sydney area, I highly recommend her!

You can find out fabric requirements for High Flyers on the website. If you have a store and want to stock this or any other Make It Perfect patterns, contact Creative Abundance to place an order. 
If you would like to purchase a copy of High Flyers for yourself, they should be popping up in retail stores very soon. Ask your favourite store to get one in for you!

I’m giving away a copy of High Flyers (in your choice of size range) to one lucky reader – leave a comment on this post to be in the running!
(Please make sure you leave an email address with your comment.  Giveaway will close Wednesday 25th May and winner will be drawn via a random number generator.)

Hero Vest

A hood + zipper + pockets = three necessities that will ensure boy’s clothing gets the big tick of approval.


The Hero Vest is made for those little heroes in your life – the ones that can so easily make you forget all of their mischief and madness with a cheeky smile or squeezy hug!


A quick cover-up for chillier days, the Hero Vest is ultra comfortable, featuring ribbed binding on the hood, waistband, pocket openings and armholes – allowing you plenty of options to include lots of fun colour combinations!


With the exterior made from either woven or knit fabric you’ve got plenty of fabric options to explore. And the snugly polar fleece lining will ensure your boy will always stay toasty and warm.


Perfect for grabbing as you run out of the door, the Hero Vest will save you in the case of all unpredictable weather!


This pattern comes in two size ranges:

Little Hero Vest: 0-5 years

Big Hero Vest: 6-10 years


Make It Perfect

Sew, Mama, Sew Giveaway Day #1

THANKYOU EVERYONE – GIVEAWAY NOW CLOSED!!!

So excited about Sew, Mama, Sew’s Giveaway Day! Can’t wait to head over to their blog later on today and see who else is participating.

I’ve got THREE giveaways happening…feel free to enter all of them…everything is made by me!

GIVEAWAY #1

One funky patchworky zippered pouch
One frilly mini-journal
Two Make It Perfect patterns (Pinny & Pinny #2)
Set of 6 handmade magnets


To enter, simply leave a comment!! (If you don’t have an email address linked to your profile, please leave an email address with your comment so I can contact you!) Winner will be chosen via random number generator on Thursday 20th May. I will ship worldwide!

Don’t forget to enter my other giveaways…
Sew, Mama, Sew Giveaway #2
Sew, Mama, Sew Giveaway #3
And my new pattern release, Sprout giveaway is still opened too!

Ottobre

.Harvey models: Stripes & Monkeys.


Okay, I’ve really got to get these pictures on the blog before Harvey grows any more! They were all taken at least a month ago and all of these outfits are fitting rather snuggly now, they’ll be making their way to the “too small box” by the end of the week.

First up…sad Harvey. Mean Mum made him lie down for a few photos when all he wanted to do was go to bed! This zippered suit pattern is one of my favourites for him to wear. The fit is perfect for him and it is practical and comfortable. You can read more about the pattern details here. The fabric is some Hilco stripes. 

And here is his monkey outfit. Once again I added a front placket to the onesie AFTER he had worn it for the first time. The neck opening is just too snug to get on and off comfortably. So annoying to do, especially as the binding I used around the neckline was quite thick, but worth it in the end. You can read more about this outfit here.


Other

.Cushions replaced!.

A change is as good as a holiday, right?  I finished new cushion covers to live in the loungeroom last night and couldn’t be happier with them today.  You might remember my old cushions…I made them at the end of last year and they just haven’t worked for me or our home.  Wrong colours, wrong designs.
 

This time around I took my time selecting the fabrics.  I didn’t want anything matchy-matchy so grabbed a few of my favourite fabrics from my stash and played around until I came up with a collection I was happy with. 

There is definitley nothing matchy-matchy about these fabrics!  Although the more I look at them, I can see why they work well together – there are a few from the same ranges, the scale of most of the prints are small or have a small detail about them and there is a focus on grey, lilac, aqua and green…

Cushions really are a quick and easy way to spruce up a room and freshen things up a bit – could I claim this as my spring cleaning for the year?!


My favourite method for making cushion covers is hiding the zipper under a folded flap of fabric.  It gives a really neat and professional finish.  I don’t like envelope closures as they always tend to stretch open and look sloppy over time.  If you are interested, here is a handy tutorial to hide the zippers in your cushion covers.

I was a little worried about using regular quilting weight cotton to make the cushions.  In past experience they have become saggy and stretched and haven’t been able to withstand the beatings that our cushions get (see below) so this time I fully lined each cushion using a piece of (dodgy) scrap fabric I had lying around.  Nothing fancy with the lining, just cut a piece the same as the exterior and overlocked them together around the edge and then worked with the joined pieces as one.  It has made a huge difference in the stability of the cushions and I’m confident they will be long-lasting.

Now, as much as I love my cushions to decorate our home and inject a pop of colour, the kids love them more to throw around and play with!  Some days it drives me C.R.A.Z.Y!  I am constantly picking cushions up off the floor, but the small-fries love it!!
Hmm, looks like fun…I might have to join them in their antics next time! 
SUPPLIES:
Umbrella Prints, Floating Flowers
Umbrella Prints, Elephants
Umbrella Prints, Raindrops
Erin McMorris, Summersault, Pixiestick Posies in Turquoise
Erin McMorris, Summersault, Raindrops in Celery
Erin McMorris, Wildwood, Checked Floral in Green
Saffron Craig, Magical Lands, Magic Spots
Lizzy House, 1001 Peeps, Pearl Bracelet in Purple
Jennifer Moore, Monaluna, Hip to Be Square in Steel 


Ottobre

.Sewing for baby: spots.

And there are more baby suits…
 
Another gorgeous and practical zippered romper from Ottobre 6/2012 “Nukkumatti Baby Sleeeper”.

And from the latest Ottobre edition 3/2013 – these super cute harem-style baggy pants made using the “Summer Sea Jersey Pants” pattern.

These look like they are going to be a cute, baggy fit with snug waistband and leg cuffs. The leg cuffs can be worn down for long pants or rolled up for 3/4 length so should work well for the size 00 I’ve made and take the baby into Spring.

I made the coordinating bodysuit from Ottobre Winter 6/2012: “Kisuliini Raglan-Sleeve Bodysuit.” I love this grey/green spot print – matches our house too!

Would you believe that I’ve only got 2 more baby outfits to share and then I’ve blogged them all! I think that I have well and truly got enough size 000 and 00 clothes now – but that probably won’t stop me from sneaking in another outfit or two if I’m still hanging around home for a week or more!

Make It Perfect

.Cushions in August Fields.

Finally getting around to stealing photos of Carli’s blog to show the cushions and quilt I made for her new couch in her new house.

Zippers and all! I don’t know why zippers have intimidated me in the past…they weren’t hard at all though.
We decided to go with a single print either side so the cushions could be reversible. I was very impressed with the fabric Carli choose. Bright and fresh, but not too overpowering. I’m very jealous though that her cushions were finished in just a few hours and are already adorning her couch whilst mine are still a work in progress. I’m really starting to regret my decision to HAND-QUILT every cushion, front and back so that the fabric is a bit stronger…it is taking me FOREVER!

After not having much experience using home decorator weight fabric before, this project has won me over. It is not too thick, not too thin…holds it’s shape really well and makes for a lovely, heavy feeling quilt.

For more cushion and quilt pics see Carli’s post here.

Make It Perfect

.Teacher Presents.

It was Oscar’s last day of school today.  I can’t believe his first year is already over!! This means “big boy school” next year – he is in a straight Prep class and goes full time, 5 days a week.  He has had the most amazing teacher this year, she is well-known as being the BEST kinder teacher around and loved by everyone.  Such a great start to his schooling life.  I wanted to give her and the two aides in his classroom (who were both brilliant also) something special to say thankyou.  I was inspired by Karen’s blog post and settled upon custom zippered pouches (see my tutorial here) for each of them.
Instead of me writing a word in the white space, I got Oscar to write his teachers names on a piece of paper and then traced his handwriting onto the pouches.  I had to do a bit of squishing up and rearranging so that they fit, but tried to keep it as true to his handwriting as possible. 
His teachers were so happy, I love how they turned out and think this may be a teacher present tradition for years to come.  (Plus I got to dive into my out-of-control scrap box, which always makes me feel good!)


Make It Perfect

.September Cool Shops! KNITTY BITTIES.

Cool Shop! #2 for September is Knitty Bitties.


Andrea is the creative mind behind Knitty Bitties, a vibrant Etsy store selling a range of bright and funky sewn goodies. I received one of her gorgeous Camera Strap Slipcovers in “Hello Sunshine” to review and it is very cool. I love how it has livened up my boring plain black camera and is also extremely comfy resting around my neck.


Andrea has a great eye for putting together lovely fabric/colour combos – if you take a look at the products in her store you will see what I am talking about.


Knitty Bitties sells a huge range of cute, gathered clutches, camera strap covers, list takers, zippered pouches, and more – you are guaranteed to find something you love and the perfect gift for a friend.

I love this Gathered Ruffled iPad Cover:


And her Gathered Ruffle Clutches are super sweet too:

GIVEAWAY

As part of her Cool Shops! review, Andrea has generously offered to host a giveaway to readers of my blog. One lucky person will win a Camera Strap Slipcover of their choice. All you have to do to enter is leave a comment!


Giveaway will close on Thursday 9th September and winner will be drawn randomly. Your comment will be disqualified if you do not leave an email address in your comment or linked to your profile.
Hero Vest, Make It Perfect

.Hero Vest for a GIRL.

Sewing for girls is a breeze…they have the most versatile wardrobes and a pattern targeted at boys can easily be sewn up in girl-friendly fabric – a bonus if you have boys and girls in your family.

And while I think the Hero Vest is the perfect boy sewing pattern, I also knew that it would be awesome for a girl.

The Hero Vest with girl power!


This Hero Vest is made using jersey knit for the exterior, polar fleece for the lining and ribbing for the aqua binding.

I really like how the charcoal lining peeking out from the hood and black zipper help to tone down the bright pink so that it isn’t so sweet and pretty – adds a bit of funk, don’t you think?


The pockets are one of my favourite features on the Hero Vest. I really like the quirkiness of the circular openings and decorative topstitching outlining the shape of the pocket.

These are so satisfying to sew and a great way to gain more confidence with knit sewing and inserting zips. In fact, this is the easiest way you can sew in a zip (in my opinion) so I highly recommend you giving it a try if you have been avoiding them in the past – embrace the zip, you will open yourself to so many more sewing options once you aren’t scared of them anymore! Oh, and if you don’t want to use a knit fabric for your exterior, remember this pattern is so versatile and works really well with a woven cotton exterior too.

The giveaway for the Hero Vest pattern is still running, visit this post to enter!

Or if you don’t want to wait, this pattern is available as an instant download PDF here!

Free Pattern, Zippered Pouches

.Gifts for teachers.

Every year as Christmas rolls closer, I tell myself that next year I will be more organised and start my sewing and shopping earlier…but I don’t.  And I kind of like that last minute rush – it adds to the festivity in the air.  December would be boring without it, right?!
My children have been very blessed to have such wonderful teachers this year, both at school and at church.  They put so much time and effort into teaching them and we like to give them a pat on the back and a big thankyou for their efforts.
 
The zippered pouches we made for Oscar’s school teachers last year were very well received, so we did the same for his teachers this year.  It’s fun to see how well his writing has improved from one year to the next – last year he was copying my writing and this year he wrote straight onto the fabric with my water-erasable pen!

And for the children’s church teachers, I made them a necklace with matching pair of earrings.  These ones are made with satin fabric and the earrings are made from little satin-covered buttons.


 These necklaces are pretty much the only ones I wear now – they are very sturdy and can take a lot of tugging and pulling from the kids and are really comfortable.  Plus, they don’t get tangled in a heap like all of my other necklaces are…probably the main reason I keep reaching for these ones every time!

I might put together a tutorial for these once we get back from our holiday – they are really simple to make!
Baby Dream Bag, Make It Perfect

.A New Pattern:: Baby Dream Bag.

Do you love sleeping bags for your baby? All of my babies have slept with them and they have become a part of their night-time routine, Harvey needed a couple more to go on rotation so instead of buying a new one I thought it would be best to design a pattern of one and have the freedom to choose my own fabrics and thicknesses!
 
 The Baby Dream Bag is essential to ensuring a good night’s sleep. You will sleep soundly knowing that your baby is covered all night long without kicking off blankets and waking themselves and everyone else up.  
Baby Dream Bag includes a full-length zipper guard with generous chin protection, ensuring that baby’s soft skin and inquisitive fingers aren’t able to access the zipper.
Night-time nappy changes are made easy by zipping the bag from the bottom up.
By sewing your own Baby Dream Bag, you have control over how warm you want the sleeping bag to be. Whether you leave out the wadding for a summer-weight bag or make it with the warmest layers you can find, you will easily be able to customise the sleeping bag to suit your needs and climate.

Making these Dream Bags is so rewarding, it’s always satisfying to sew something that is going to be used over and over and over again…and at the moment Harvey spends about 14 out of 24 hours sleeping in his sleeping bag so I think it’s well worth putting the effort into! For our winter climate at the moment, I’m making his Baby Dream Bag using quilting cotton for the exterior, polar fleece or wadding for the warm layer and knit jersey for the lining. They are cosy and warm, but still lightweight, allowing him to move around as he needs to in his cot.

The great thing about making your own Baby Dream Bag is that you have complete control over what your bag looks like, how warm it is and how it feels…choose from any woven fabric for the exterior. For the lining you can use quilt wadding, polar fleece, flannelette, or even repurpose an old blanket! And the lining can be made using a woven fabric, flannelette or a soft knit fabric. If you want your Baby Dream Bag to be for Summer weather, you can leave the warm layer out altogether! Have fun experimenting with your own unique fabric combos and creating a sleeping bag different from any other!

The Baby Dream Bag is like a wearable blanket, it can’t be pulled up over baby’s head or get tangled up like a regular blanket can and will keep baby at a comfortable temperature all night long. I love using sleeping bags with my babies because they can wake up during the night, have a cry and move around the cot then fall back to sleep without me having to sneak in and make sure they are tucked in. They also become a part of the bedtime routine, which makes traveling and sleeping away from home so much easier.


My babies have all used sleeping bags from around 6  months (when I stop swaddling them) until 18-24 months. I know that many people use baby sleeping bags from newborn age right up until 3 years so the Baby Dream Bag pattern includes sizes from 0-36 months!

The Baby Dream Bag is available as an Instant Download PDF pattern here. It is on sale for $10 (usually $12) for the rest of this week!
(Discount price offer ends on Sunday 25th May.)

Paper copies of the pattern will be heading to shops very soon if you prefer to purchase a hard copy of the pattern.

Make It Perfect

.Online.

I’ve had a few cool online sightings and links over the last week or so…

I’m guest blogging over at the Oz Material Girl’s blog – they asked me if I had any tips or tricks to share regarding my patterns and I’ve written a tutorial to show you how to avoid puckers and create perfectly shaped hats. If you have had difficulties with joining the circular pieces of your About A Boy or Lazy Day Hats or if you are scared of sewing circles – head on over for some pointers!!

The Oz Material Girls are also giving away a copy of About A Boy or Lazy Day Hat so make sure you leave a comment to win a free pattern!


My Zippered Pouch Tutorial was featured on Sew Much Ado’s “We Did It! Wednesday!” Thanks so much!!! If you are visiting from Sew Much Ado – welcome 🙂


My cousin, Lisa calls herself an “amateur” photographer – pfft!!! We spent the morning together at my house catching up with our other cousin, Penny who made a quick visit home for Nan’s funeral. I have always declared Lil impossible to photograph, but she was working the camera today!! How cute is this pic that Lisa captured of her? Check out Lisa’s photography blog – she is awesome!!!


Citrus pOp made it to the front page of Etsy on the weekend!!! I was a bit excited 🙂 The Mandarin Grove hairpins sold shortly after. I’ve got some beautiful necklaces in the making that I will be adding very soon – will keep you posted. Remember, free postage offer is still happening until tomorrow…write “blogspecial” in the comments after you have purchased and I will refund the postage amount.