Browsing Tag

Make It Perfect

Home & Family, Make It Perfect, Wonderland

.When she turns 7 its all about roses.

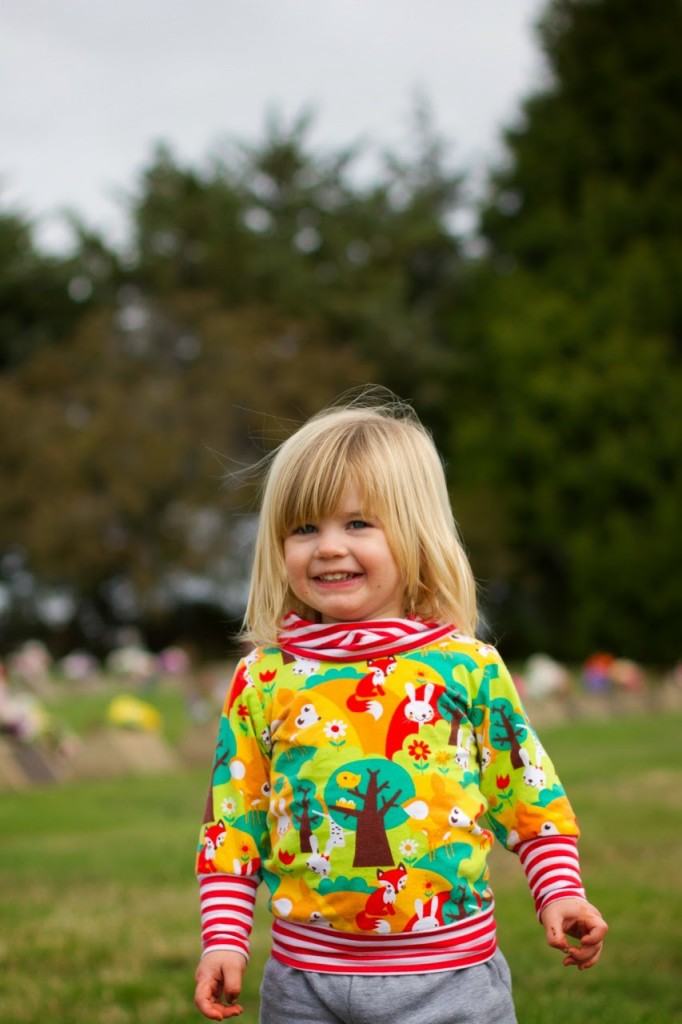
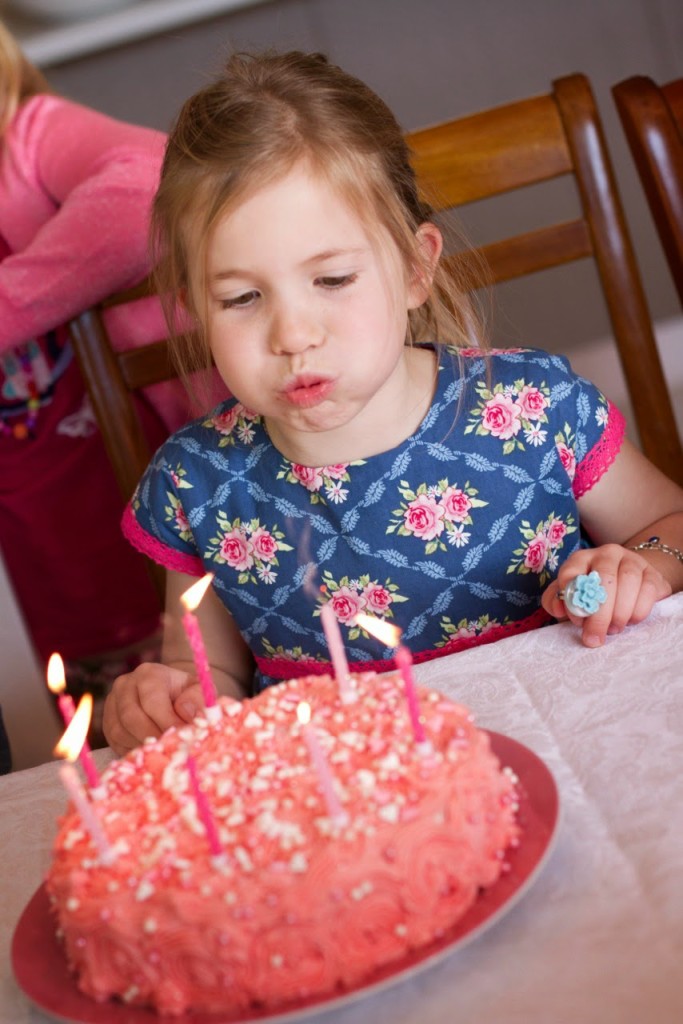
Lil turned 7 on Sunday. It was a weekend of celebrations, with little girls over for a birthday party, crafts, games and lots and lots of cake!
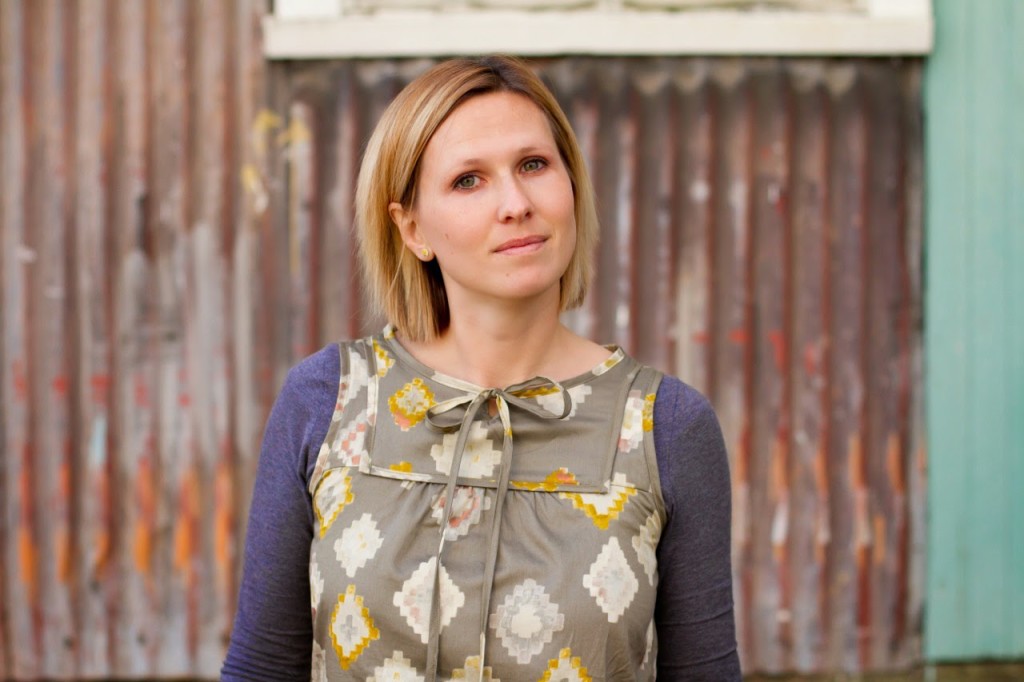
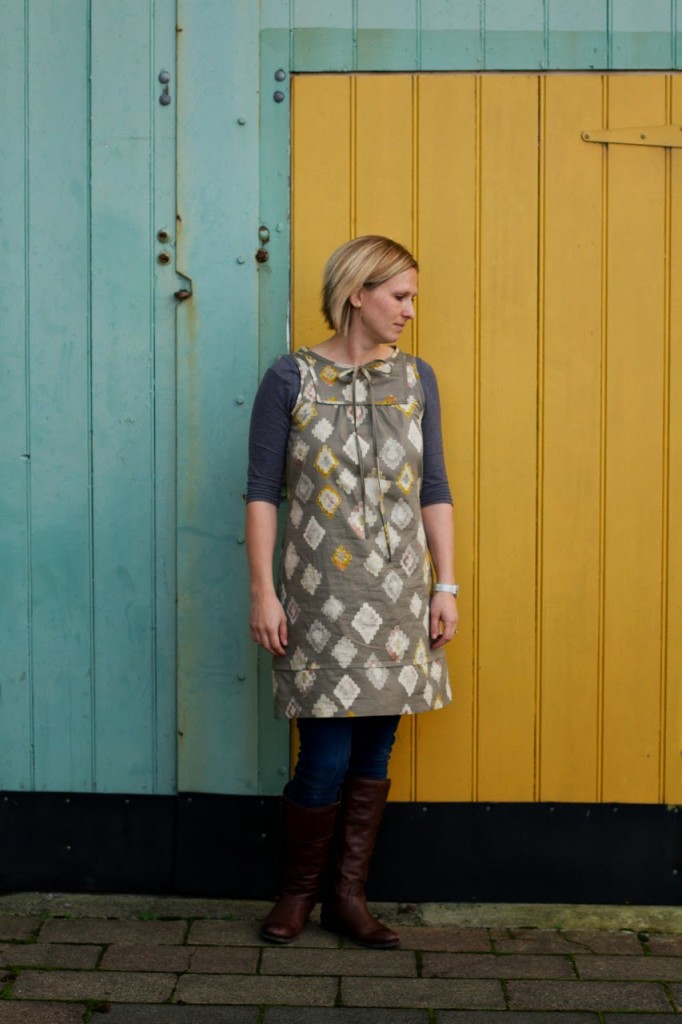
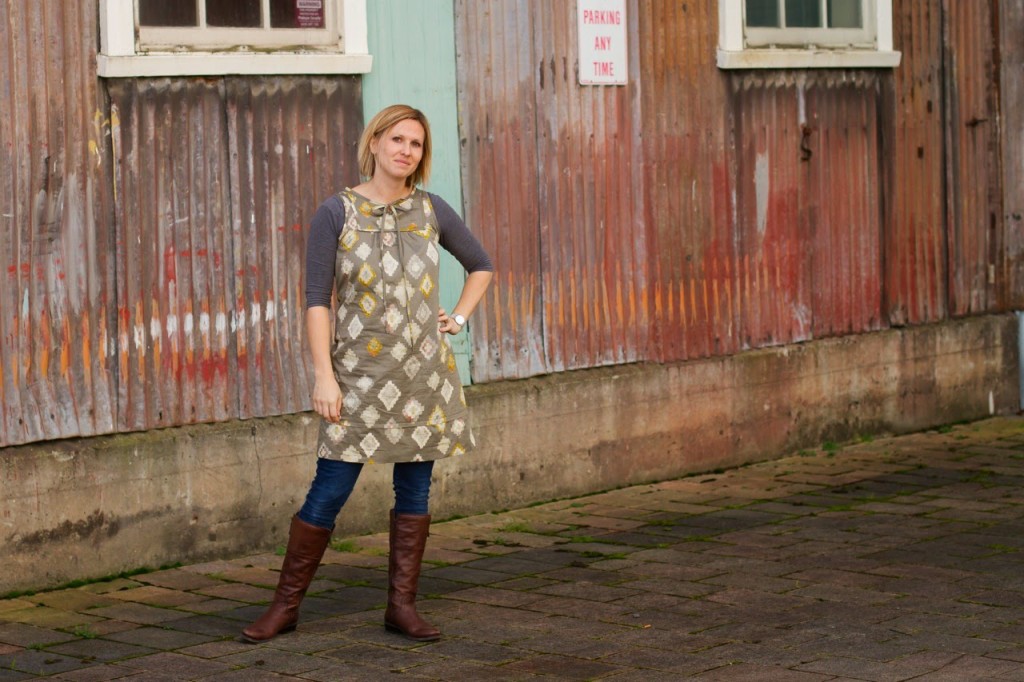
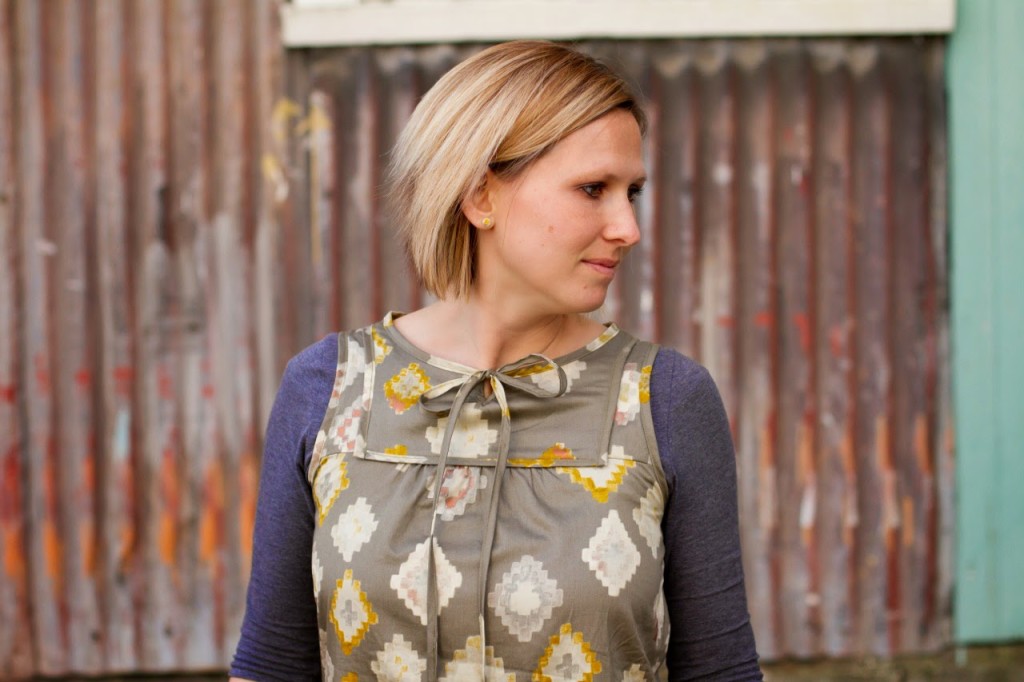
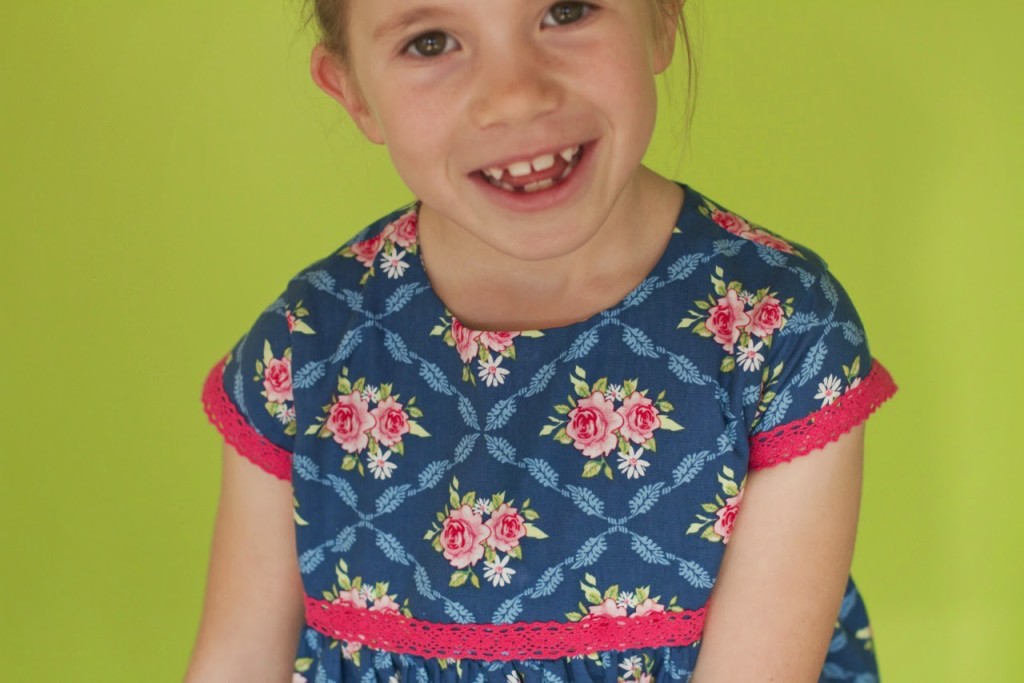
For months Lil has been asking me to make her a dress that touches the ground. I thought a birthday dress would be the perfect opportunity to grant her wish and I let her loose in my fabric stash to choose any fabric she wanted. I wasn’t expecting it to be so classic and floral. Apparently when you turn 7 flowers are very important – particularly roses. I bought this fabric (Tilda by Norwegian designer Tone Finnanger) half price when my local fabric store recently closed down. It is beautiful, but not my usual style so I was surprised when Lil choose it and tried to sway her towards something else but she wouldn’t budge! 
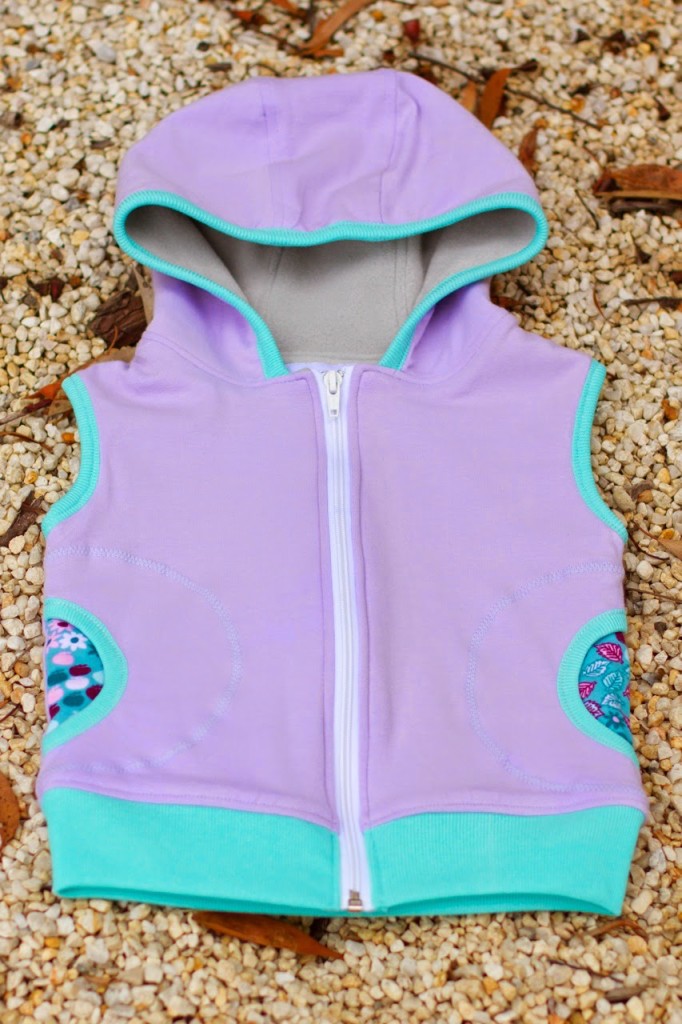
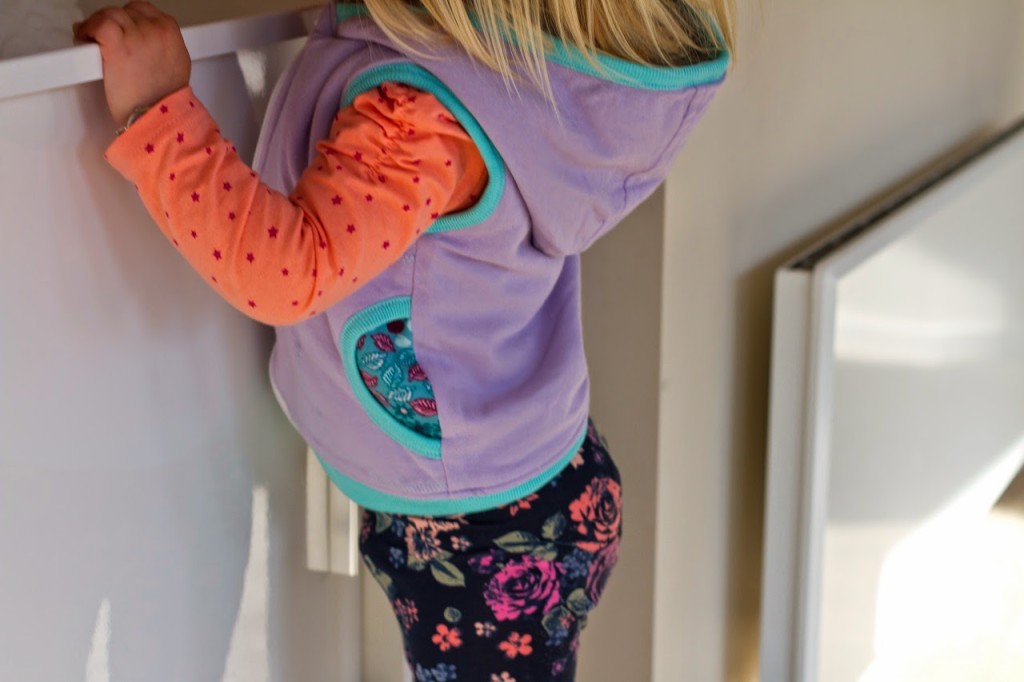
Then I spent an evening looking through my patterns and Ottobre magazines trying to find a maxi-length dress with no luck when it dawned on me that I could easily turn my Wonderland pattern into a maxi dress! I’m not sure why I haven’t made more of these dresses for Lil – the last one I made for her was when she was 4. I think I must have forgotten about it, but am planning on making a few more soon. It is such a sweet dress, a little bit fancy but not too over the top. Quite a quick sew too, the bodice is fully lined and the sleeve edges and hem of the dress are niftily hemmed using a ribbon or other trim. We choose this pink crocheted lace. Lace, too, is apparently important in the eyes of a 7 year old girl.
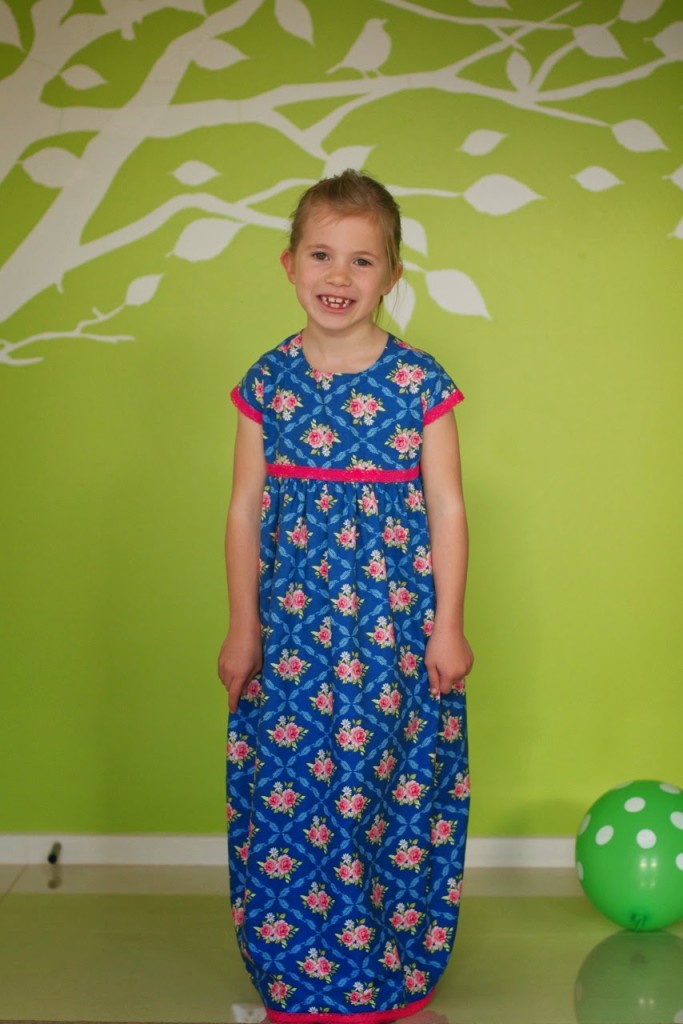
To turn the dress into maxi length: first, I made the bodice and tried it on Lil. Then I measured how long I wanted the skirt to be from the bottom of the bodice to the floor and added seam allowances. I decided to gather the top of the skirt instead of pleats and sewed the skirt onto the bottom of the bodice using the regular method of attaching a skirt with right sides together instead of attaching the skirt to the outside of the bodice as the pattern instructs.
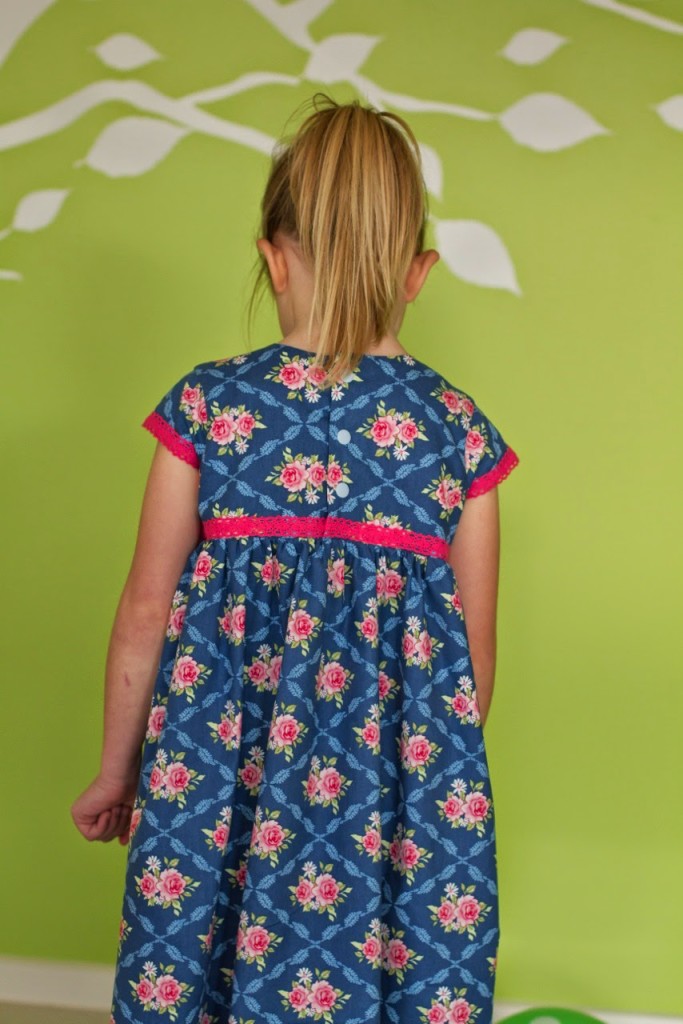
After I had finished the dress, I thought it would look nice with a strip of lace around the bottom of the bodice too, so sewed that on. And to make things faster I opted for snaps down the back of the dress instead of buttons!
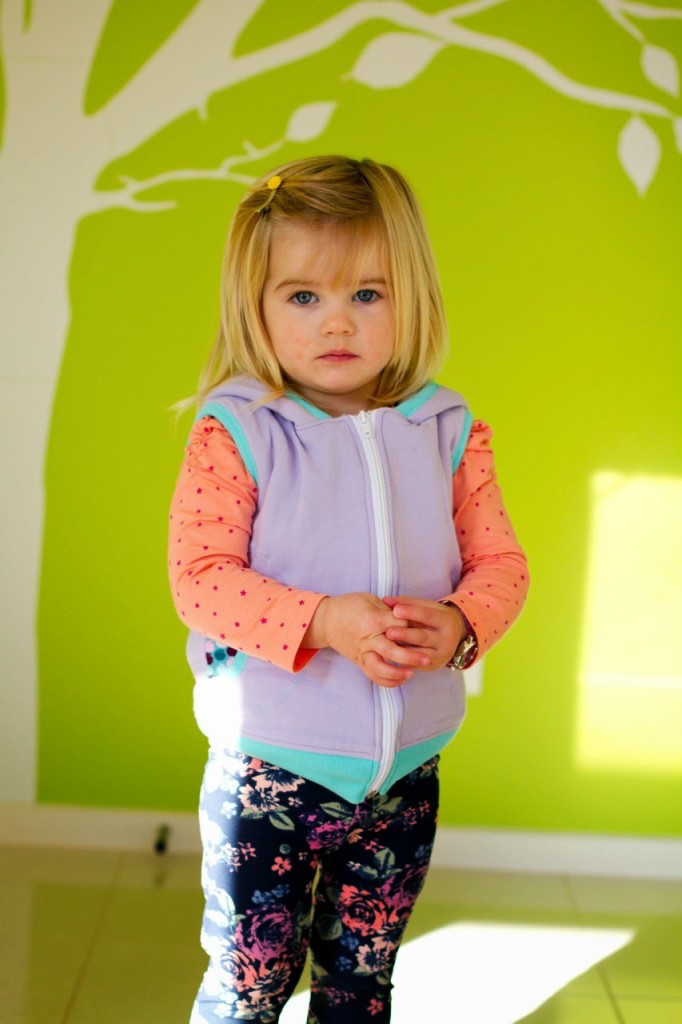
Lil is over the moon. And the dress actually looks a lot cuter than I thought it would to start with. A bit “Little House on the Prairie” but I’m happy that she looks like a little girl and prefers to wear clothes like this rather than styles that are meant for teenagers!
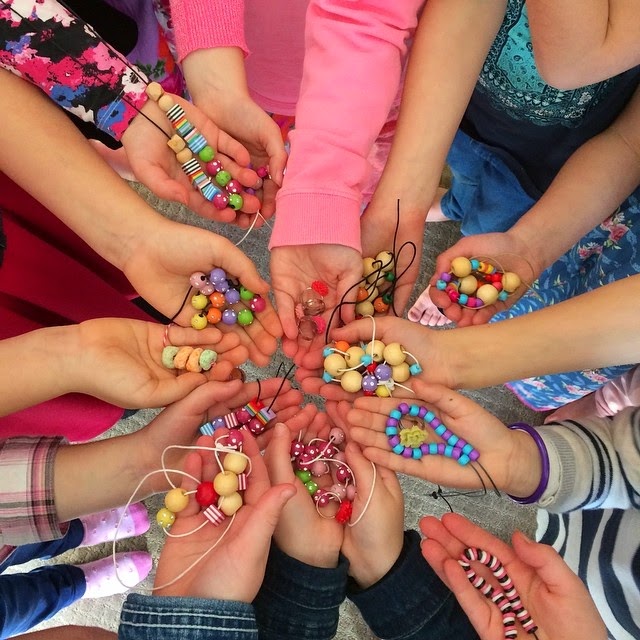
To kick things off there was a birthday party on the weekend with her school friends and a couple of cousins. We had 13 little girls here and they were so cute and lovely to have around. We decided on a “make your own jewellery” themed party and thought it would be fun for the girls to do some crafting together.
This free printable from Willowday was perfect to set the theme for the invitations. 
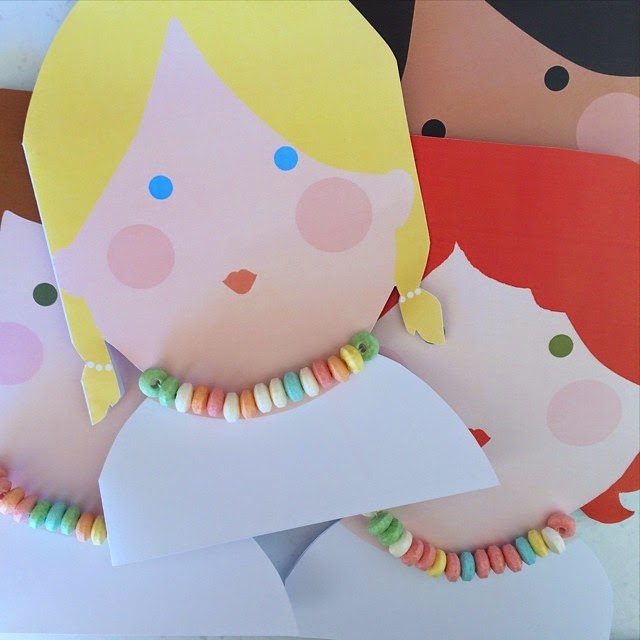
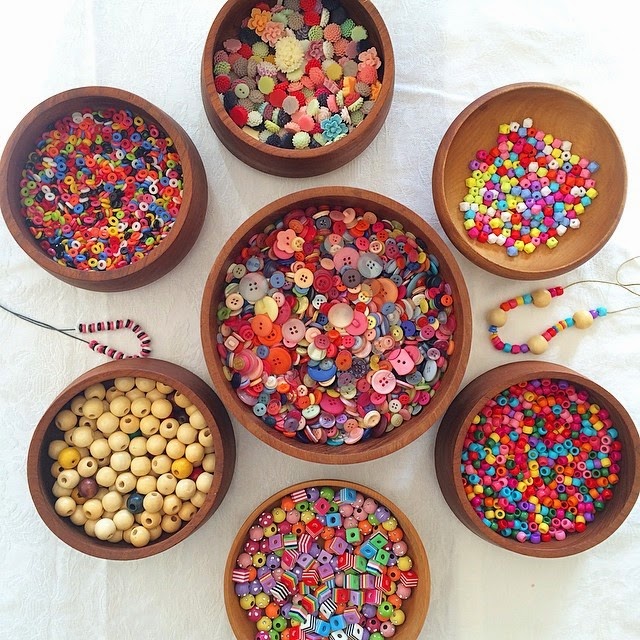
I set up lots of beads, buttons and jewellery supplies on the table and after a game of pass-the-parcel the girls sat and made necklaces and rings. I also had a bowl of fruit loops with some twine to make an edible necklace – which was more popular than the beads! The girls didn’t spend as much time crafting as I thought but didn’t want to play any more games and were happy just playing together and snacking on party food for the rest of the time.

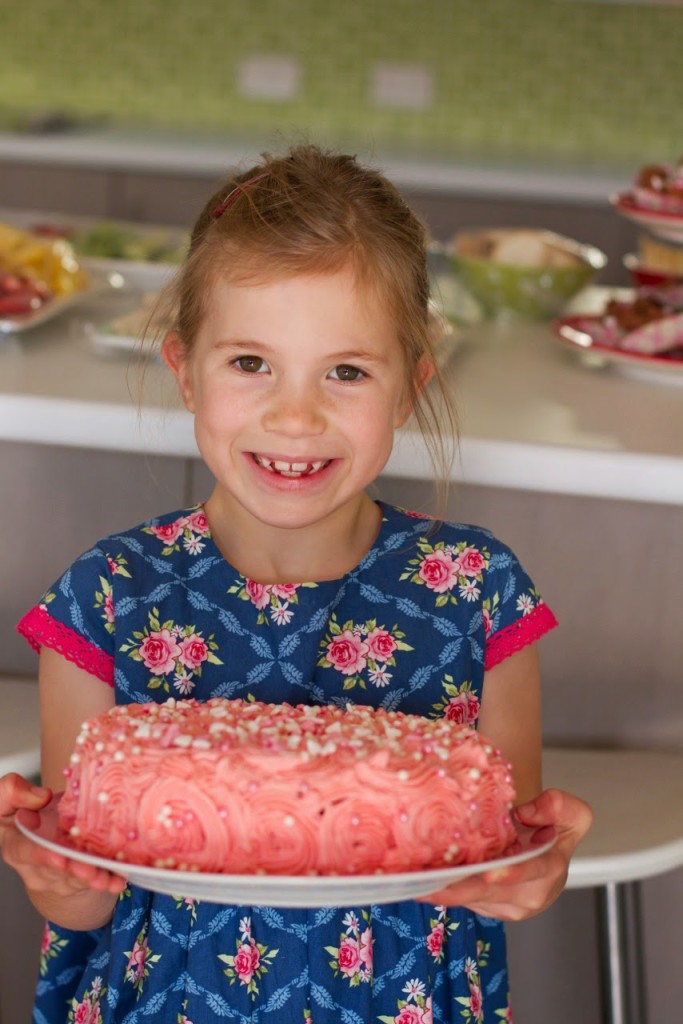
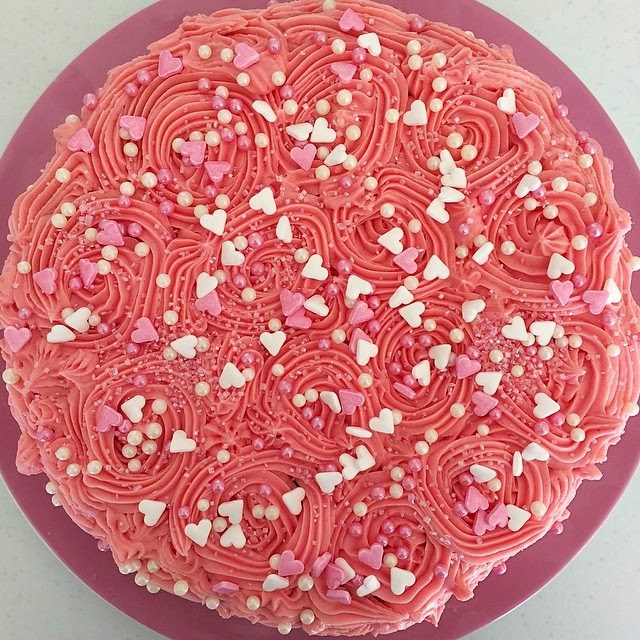
Lil wanted a strawberry cake so I made her a very pink cake (mixed a packet of strawberry jelly crystals into a butter cake) and swirled icing “roses” with a piping bag then Lil sprinkled hearts, pearls and coloured sugar over the top.

We always have a cake for Sunday night family dinner at Mum and Dad’s house and she wanted more strawberries so I went crazy with a quadrupole layered sponge filled with strawberries and cream to feed the troops. Yummo!
 
And that wraps up another birthday in the Coward family!
 
BIRTHDAY DRESS SUPPLIES:
Make It Perfect, Wonderland pattern
Tilda Rosalie in deep blue
Pink crochet lace trim
Hero Vest, Make It Perfect

.A little girl Hero Vest.

For niece Nancy’s birthday this year I made her a Hero Vest.
Still one of my favourite kid patterns. Layering is the way to go when it’s cold outside and the Hero Vest is great for keeping kiddos warm, while still giving them room to move.

This Hero Vest was made using some light purple jersey I bought ages ago from Crafty Mamas (I can’t remember any other details about it now!), lined with light grey polar fleece from Lincraft and the pockets are lined with some interlock I bought from Spotlight a few years ago. The ribbing is also from Spotlight.

Cute and cuddly, soft and warm. That’s what kid sewing should be all about!

SUPPLIES:
Make It Perfect, Hero Vest sewing pattern

Basic Tees, Make It Perfect, Spy Tops

.Spy Tops for the M’s.


One of the many perks of having a big family is that there are always plenty of children around to test pattern sizes on! When I was writing up the instructions for my Spy Top variation of Basic Tees, I made some for my nieces in Sydney to test a few different sizes.


These two can be fussy about what they wear, so I always like to check with them first and make sure they are actually going to like it. Michaela, for instance, will NOT wear anything with buttons! So funny, but Lil loves getting casts-offs from Michaela when ever she gets a new item of clothing with buttons on it! I took photos of a heap of different fabrics and emailed them to my sister for the girls to choose from. Michaela liked this Peacock Love from Lillestoff. I paired it with some striped fabric that was a perfect match. Michaela turns 7 in a few months and I made her a size 7, it fits well with plenty of growing room.


Maya is a bit quirky in her choice of clothes, she always has us laughing with her unique style and doesn’t care what anyone thinks about it! She has been fox-crazy for a long time and choose this fox fabric, also from Lillestoff. It was a tricky one to find a colour to pair it with, I had red in my cupboard but thought it might look a bit too Christmasy with lots of red trim. I ended up going with a light grey Robert Kaufman Laguna knit.
 

Maya is only 9 but I made her a size 10 because she prefers less-fitted clothes. She is a skinny little thing (wears a size 7 in pants!) so I could have cut the waistband a bit smaller to bring the waist in a little bit. She requested a photo with her beloved “Foxy” toy that has been a favourite of hers for as long as I can remember! Thanks Carli for snapping these pics of your beautiful girls, it’s handy to have a photographer in another state! x

I’m looking forward to seeing some of your Basic Tee Spy Tops creations – but I’m warning you now…once you start you will be addicted and won’t be able to stop at one! Next up on my sewing list is to make a Spy Top for myself…

SUPPLIES:
Make It Perfect, Basic Tees pattern (Spy Top variation)
Lillestoff, Peacock Love organic knit
Lillestoff, Fox organic jersey
Robert Kaufman, Laguna jersey in Grey

Make It Perfect, Poppy Tunic

.A Poppy Tunic in Nani IRO.

 
It’s no secret that I love Nani IRO fabrics. Naomi Ito, the designer behind Nani IRO is my favourite textile designer by far. I love her style, especially for clothing sewing. Everything she produces is a careful mix of pretty and playfulness and her fabrics are one of the most luxurious textiles that I have sewn with.
My favourite place to purchase Nani IRO fabrics is from Miss Matatabi. Miss Matatabi has declared the month of June “Nani IRO Month” and has invited some of her friends to help celebrate! I didn’t need much encouragement at all to join in, another excuse to sew with Nani IRO fabrics…I’m in without hesitation!
 
I’ve got a looooong list of “things to sew” (mostly made up of things to sew for myself!) and a new Poppy Tunic was at the top of the list. Poppy Tunics are one of my favourite items of clothing for layering, and I especially love wearing them when it’s cold over a pair of skinny jeans or leggings with my boots. So, I thought I would kill two birds with one stone and sew a Poppy Tunic from Nani IRO fabric.

I had in my mind that I wanted to sew my Poppy Tunic from one single fabric, usually I make them with a contrasting chest piece and hem but have been wanting to try one out with no contrast fabrics for awhile now. I also had in my mind that I wanted my Poppy Tunic to be a dark colour, which narrowed my fabric choices right down and actually made it easier to decide on which fabric I wanted to use. The fabric that I decided on is Shine Many Ways B. It is completely different from fabric I would usually select, but now that I’ve sewn with it I love it. So wearable and a lovely, earthy colour palette with enough detail to stop it from being boring. If you look really closely in some of the photos, you might be able to see that the bronze colours in the fabric are actually metallic – so cool!

This fabric is a cotton sateen…I usually pick the double gauze when I purchase Nani IRO fabrics and I haven’t sewn with cotton sateen before. I wasn’t sure how it would go but it is AMAZING! Absolutely perfect for sewing clothing with. It has a heavenly feel and drape – kind of reminds me of that soft, buttery feeling of voile but has a bit more substance to it and isn’t as sheer.


Most Nani IRO fabrics are a double gauze, which I’ve sewn with lots but there are other substrates to choose from as well – such as this cotton sateen, brushed cotton, cotton canvas and even knits! I’ve got a big pile of Nani IRO fabrics in my stash, I will take a pic and share them and my previous Nani IRO projects with you later on in the month.


I know that I will get so much wear out of this Poppy Tunic. The only thing I wish I had added to this one is pockets in the side seams because I keep looking for somewhere to hide my hands! They will be easy enough to add in if I ever get around to it anyway.

 
Make sure you keep in contact with Miss Matatabi for the rest of this month as she shares more of her friend’s Nani IRO creations (see the list below for participants). And if you make (or have made) anything from Nani IRO – or even if you just want to share a photo of your stash, then hash-tag “ilovenaniiro” to share it with us all on social media! Thanks for having me Frances, love your store and grateful for your friendship and for doing cool things like hosting Nani IRO month!

SUPPLIES:
Make It Perfect, Poppy Tunic pattern (avaliable as part of the Perfect Pattern Parcel #3 until Friday!)
Nani IRO by Naomi Ito, Shine Many Ways B cotton sateen

Basic Tees, Make It Perfect, Spy Tops

.Spy Tops Galore.


Sharing a few more Spy Tops with you today…these photos of my niece, Poppy were taken at the end of last year. She is a little cutie and has grown up so much in the last 6 months. The fabric for this Spy Top is from Spoonflower here. I purchased the organic cotton knit, which was the only knit option avaliable when I bought it a couple of years ago. They have brought out a few more knits lately though that I would be interested in trying out because the ones I have fade so much. It is a lovely, snuggly fabric to work with and wear though.


Crazy Nancy-Noo in a Spy Top I made her last year also. This one is made from Lillestoff Summer Forest Jersey – cute print, isn’t it? She is a funny little chicken and had been digging around in the cemetery and tipping water out of as many pots as she could get her hands on when I took these photos of her!


And another for Lilsy because she is almost two big for her others. This fabric is a rose print from Stenzo. She has been asking me to sew something for her in it forever and I keep changing her mind because I didn’t think it would suit a little girl but now it is made up I really like it. If you look closely, you will probably notice that the sleeve cuffs are a bit darker than the hem cuff and cowl. I only wanted light pink for the contrasting colour and didn’t have enough of one piece around to use to used two different fabrics. I could just tell you that I wanted it to look like that and you would be none the wiser though…


If you like these tops and want to make some of your own, grab a copy of Basic Tees and your favourite knit fabric and get sewing! And remember, this pattern is avaliable at a discount price until Friday, so get it while it’s cheap!!