Search results for

house tour part 2

Home & Family

.The House Tour. {Part 2. Kitchen, Dining, Lounge}.

Let the house tour continue! If you missed the previous house tour post, you can see and read all about the exterior here. Now to move into the kitchen, dining and lounge areas. I think a lot of people were surprised when they heard
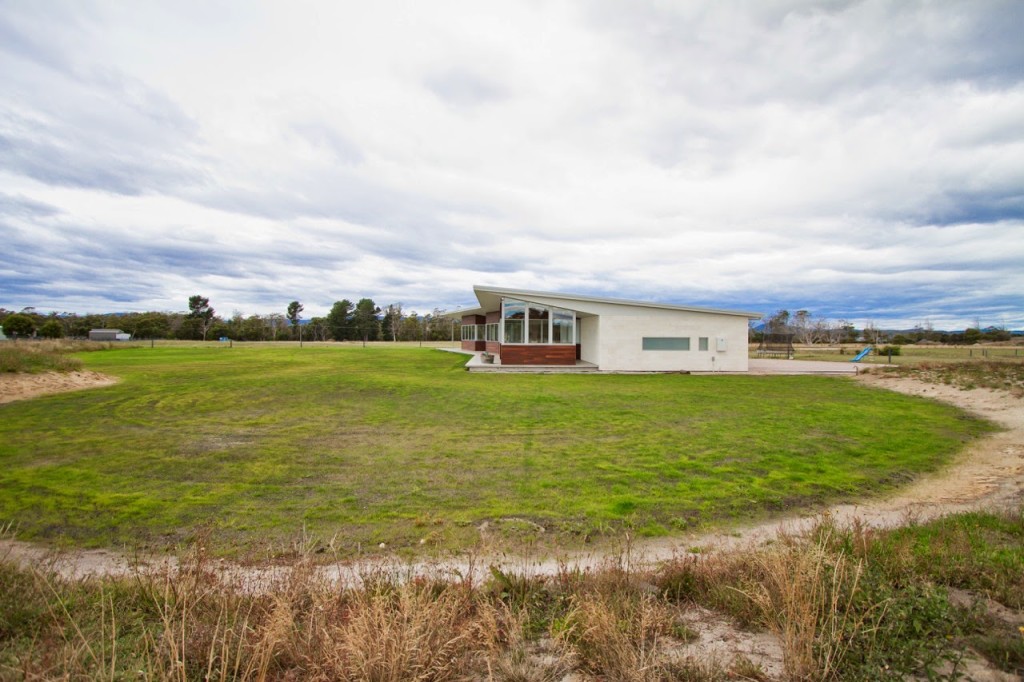
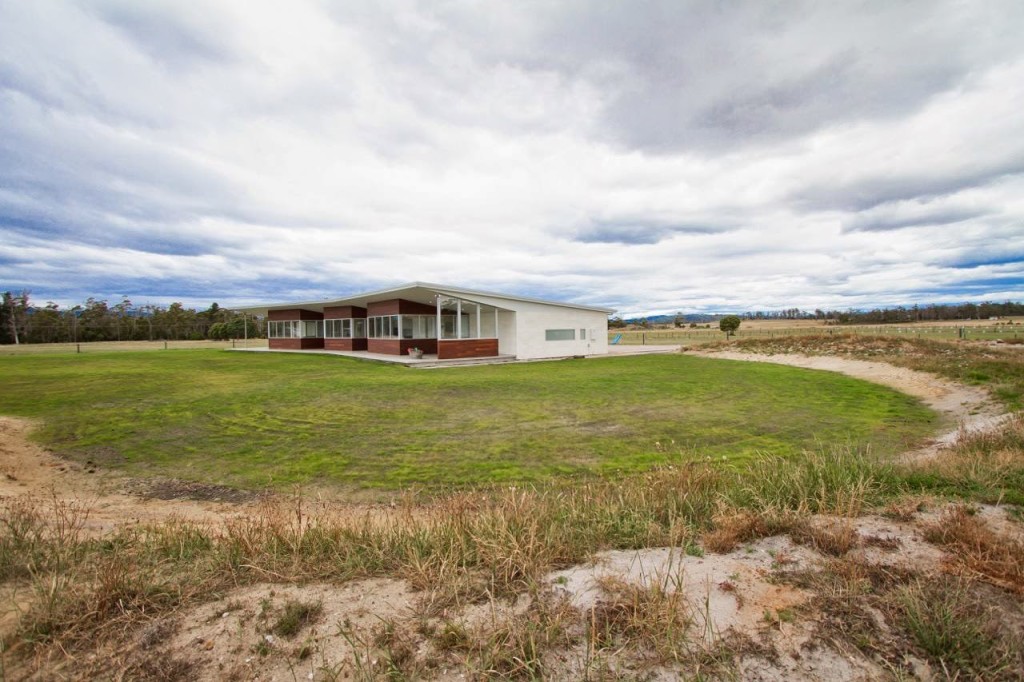
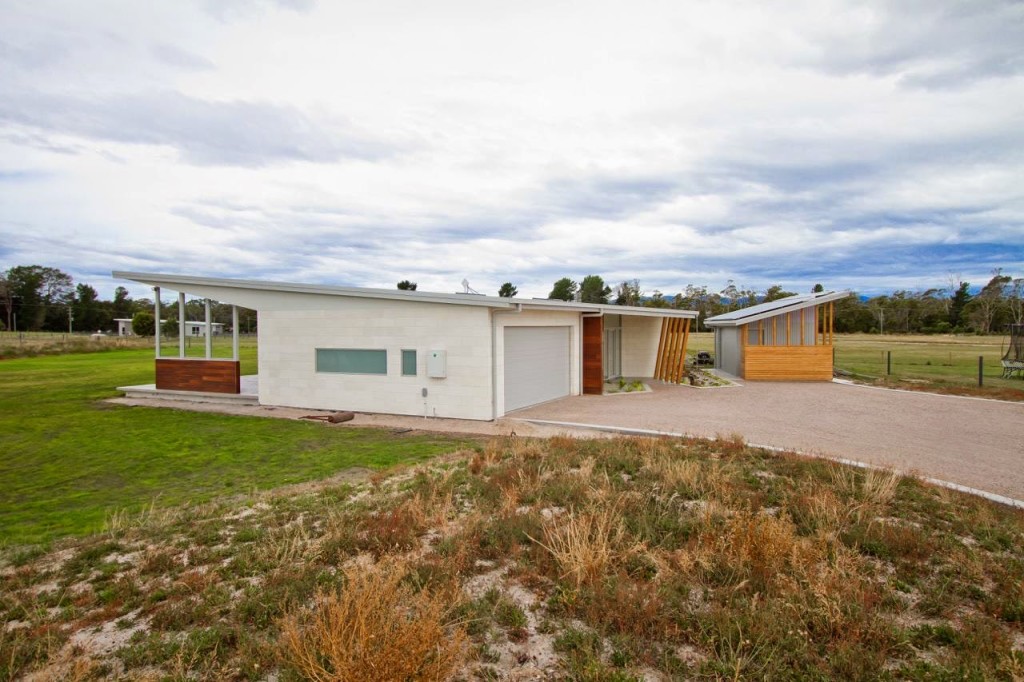
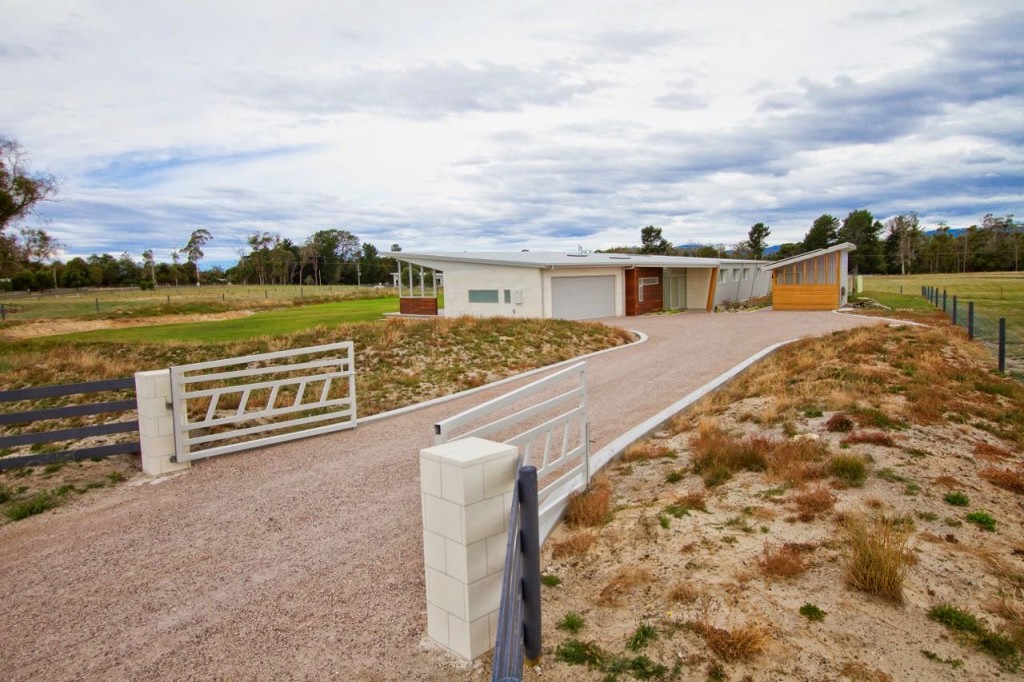
about our natural, neutral palette at the new house. The first house we built was very “out there” as far as colours go. Lime green accent walls, lime green mosaic tiles in the kitchen and bathroom, splashes of scarlet red and brown tones throughout. It was a fun house with a lot of character but we felt ready to tone things down this time around and reflect the beautiful countryside and nature surrounding us.

We decided to stick with light timber, lots of stark white and concrete/grey throughout the house. Our house has a lot of North-facing windows and is really bright and fresh, which is only enhanced by the clean, neutral design and colours inside.
 
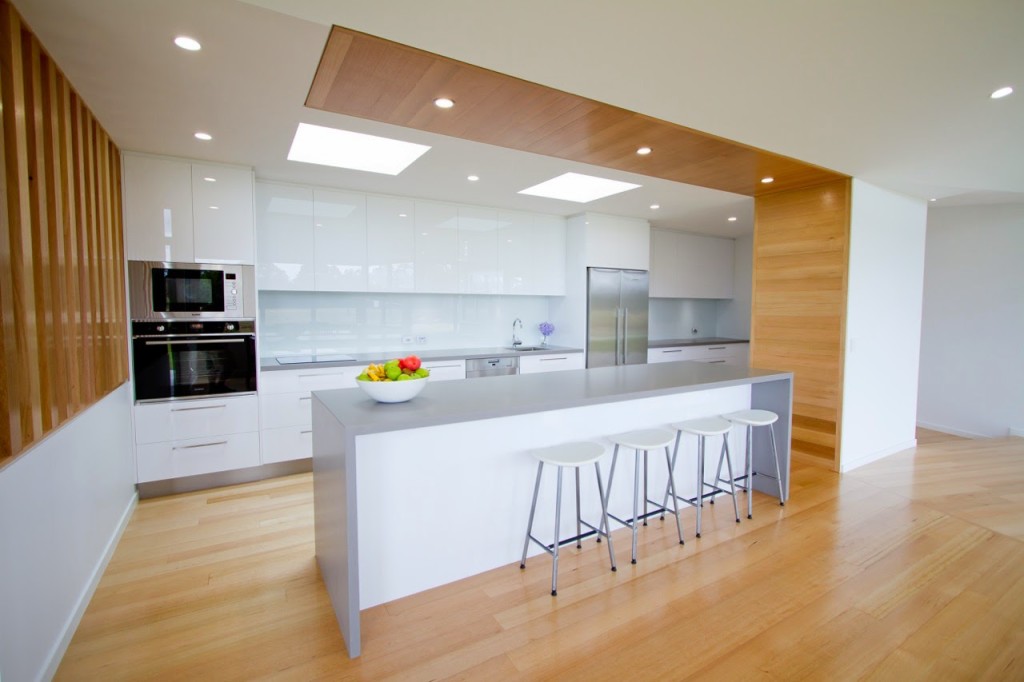
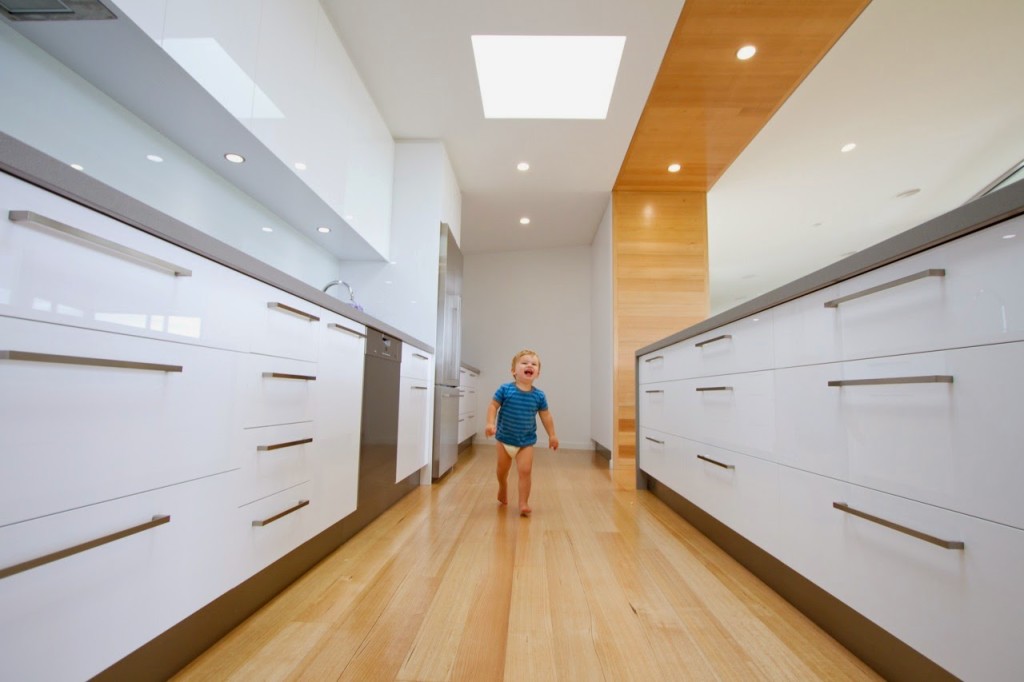
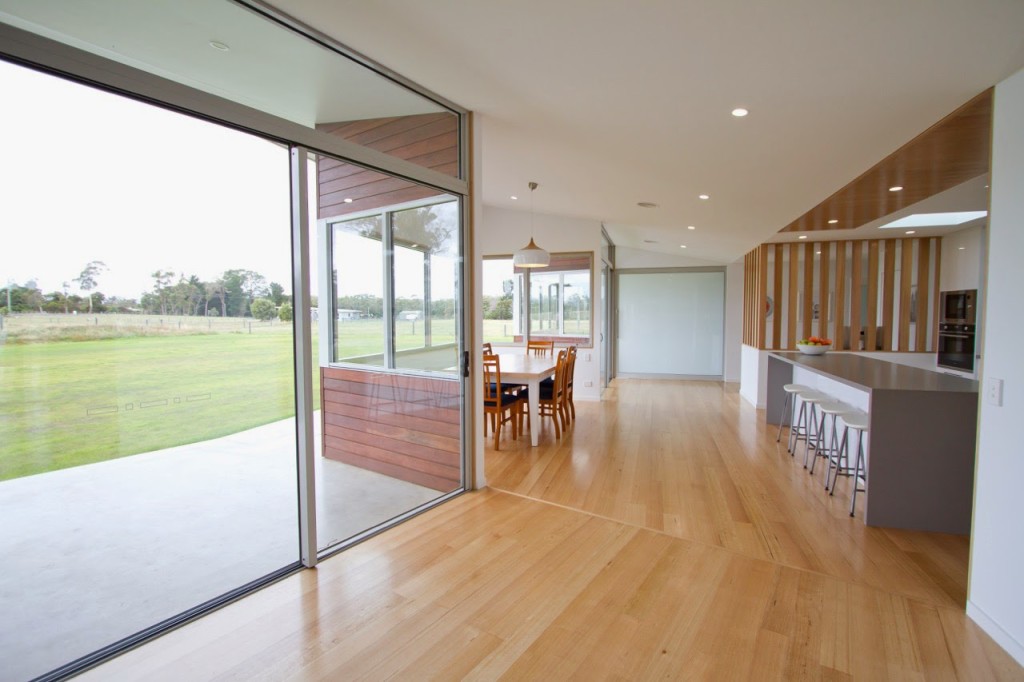
 So, here is our kitchen. Definitely the hub of the home and where I seem to spend a great deal of my time. It is right in the middle of the lounge room and rumpus room and looks out to our front yard.


We spent quite a bit of time deciding what colours and finishes we wanted to use on the kitchen cupboards, benchtop and splashback. In the end we went safe and fresh and choose white high gloss cupboards and drawers. Underneath the benchtops we have lots of drawers, which I love and above the splashback and appliances are soft-close cupboards. I’m happy that we decided to omit the handles on the cupboards as it keeps things looking nice and clean. I’m hopeless at visualising a finished space before it is actually finished and I was a little worried that the kitchen would look too boring, but I really love how it all turned out. It feels sleek and simple and stylish.

The splashback is white glass, this is the only part of the kitchen that we are not 100% happy with. It has a slight green tinge to it in some light, especially when compared to the bright white cupboards and drawers. We did think of putting timber behind glass at one stage but weren’t sure how it would stand up so didn’t go for it but if we could change one thing about the kitchen now we would have a timber splashback. 

To bring a concrete element to the inside of the house, we choose a concrete-look benchtop. It is a new Caesarstone colour called Sleek Concrete. It would have been nice to have a polished concrete slab as the benchtop but also super expensive so this was a nice compromise.

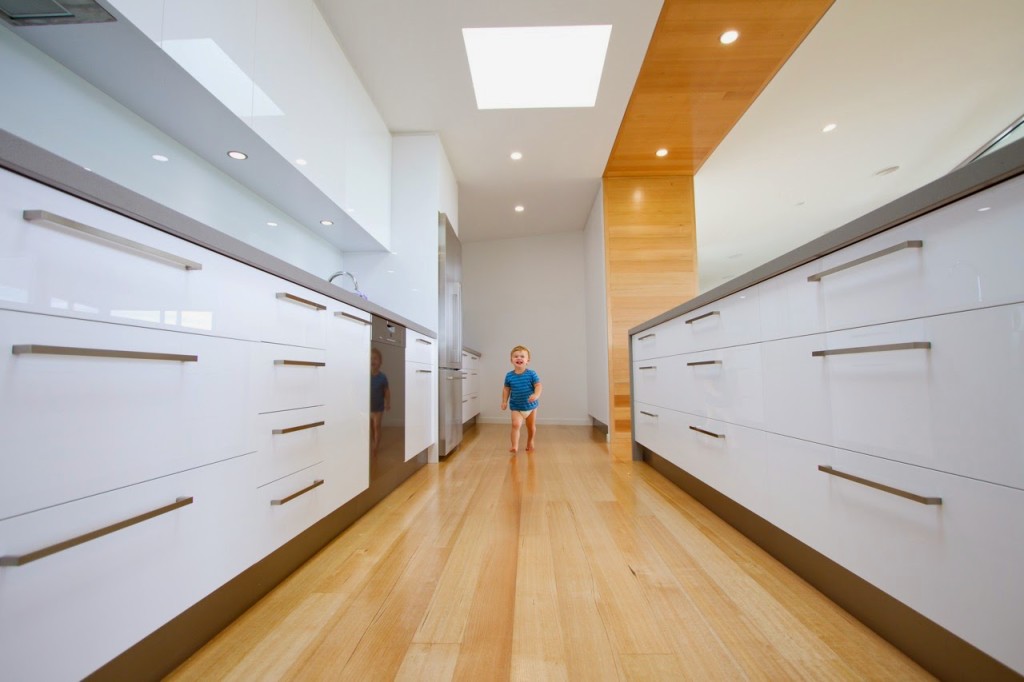
Moving onto the ceiling…we wanted the kitchen nice and light so put two big square recessed skylights in the ceiling. There are a few other skylights in the house and they are one of the best decisions we made when planning the build. They let in so much light and I love the direct sunlight that moves across the kitchen throughout the day. It is awesome standing underneath them and looking up during a heavy rain too!

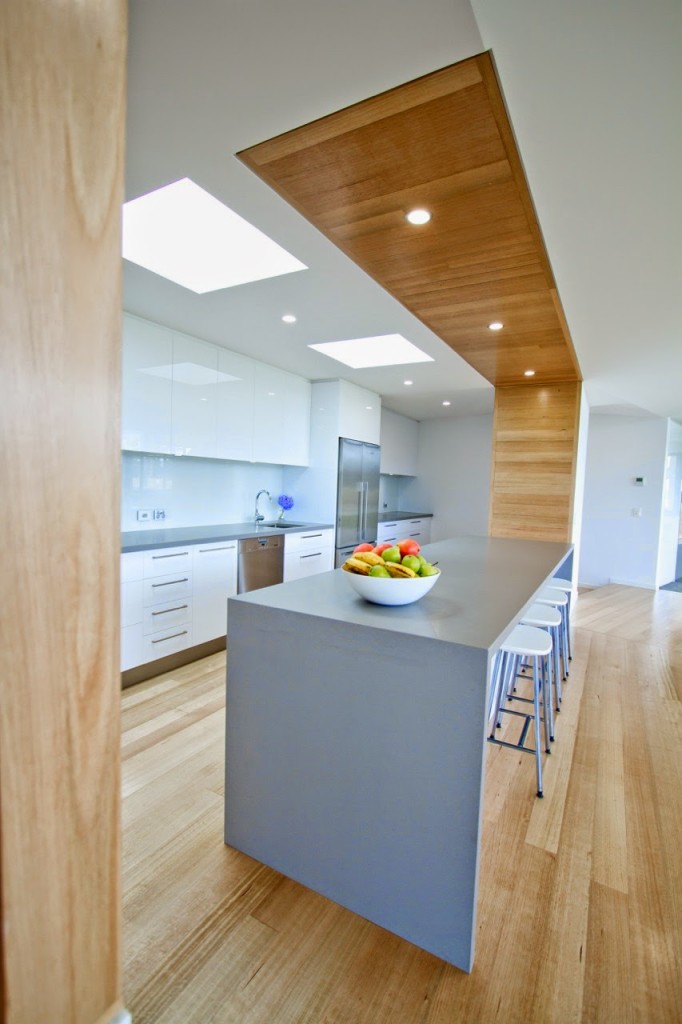
The timber running up the wall and across the ceiling is the one thing in the house that I can take full credit for…and I’m pretty proud of myself because Jaron usually comes up with all of the cool design stuff before I do! We were trying to look around for pendants to put above the island bench and couldn’t find anything that we were really happy with, then I had a thought that maybe we shouldn’t bother with pendants at all and keep the kitchen clean and streamline without too many distractions. I’m not sure where this inspiration came from but we played around with different ways of including timber in the ceiling of the kitchen and settled on this design and it really helps to increase the interest and ties in well with other timber elements in the house. All of the timber in the house (including the floors) is Tas Oak. I was really set on having a light coloured timber and wanted to stay away from high gloss so we did some research and used a Scandanavian product called Bona Traffic HD as a coating on the timber and it is awesome! It is a satin finish and makes a huge difference in keeping the floor looking clean. When the sunlight hits the floor you don’t notice any of the dust that is really noticeable on a high gloss timber floor. It also has a soft, almost waxy feel under your feet and is lovely and warm to walk on. I especially love the light blonde colour and how it is more of a sandy colour rather than dark brown, yellow or orange. The floor is so easy to clean and hardly ever looks dirty – I’ve managed to go 2-3 weeks in between washing it and you can’t even tell it is overdue for a wash! After the white gloss tiles in our old house that always seemed to look dirty and smeary this floor is a dream!

The pantry is to the right of Harvey in the back of the picture above. It feels a little hidden as it is enclosed by two big, gloss, push-to-open doors with no handles and feels like a blank wall. It has heaps of space, actually the whole kitchen has heaps of storage. Half of the cupboards above the bench don’t even have anything in them yet!

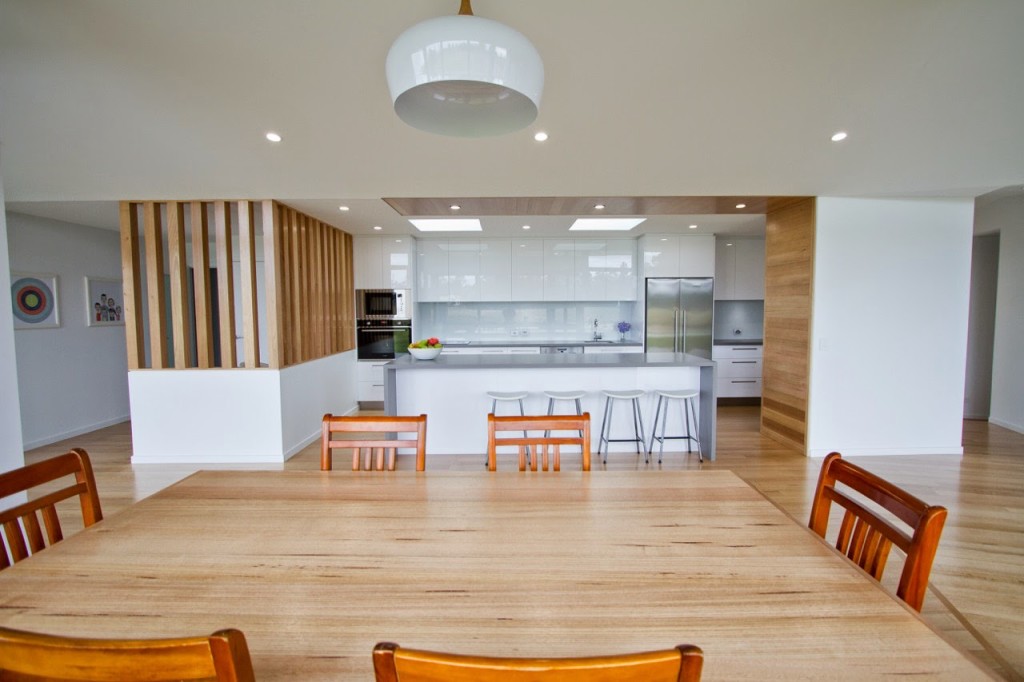
I think we are one of the few, newer houses that doesn’t have a sink on the island bench. It is just something that I have never wanted in my kitchen. I would rather have my bench clutter-free, ready for kids to sit at or people to eat at or a place to serve food and not have to worry about water and taps and dirty dishes getting in the way. 

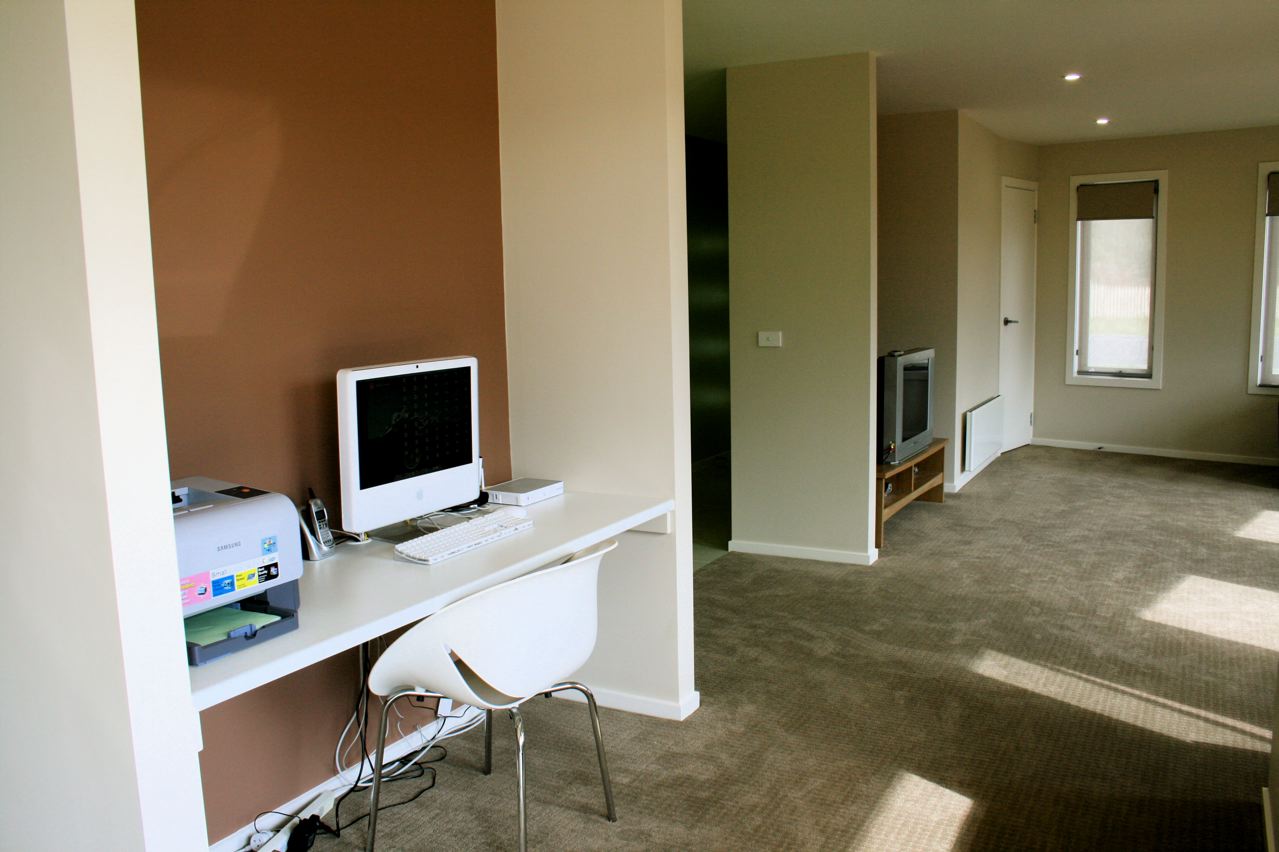
You can see in the photo above the timber posts screening off our computer nook. This area works really well. It means that the computer is still in the busy part of the home, I can always see what is going on or be close to everyone when I am using it, but also has it’s own space. 

And here it is looking from the rumpus room. That door to the left of the computer desk is for storage. The computer desk is a grey laminate – it looks almost identical to the Caesarstone benchtops in the kitchen but a fraction of the price.
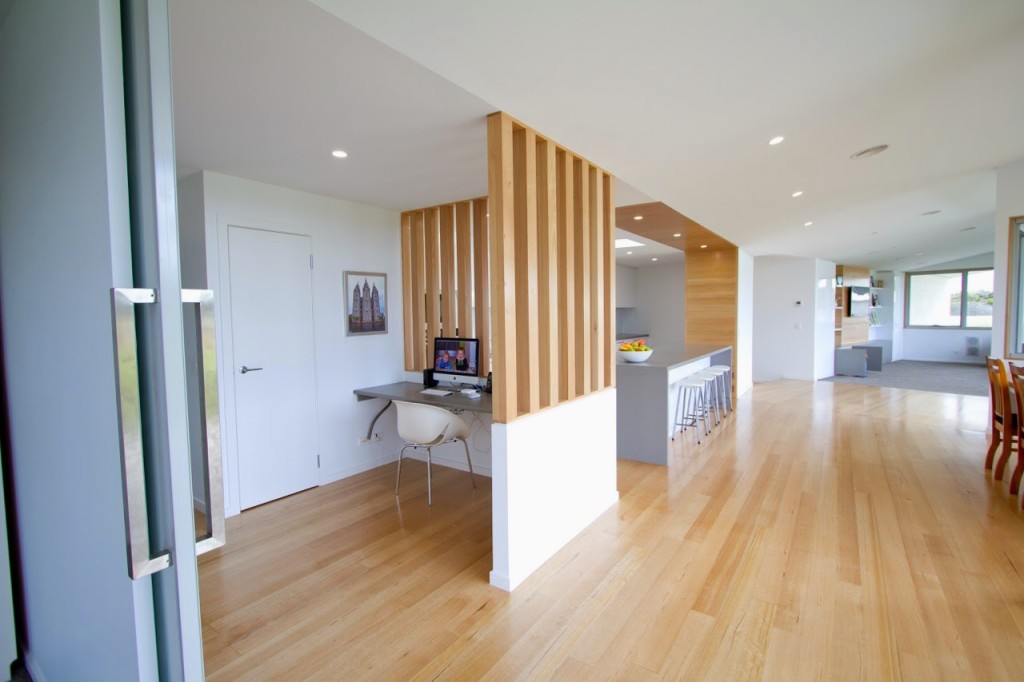
The dining area sits directly in front of the kitchen. I love the pendant light that we choose to put here (there is another identical one in the entrance) the white gloss and timber suits the house perfectly.

Our dining set is a work in progress…the table was the same colour as the chairs a few months ago. Jaron painted the legs white and used left over timber from the floors to make a new tabletop. So much nicer than what we had before and it only cost $60 and a couple of nights work! Now we need to paint the chairs white and cover the seats with something. Not sure what we will use yet…I have been looking for a grey oilcloth but haven’t been able to find anything that I really like yet (any ideas?) but am also wondering if I could cover them with some leather. Not sure how the leather will go with milk spills and wiping up food though so will have to do a bit more research.

And the last area to talk about for today is the loungeroom…

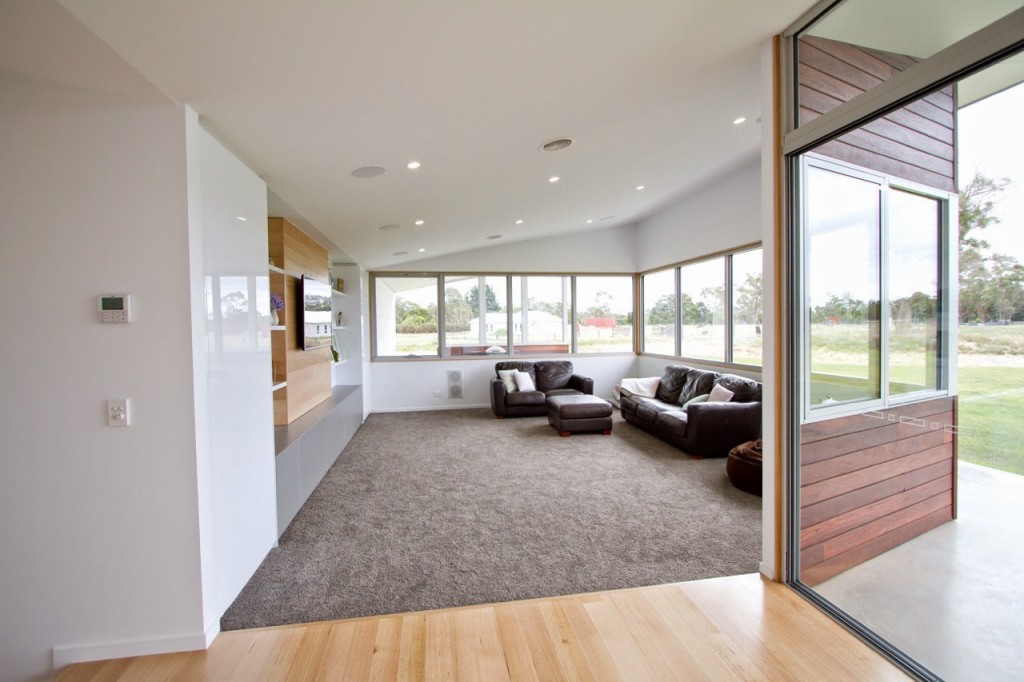
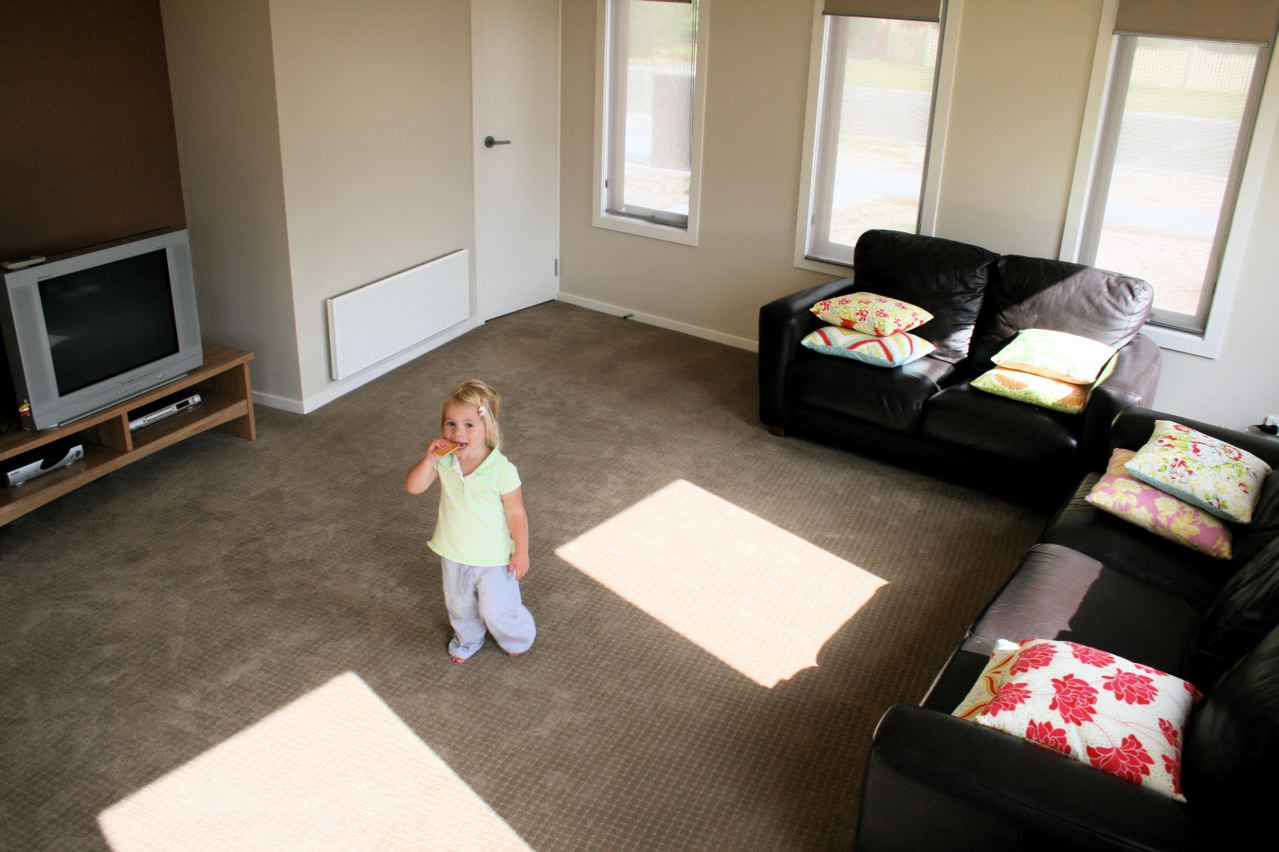
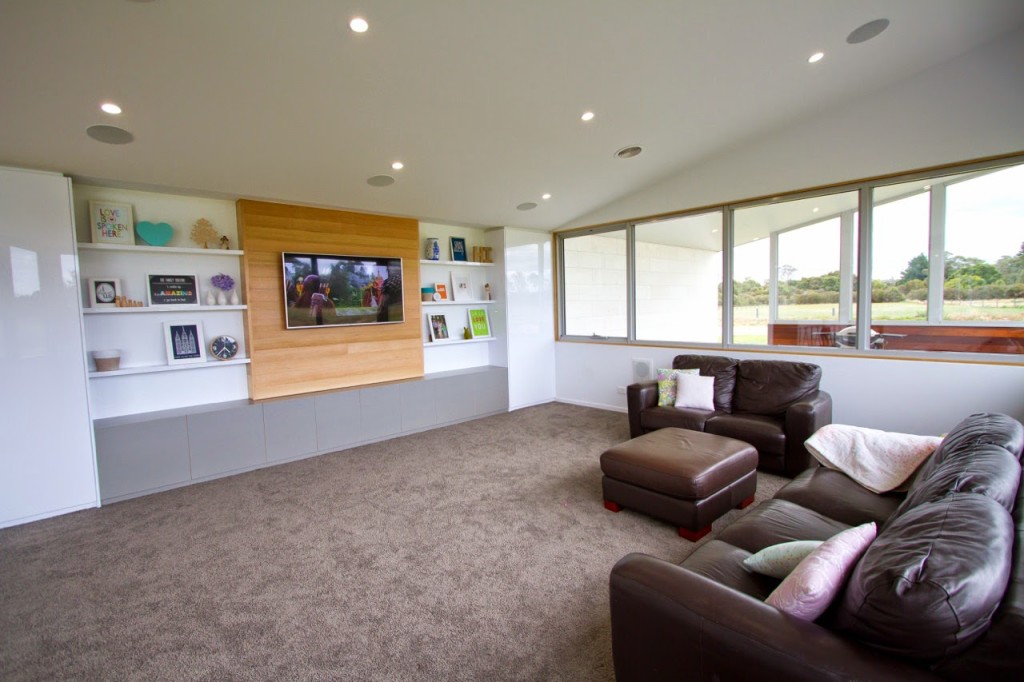
The loungeroom is still a work in progress – we eventually want to get a new couch that suits the space a little better and the display shelves are ever changing and I really need to make some new cushion covers but I’m taking my time with the decorating of this room because we also spend so much time here I want to get a feel for the house first and see where it leads me!

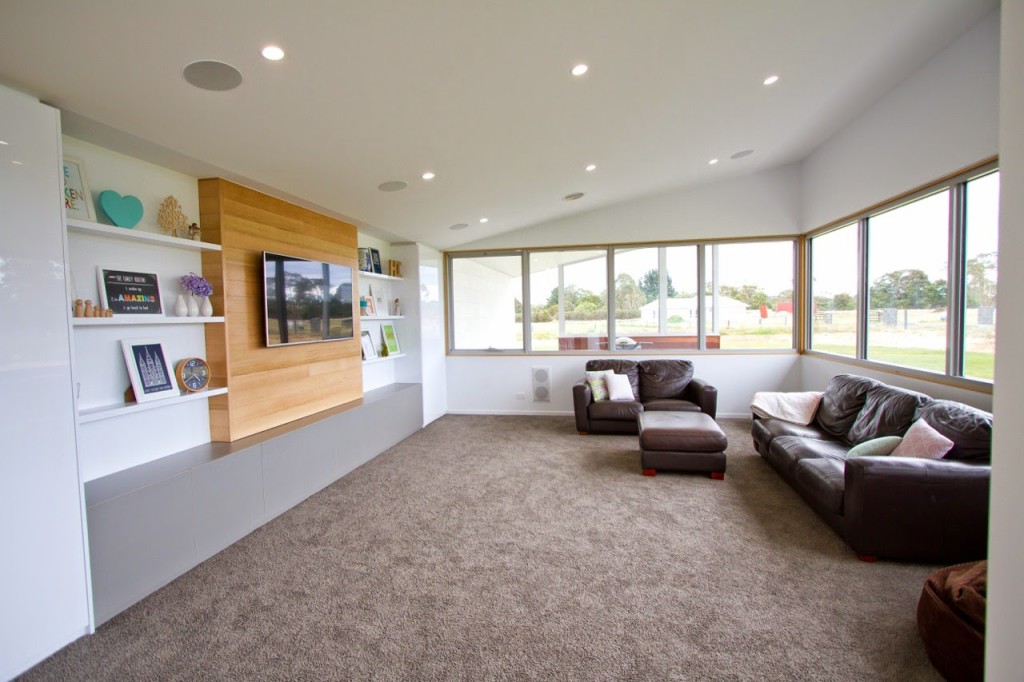
I had some Ikea shelves next to the TV in our old house and I loved how I could display photos/prints/knick knacks and easily change them around without committing to holes in walls. Because we knew it worked well for our style we had the joiner build us in some white gloss shelves either side of the TV for this purpose. It was nice to have somewhere easy to start decorating when we moved into the house too.

The timber paneling in between the shelves is the same Tas Oak as used in the kitchen. We wanted something to give a bit of warmth to the room so that it just didn’t look like a TV on a white wall and it carries on with the light timber theme we have going throughout the house.

Either side of the shelves are two big white gloss cupboards to use for storage – the one on the left is for books and the one on the right has board games, kids drawing stuff and is predominantly used for media – the DVD player, top box, amplifier and receiver are hidden away in this cupboard. Jaron’s big dream was to have surround sound in the loungeroom and he won (I wasn’t keen!) so this is where all of his stuff is kept out of view! The grey bench underneath the TV and shelves is also made up of a heap of cupboards too for extra storage (and at the moment they are all empty except for a few puzzles and kids books in one of them!)
We used the same paint colour throughout the whole house – on all of the walls, trims and ceiling. It is Vivid White half strength Dulux Wash & Wear 101. This was another risk we took that paid off – we really wanted stark white walls to contrast nicely with the timber and grey elements of the house. So many people tried to talk us out of it and said that it would look too cold but we love it and I’ve discovered a great way to wipe dirty finger marks off without leaving any smears – I’ll share it next time because this post is getting too long!

Not sure if you can really tell in these photos but all of the windows in the loungeroom, dining and rumpus room have Tas Oak timber reveals with a shadow line around them. To tell you the truth, I didn’t have a clue what Jaron was talking about when he said he wanted to do it but I love it and once again, it brings in a subtle timber element to all of the rooms.

The carpet we used throughout the house was something that we splurged on. It is Providence Sublime in Fog and is super soft and thick and luxurious. I figure that we sit and lounge and walk barefoot on the floor constantly so it was worth forking out a bit of extra money for. Plus it was one of the only carpet ranges that we could find that made a real stone grey colour, most other greys were too blue or too brown but this one works just right with the rest of our colours.

And this is what you see when you look back at the house from the loungeroom. That big opaque sliding door at the end is the rumpus room and my sewing area but it was a big mess on the day we took photos so I’ll save those for another day!


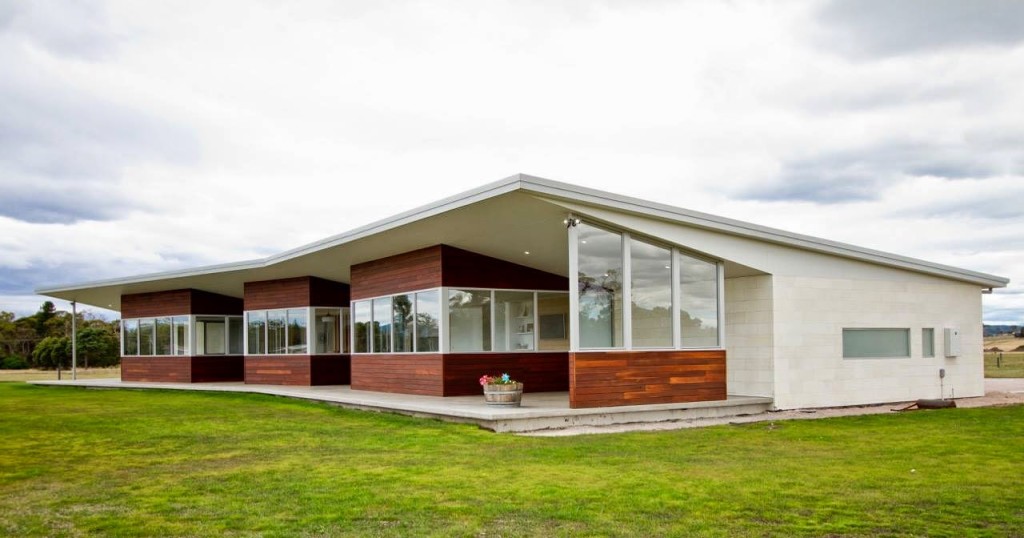
 And if you’re a bit clueless with visualising things like I am, here is another look at the floor plan so that you can make sense of how these rooms fit together with each other and the rest of the house!

High 5 to you if you stuck with me for this loooong post! I better save the rest of the house for another time!

Home & Family

.The House Tour. {Part 1: Exterior}.

We have been living in our new house for 3 months now and I’m ready to start sharing some pictures of where we live! You can click on these links to see some “before” and “during” shots if you are interested. And here it is – all finished and lived in! Today I will share some pictures of the finished exterior of the house and will move inside next time. Jaron (Starbox Architecture) designed the house (the designs went on foooorever…and he has already started getting ideas togther for our next one!) and it was built by LAW Constructions.
Our block is just over one acre. Towards the end of the build, we had a digger and bobcat come in to level off the yard and create a circular bank around the perimeter of the land. It looks a bit scrubby at the moment with LOTS of weeds to get rid of and years worth of landscaping to do but has great potential. 
Another benefit of the bank surrounding the yard means that we have a head start on screening and privacy as the bank sits about 1m above ground level so anything that we plant now will already be sitting higher than the yard. Plus, it looks pretty cool – once the grass has grown and thickened up we are going to enjoy some fun footy, soccer and cricket matches out there!


The grass has been a big job for us. Before we moved in we got a heap of topsoil delivered, but unfortunately we lost a lot of it in crazy high winds that we experienced a few months ago. Before sowing the grass, we installed some underground irrigation. The system is automatic so Jaron sets the timer for when we would like the grass watered and the little sprinklers pop out of the ground and turn themselves on. I wasn’t too keen on the system when we were getting started, but can now see that it was well worth the investment with the time and effort we are saving by not having to move portable sprinklers around the yard all day just to keep the grass wet! Our soil is pretty rubbish out here – we are basically living on a big sandpit! It is actually awesome because no matter how much the kids dig and roll around in it they don’t get dirty but not so good for gardens and lawns. Our grass is slowly getting there, but it is going to take a lot of work to get it to where we want it. I’m obsessed with weeding and head out for a little while every day pulling weeds but it’s amazing how much faster and stronger they grow than the grass! Because of the sandy ground, any time we want to plant anything we have to fill the area with potting mix first.
This is what you see when you come up our driveway. The main entrance to the house is actually at the back – although we still call it the front door! A few years down the track we hope to finish the driveway with hotmix, but compressed gravel is doing the job for now. We waited awhile to get the block fully fenced (it was included with the land) and I thought it was going to be such a relief when everything was finished so that I could send Harvey outside to play on his own…only to discover that he could squish is way underneath the fences and escape! We are very lucky to be only one of two houses in the subdivision so it is a very quiet street and can let the kids ride bikes and play anywhere they like without worrying about cars or people that we don’t know hanging around.
Here is a close-up of the entry. Jaron’s office is behind that timber wall. This works great because when he has clients come and see him they walk straight into his office and the rest of the house goes unseen. There is even a separate toilet right next door for them to use. One of our priorities after moving in was to eliminate the amount of dust, sand and dirt being blown and walked through the house. The garden at the entrance was one of the first things we did after the grass and we planted it out with daphne bushes, kangraoo paw, jelly bean succulents and some hearty grasses then finished it off with a medium sized stone covering. It’s amazing how much cleaner the house stays when there is grass and garden keeping the dirt at bay. 

Let me try and list all of the exterior materials here in case any of them interest you. The big feature of the house is the timber wrapping around the front and a little at the back of the house. Originally we wanted to go for a grey colour, but ended up choosing a more natural brown colour, Spotted Gum from Woodform Architectural. The original colour of the timber was exactly what we wanted and then when it was stained it turned darker than we had hoped. We still like it, but are happy that the colour will fade with time and then we will coat it with a clear stain to retain the lighter colour. The ends of the house are clad with South Australian limestone from Limestone Australia. The roof and slanted wall at the back of the house are Colorbond Custom Orb in Shale Grey colour. And the window frames are all Shale Grey colour too. At the entrance of the house, you can see slanted timber posts which are laminated Tas Oak.


The building to the right of the house is a shed with Tas Oak timber posts and slats to screen air conditioning external units and wheelie bins. The shed roof is also clad in solar panels.

I think I’ve covered everything and will try and write a post in the next few days about some of the interior of the house!


Home & Family

.House Tour { Part 3. Bathrooms & Laundry}.

Time for another house tour post! If you missed them, the first two posts are here and here.

So, I thought I’d show you around the wet areas today – bathrooms & laundry.

In the first house we built, I found choosing tiles to be such a nightmare. We went tile shopping every Saturday for 6 weeks until we finally settled on something! This time around though, we knew exactly what we wanted and our tile shopping lasted less than 1 hour!
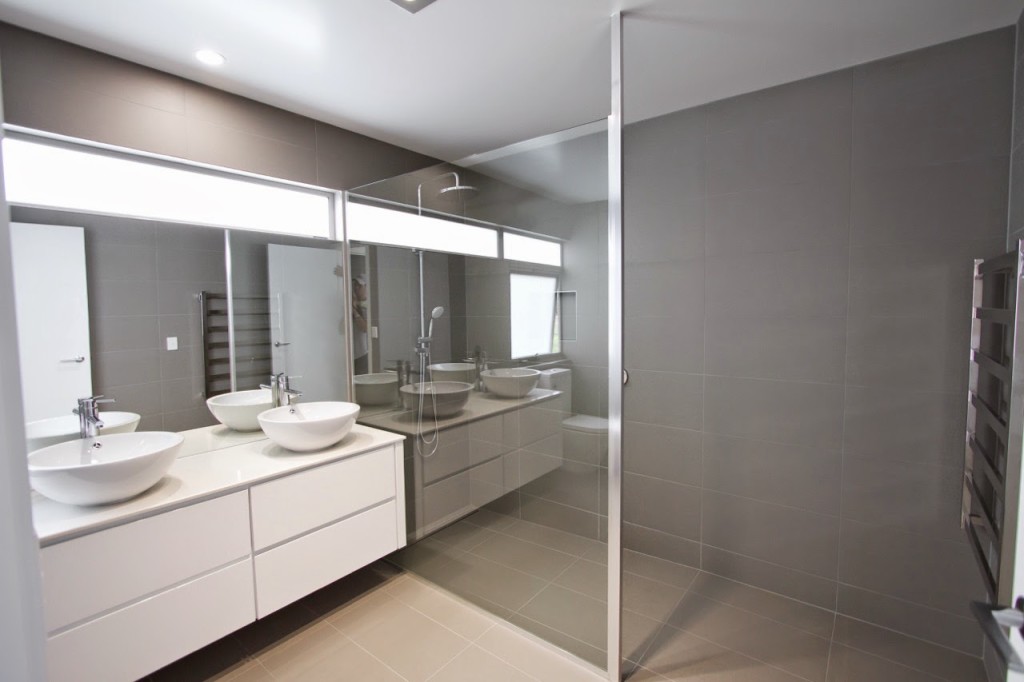
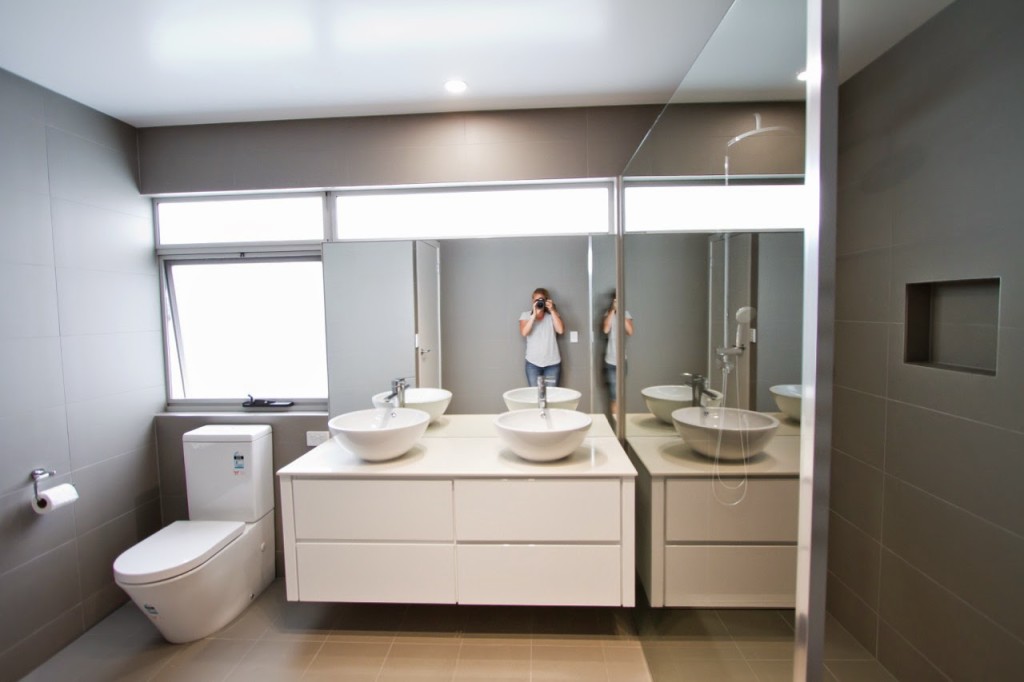
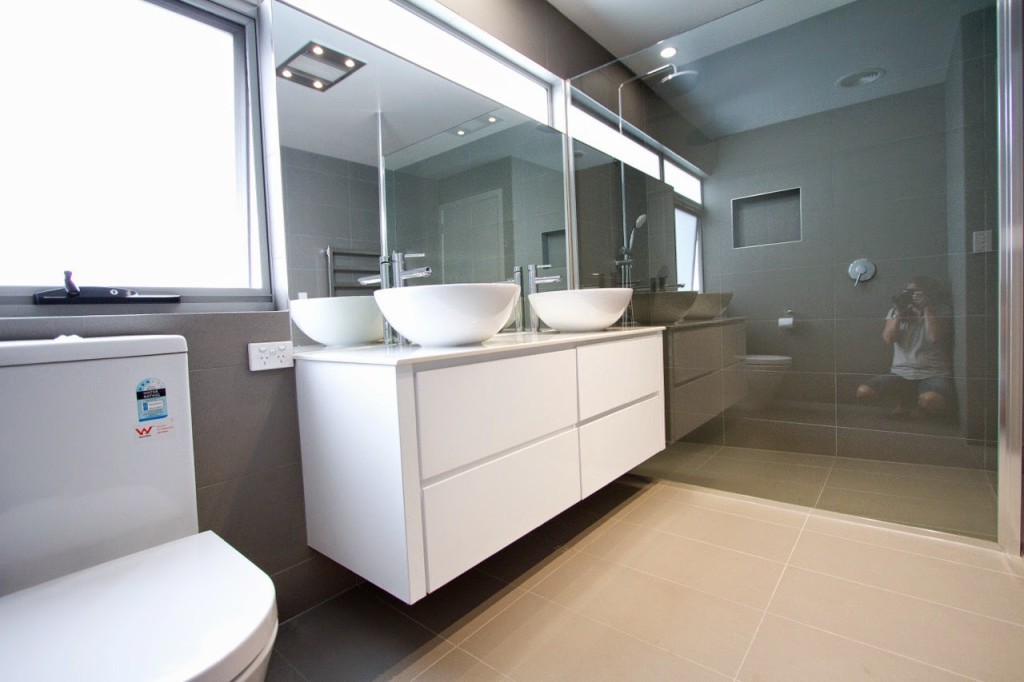
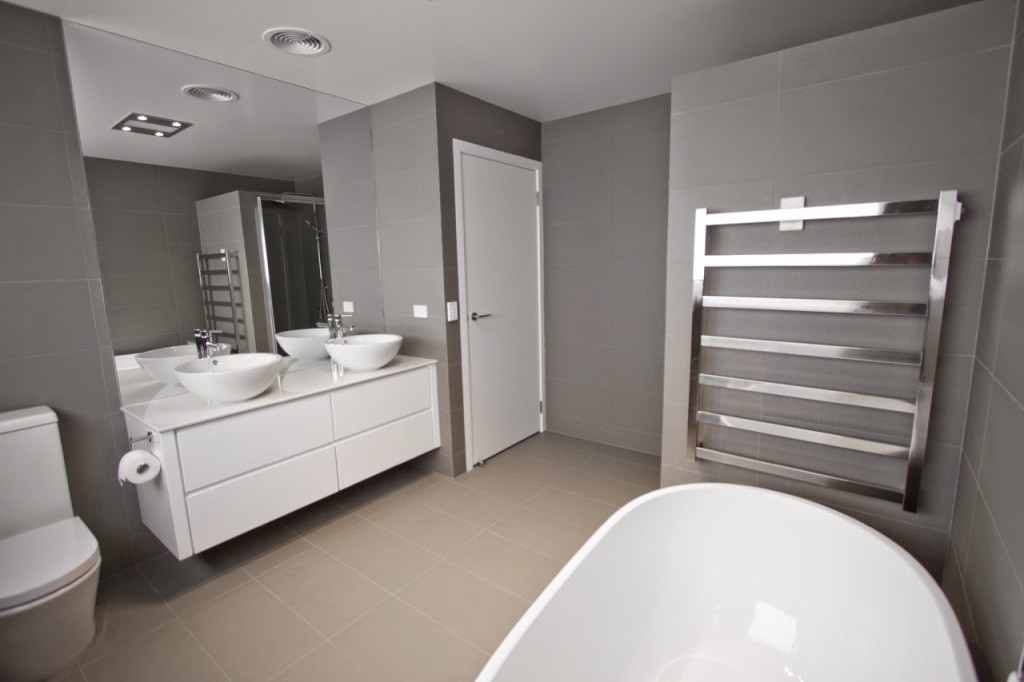
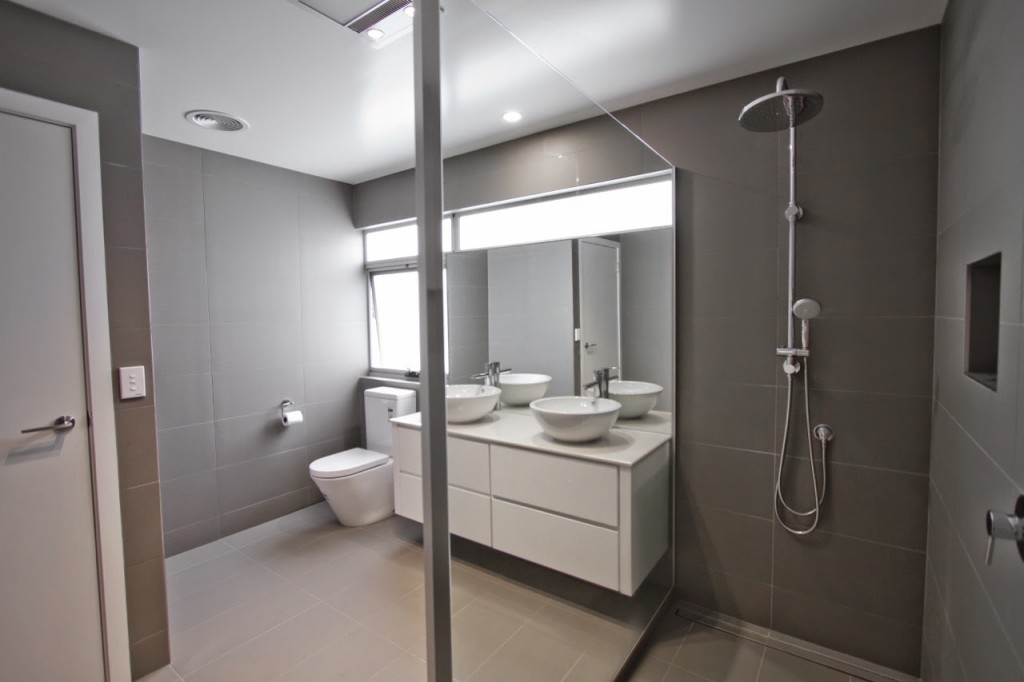
This is our ensuite. For the tiles, we choose a matte-finish grey rectangle tile and used that one tile everywhere – floors and walls right up to the ceiling (that’s why our tile shopping was so fast!)

We wanted to keep the bathrooms uncluttered, simple and open and using a single tile helped to achieve that. I always thought that showers like ours in the ensuite with a single panel of glass and no door would be cold and draughty. Now that I have been using the shower for awhile I am completely sold though. I don’t find it cold at all and cleaning the shower is a breeze. After the tiles are dry, I vacuum the whole bathroom (even into the shower) then mop the entire floor. Cleaning the tiles and shower area is really easy because there aren’t any grooves or edges on the shower door or surrounding frame, so it is really just a quick wipe down and scrubbing in the grout if needed. Then the glass is just like cleaning a big window. Bathroom cleaning is one of my least favourite jobs but this shower makes it a little bit better!
Another thing I really like about having matte tiles in the bathrooms are that they dry super fast. An hour or two after having a shower the tiles are completely dry in the bathroom – including the ones in the shower. The great thing about this is that it means that water isn’t sitting on the tiles, in the grout and the corners of the shower for as long and reduces the amount of grime and scummy buildup in the shower. I have been pretty slack at cleaning the showers in this house for that reason – they hardly ever get dirty or grimy because the water dries so fast. Big win!!!

 The kid’s bathroom is pretty similar to the ensuite. We used the same vanity, basins, taps and shower heads. This bathroom has an enclosed shower with a door though (not as fun to clean! In hindsight, I probably would have done the same shower as in the ensuite) and the addition of a big bath. The kids love it.

In our old house we had a heated towel rail in the bathroom and got them again for this house. It is so nice to have warm, dry towels in the middle of winter. Some days it can be so cold and dull that the towels don’t even dry between showers and there is nothing worse than trying to dry yourself with a cold, damp towel after the shower! It’s a little luxury that we love now!

And lastly, this is the laundry. We kept things all white in the laundry to help give a sense of cleanliness…because the reality is that my laundry NEVER looks like this! There is plenty of colour and texture introduced in baskets and piles of washing waiting to be washed, folded and ironed!

Because the laundry is an internal room with no windows to the outside, we decided to put a big skylight in the roof. It makes such a difference to an internal room to have a shaft of light and sunshine flowing into the room.

The laundry has cupboards galore – the top ones are hardly even filled up yet. But it is such a great feeling knowing that there is plenty of room to store everything in the house. The tall cupboard on the right is great for keeping mops, brooms, etc.

You can see the window to the left of the room which looks into the garage too. We did that to let in a bit more light and open up the room some more. 

The floor in the laundry is polished concrete. Again, a really easy flooring to keep clean.


It’s taken me 3 months to get this far in the house tour so by the time we have been in here for a year maybe I will be finished!!! Stay tuned!

Home & Family

.Our NZ holiday – PART 2.

Feels a bit silly to be blogging about Christmas in the beginning of February…I think I’ve lost my blogging legs 🙂
 
This was the first Christmas that the kids had spent away from home, but after reassuring them that, yes Santa WOULD know where they were, they were as excited as ever!  
 
Christmas Eve was spent doing last minute shopping, some swimming at the beach and lots and lots of cooking.  We had a delicious gourmet BBQ for dinner, followed by the traditional Christmas pav – laden with fruit and ferrero rocher chocolates…YUM! 
Nana and Lil shared a special Christmas message for us, complete with one beautiful little angel.
And as always, the reindeer food was a hit with the kids.  First Tommy and Lil scattered it around, then Oscar came by later on and divided it into 9 little piles – one for each of the reindeer.

Christmas morning came (and not quickly enough for these excited kiddos!)  We opened presents from Santa before church, then went to church for an hour and listened to some very uplifting and inspiring messages.


The rest of the day was spent opening presents, eating way too much delicious food and hanging out together.


We enjoyed a family walk along the beach in the evening, a perfect way to finish a lovely day.


Basic Tees, Make It Perfect

.MaaiDesign Blog Tour.

IMG_9358IMG_9347IMG_9338IMG_9369IMG_9367

Today I am taking part in the MaaiDesign Blog Tour.

If you aren’t familiar with MaaiDesign and you love high-quality, affordable fabric then you need to be! MaaiDesign is a fairly new online fabric store started by Maaike, who grew up in Belgium and now lives with her family in Australia. Maaike has put together a beautiful fabric store which specialises in a unique range of European fabrics – both knits and wovens. I have had a lot of experience sewing with European fabrics and if you have been following my sewing ventures for awhile, you will know that I am highly fond of them.

The knits I chose from MaaiDesign are right up there with the best I have sewn with. The fabric has amazing stretch and recovery and the colours are super vibrant. I was extremely impressed with the quality and they were so easy to sew with.

So, my projects might seem a little ordinary but the kids are in need of new clothes because I have been in a sewing drought lately and some early winter sewing seemed like the practical thing to do!

For Lil, I couldn’t go past making her a new Basic Tees Spy Top. This is honestly one of my very favourite designs to sew for her, it is stylish and warm and comfortable so I know that she will wear it over and over again. I used this Firework Blue organic cotton jersey for the main print of the top an paired it with some light grey solid jersey I had in my cupboard. I sewed her a size 8, which I knew would be a little big for now, but wanted to make sure it would fit her for winter. 

I made Harvey a long-sleeved boys Basic Tee using Off Beetle Blue organic cotton jersey. The only variation I made to the pattern was to cut a little bit off the sleeve length and finish the sleeves hems with a folded over strip of fabric – similar to the neckline binding. Unfortunately I couldn’t get Harvey to cooperate and take a photo wearing the top. A combination of being a bit sick, tired, almost 3 and extremely stubborn! I decided to skip the battle this time!!!

To celebrate the MaaiDesign Blog Tour, Maaike  is offering a 10% discount valid until March 26th 2016, just enter the discount code maaidesign10% at the checkout and grab yourself some of these amazing fabrics!

blog tour


March 8th – Suz from Sewpony

March 9th – Caroline from Usefulbox

March 10th – Kate from Sewing With Kate

March 11th – Allison from The Tall Mama

March 12th – Suzanne from Dressed in Pretty Little Things

March 13th – Toni from Make It Perfect

March 14th – Natalie from Sew Outnumbered

March 15th – Jenya from While she was sleeping

March 16th – Nicola from Create.nic

March 17th – Shelley from Bartacks and Singletrack

March 18th – Maaike from MaaiDesign

Home & Family

.house-wifey.

Here’s the thing…running your own business and working from home is awesome.  When I started selling my sewing patterns, I never did intend to make a business of it, but over time things have fallen nicely into place and now I find myself “working” from home and contributing to the family bills.  With any kind of commitment, comes work though.  Unfortunately I don’t sit around and sew all day (ah, wouldn’t that be great?!).  Aside from the usual day to day jobs that come with being a wife and mother, I spend many hours on the computer answering emails, working out finances, writing up patterns, not to mention keeping the blog updated and things running over on Facebook.  There is lots to think about every single day.  I love it though.  If I didn’t love it, I wouldn’t be doing it.

But sometimes I miss the old me.  The me with had a baby or two at home, got bored because there was “nothing to do”, managed to take a walk every day without feeling like it was wasting precious time,  the me who would cook for the sake of it, sit on the couch and watch a bit of midday telly and read a magazine in the afternoon.  It was pretty cruisy back then!  

So yesterday I declared it “house-wifey” day.  I didn’t do anything “work” related.  I got the kids up at the bench and we cooked cheese and bacon scrolls followed by caramel popcorn together.  There was delicious chicken noodle soup for dinner and some of Clare’s scrumptious rocky road to finish it off.  Then I went with Mum to visit a sick friend.  Came home and did a bit of housework and sat on the couch and read with the kids for awhile.  I felt like I had accomplished a lot, my mind was refreshed and it didn’t matter that there were still a gazillion emails sitting unanswered and I hadn’t worked out the tricky bit on my new pattern.

Next time I’m feeling over it, I’m scheduling another “house-wifey” day – kinda like taking a sickie from work but I feel good!
Actually, today is turning out to be a bit “house-wifey” too – I’m about to turn this 10kg of tomatoes into fresh pasta sauce and stock up the freezer because after making fresh pasta sauce in the thermomix, I don’t want to eat it from a jar again.  Maybe I’ll have a go at making some relish or tomato sauce while I’m at it – yum!
 
P.S. If you used to be my friend on Facebook, sorry I ditched you.  For many reasons, I’ve been mad at Facebook lately.  Although I didn’t ever write much on my personal wall, I did procrastinate my time and have a browse around a couple of times a day when I should have been doing something else. I didn’t like how when I saw someone in real life, I wouldn’t have anything to talk to them about because I had already read it all. 
I am however, happy to keep going with my Make It Perfect Facebook page – I like the personal contact I can have with people who support me in my business and find it is a quick and easy way to get answers to questions.  If I deleted my personal account, I couldn’t keep my Make It Perfect page, so I decided to unfriend everybody and will no longer keep my personal page going.  So if you need to talk to me, lets chat in real life – or you could call me – or send me an email!  It feels good to be rid of another thing on the computer that has been eating away at my time.
P.P.S. If you are Facebook-lover, I’m not judging you…it just isn’t working for me…each to their own.
Make It Perfect

A new house!

Wouldn’t you love a brand new house just like this? Oscar does, he has been playing around in his little fort for ages throwing his balls around and reading stories! It sure beats watching the Wiggles over and over again! He is sitting in there at the moment saying “mine…house…mine…house”!!

Make It Perfect

.2 today.

The little miss of the house turned 2 today.

We have been busy with family for the last 4 days so she was very lucky to have visitors from New Zealand and Sydney with her to celebrate the big occasion!
And lots of devoted fans to laugh at all of her crazy antics.
We love you precious girl…the laughter and tears you bring into our family
…the cute as piggy tails
…the cheeky little smile
…the love of beautiful skirts and dresses – your pretties
…the obsession with your dummy
…the obsession with lollies
…the crazy tantrums
…the bossiness
…the constant “read it”
…the cuddles and kisses
xxx
Make It Perfect, Poppy Tunic

.Poppy Tunic in Perfect Pattern Parcel #3.

If you are a lover of sewing patterns, you have probably noticed the trend of buying pattern bundles for a discounted price. Perfect Pattern Parcel supports independent pattern designers by selecting a group of PDF sewing patterns and bundling them together to create a coordinated parcel of patterns – the theme for Pattern Parcel #3 is “women’s Summer wardrobe essentials.” And although it isn’t Summer in my part of the world, it’s always good to plan ahead! Actually, a few of these patterns can easily be layered for cold-weather wearing anyway. 

Pattern Parcel #3

Included in this parcel is my Poppy Tunic pattern. This is one of my very favourite me-made items of clothing to wear. It’s especially comfortable and flattering with a pair of leggings and boots for winter.

Perfect Pattern Parcel is unique in that it allows customers to choose how much they want to pay for their parcel! If you choose to pay $28 or more (which is a bargain for 6 patterns!) you will receive a bonus pattern in your parcel. The best part about PPP is that a generous chunk of what you pay is donated to a great charity (donorschoose.org) which helps schools and teachers buy educational supplies! You can see what was donated from the last parcel here.

Pattern Parcel #3 is only avaliable for 2 weeks so don’t miss out on your purchase now!

Buy Pattern Parcel #3

Parcel #3 Inspiration Tour Schedule:

Friday, May 30
Sew Busy Lizzy ||
Pienkel ||
SeamstressErin

Saturday, May 31
Design By Lindsay ||
the Brodrick design studio ||
Cookin’ and Craftin’

Sunday, June 1
Diary of a Chainstitcher ||
a happy stitch ||
Disaster in a Dress ||
sew Amy sew

Monday, June 2
Idle Fancy ||
Casa Crafty ||
Kadiddlehopper ||
Dandelion Drift

Tuesday, June 3
Our Family Four ||
Casa Crafty ||
Cookin’ and Craftin’ ||
a happy stitch

Wednesday, June 4
Lexi Made ||
The Quirky Peach ||
Stitched ||
a happy stitch ||
Casa Crafty ||

Thursday, June 5
verypurpleperson ||
Casa Crafty ||
sew a straight line ||
Sewbon

Friday, June 6
Shawnta Sews ||
Mama says sew ||
a happy stitch ||
Cookin’ and Craftin’

Saturday, June 7
Casa Crafty ||
sewninestitches ||
‘So, Zo… What do you know?’

Sunday, June 8
oonaballoona ||
A Stitching Odyssey ||
Sew Charleston

Monday, June 9
Sew Sweetness ||
True Bias ||
Ozzy Blackbeard

Tuesday, June 10
Welcome to the Mouse House ||
Sew Caroline ||
Adventures in Dressmaking

Wednesday, June 11
Peneloping ||
YoSaMi ||
sewVery

Thursday, June 12
la inglesita ||
La Pantigana ||
Sanae Ishida

Friday, June 13
Seamster Sewing Patterns ||
Paunnet

Make It Perfect

.The new house – BEDROOMS!.

I haven’t forgotten about new house pics…sharing the bedrooms today!

Everything in the house is still quite minimalist. I like the “clean” look but am dying to create some pretty spaces and wall displays. The problem is, I can’t decide what to do!! We will get there, I want to have it all thought through before I make any firm decorating decisions though.

Bedrooms are hard to photograph! Actually, all room pics are hard (for me) to take. This is Oscar and Lil’s room. Because we have the studio (sewing/playroom) then we thought we would take advantage of storing no toys in the kids bedroom. Just books and a few cute Melly & Me softies that I have made over the years. It works really well. They spend quite a bit of time in their bedroom during the day sitting together reading stories – I love it!

Tommy’s room is very sparse at the moment. I bought some new fabric last week to re-cover the fabric panels in his cot and it desperately needs a fresh coat of paint. We were thinking orange, but now I’m leaning towards keeping it white. I want to do something on the walls with the left over fabric from the cot panels – maybe canvases or framed or what??

tommy room

Peek-a-boo!

tommy

And I almost wasn’t going to show pics of our bedroom. It is really boring at the moment. We have never decorated our bedroom and now that we aren’t renting I really want to put some effort into making it more of a sanctuary! We don’t even have bedside tables!! But here it is anyway – and its clean!


Make It Perfect

.The new house – KITCHEN!.

Voilla! Here is the hub of our home and I am in love!

Loving the BIG drawers, roomy pantry, cupboard space that I haven’t even filled! My FAN-FORCED oven (we have lived with horrid old ovens for the last 8 years and fan-forced is seriously the key to a decent chocolate chip cookie!) and DISHWASHER. Oh, the dishwasher. I don’t dread that after dinner time any more when everyone is tired and I want to tidy the house, clean the kitchen and enjoy some family time with Jaron and the kids before they have to go to bed. Everything seems to run a little smoother now.

See the red glass pendant lights? They compliment the new dining chairs…

kitchen

Another close-up of the green tiles…they actually run over the top of the windowsill also. It looks really neat and means that the windowsill can also be a “wet area.”

kitchen3

Here is Oscar flying his Duplo car/plane/forklift – we all wear full green outfits these days…
😉

kitchen2

Make It Perfect

.The new house – BATHROOM!.

So my plans yesterday to clean the whole house and take some decent pics didn’t work. I think children are programmed to make mess faster than a mother can clean!

Not to worry, I think I need to focus on a one-room-at-a-time goal!! I did get some pics of the bathroom though. My indoor photos are DODGY. I don’t really know what I am doing with my camera indoors, the bathroom is especially tricky for me. To flash or not to flash? (I’m talking about my camera here, people!)

Whatever, these will have to do! I played around with colours and exposure and am not sure I did them much good!

The tiled floor areas throughout the whole house are tiled using big 600mm x 600mm polished porcelain tiles. Out of the whole house the tiles were the hardest thing for me to get my head around. We spent 5 Saturdays in a row tile shopping! I am very happy with our choices though. The polished porcelain tiles are pretty swish-looking and I love the light-reflection they give off.

bathroom5

Due to budget constraints we had to choose between one bathroom and a studio or two bathrooms and no studio. The studio won! Another bathroom would be handy, but not really necessary with such a young family. Plus it means less for me to clean! And we are all REALLY loving the combined sewing/playroom.

bathroom4
bathroom3
bathroom2

These mosaic tiles are the same as in the kitchen splash back – really glad we decided to use them because they are bright and funky and give the house a bit of a modern-retro feel!

bathroom
Make It Perfect

.House Update #3.

So, the painters FINALLY came this week! The house looks so much better with a splash of paint – no more yucky creamy colour! I took these photos a couple of days ago and since then the painters have painted the feature green colour to the outside too – it looks fantastic! We have it in part of the front porch and also the side deck area.
Here is a little sneak of the green wall which leads from the front door into the dining/kitchen. It is bold and a colour that you will either love or hate. Lets hope we love it when it is done!!! 🙂
A look into the loungeroom…
From the dining room facing through to the deck…
A glimpse of our feature tiles…these will be on the kitchen splashback and in the bathroom…
More of the deck. Jaron has been slogging away here. Slowly but surely it is coming along. He is hoping to have the floor and front screen done by the time we move in and we can work on the seats and side screen together once we are living there…
And thats all for now folks!

Make It Perfect

.House Update #1.

The house is moving along…here it is from the road. Frame is all up! It was so cool when we could actually go and walk through the rooms in the house. Finally it feel real. I can see the spaces and how everything is going to work out rather than try and visualise what it is going to be like from looking at the plans. Here are the kids hanging out…Oscar is sitting in a window and Lil is cruising around in the studio! I love that word…”studio”…really the room is a toy room/sewing room but studio sounds much more sophisticated!! It is going to be really good actually, it will have double french doors that open from the dining area so that I can be sewing and still be a part of everything that is going on in the rest of the house (although sometimes I would rather shut myself away!!) See how low the fence is to the neighbours house? Why do people build such low fences?! We are going to clad over the top of the fence using some of the materials we are putting on the outside of the house so that we have a bit more privacy!
This week will be fun as we see the roof taking shape.

So…moving onto colours…

I really like neutral houses. They always look clean, fresh and orderly. I admire people who can stick to a neutral colour scheme when decorating.

But I can’t do it! It is a bit of a problem really, because I fall in love with EVERYTHING!!! I like too many colour schemes and want to use all of my favourite fabrics when decorating which usually equals an overload of colour. Oh, what to do?! I really thought I would be good at choosing house stuff – colours, tiles, carpet, etc. but I actually suck at it!

I have always loved green and knew that I wanted to incorporate it into the house somehow. You might remember this print I ordered awhile back? Jaron and I both really like the colours and I am going to try (really hard) to decorate using the lime green with a splash of rosy red.

This is what we have decided for the outside of the house…predominantly Colorbond Surfmist and Colorbond Woodland Grey. Then we are going to have a few accents of Nikau Palm and top it all of with the front door in Scarlet Ribbons. I am really excited about having a red door (it is not really red, more rosy red…scarlet sums it up nicely!). Jaron was at the paint shop this week and was asking a lady working there some questions. When she looked at our colours she goes, “um…are you sure?” Haha! She got me worried for a minute, but I don’t care anymore! I have said before that we are on a tight budget and we are trying to create a home that doesn’t look like every other new house in the neighbourhood (and there are a lot of new homes around here!). We really want to take a few risks and make sure the house portrays us and what we like. And its just paint…if we end up hating it we will just paint over! Inside wall and floor colours are going to be fairly neutral – that way we can do anything with the decorating. The walls will be Grand Piano (half strength) with Antique White U.S.A skirting and trims. Then we will throw in a bit of Baton for a few feature walls. Our carpet is a dark (but not chocolate) brown and we are still trying to decide on tiles.
Tada! That’s it unless we change our minds in the meantime!! Let me know what you think or if you have any suggestions for us (especially you Nettie!!)

Make It Perfect

.Little “Gingerbread” House.

Oscar was my tag-along to mutual tonight. And happy times did he have…

What 3 year old wouldn’t love being surrounded by 10 teenage girls bowing down to praise every little thing he does. Not to mention being surrounded by plates piled high with lollies and making his very own gingerbread house! According to Oscar when we got home it is his little “gingerbread cubby.”

He totally has those girls wrapped around his little finger, wooing them with charming phrases like “oh, yeah, darling.”

We did a cheats version of the traditional gingerbread house – using Arnotts Milk Coffee biscuits to make the walls and roof. I couldn’t deal with the momentous task of either making gingerbread for all of the girls by my self or trying to get THEM to make it at another activity…too much chatter in one kitchen for me!! We’ll leave that up to another leader another year!

2-in-1 Shorts

I was inspired to design these shorts for my four-year-old son who insists on changing his outfit multiple times a day!


2-in-1 Shorts feature optional back pockets and are totally reversible and hardwearing – perfect for active kids!


Home & Family, Ottobre

.Harvey: 2 months.

It’s been 2 months since this little guy joined our family! …life is good. He fits in beautifully.


We are still all smitten by his luscious lips and chubby cheeks. And he continues to grow and change every day.

Harvey has the cutest little frown and looks around with a grumpy face when we are being too loud or invading his space! As much as he loves a cuddle, he also loves having time to kick on the floor without anyone touching him – I think I would too if I was the fourth kid!


He started out being a spewy baby and still is. I’ve had to make him lots more bibs because he was easily going through the ones he had in just one day! In the last couple of weeks he has started giving us big smiles and cooing and chatting away with us – Lil manages to get the best conversations out of him and he has even started to have a little giggle.


 Sleeping and feeding are still going really well. He generally feeds every 3 hours, but has a good 6-8 hour stretch of sleep during the night which I am REALLY appreciating! I’m not expecting it to last forever, so I’m making the most of it at the moment. 

 We love you Harvey Charles!


(I didn’t do a 1 month old blog post…but here are a few pics from his photoshoot:)

 
Home & Family

.Weekly Portraits #2.


Lil: I thought Lil was faking a few weeks ago when she claimed to have a wobbly tooth. But sure enough, it kept getting wobblier and wobblier and tonight it fell out while she was eating her chocolate cake for dessert! The tooth is missing now, we’re not sure who ate it though – her or Aunty Talissa because they were sharing the same piece of cake! Lil was a little bit shocked and told us that she noticed something felt a bit funny so had a look in the mirror before she told anyone! A note has been written to the tooth fairy so hopefully she will remember to make a visit tonight…

Tommy: It has been a week of toilet training success – the last 5 days have been 100% accident-free and he is very confident to use the toilet now – yay! Most mornings he even wakes up dry, but I’m not ready to get rid of the night time nappies just yet.

Oscar: This week was Oscar’s favourite day of school for the year – athletics carnival. He was pumped and put his best effort into all of his races, coming home with one first place, one second place and two third places. Last year he got a first and a second and was hoping to get a third so that he had a “complete set” of ribbons so was excited to achieve his goal this year! Looking at this photo makes me a little bit sad – his arms and legs are so long now but it cracks me up that he was racing in his hat!
Make It Perfect

.Gone for 2 years.

What a weekend!!! Easter festivities, a new baby in the family (but I’ll let her tell you all about that!) and the baby of my family leaving for two years to serve a mission for our church! (You know, the one I made Oishii for).

Missions are happy/sad times. Happy because the missionaries learn and grow SOOO much and I know that there isn’t a better, more worthwhile thing that they could be doing in their lives right now than this but sad because it means that we won’t see them for two whole years! Tommy will be a little older than Lil is now when Cade returns!!!

He is going to the Japan Fukuoka Mission, but first stop…Provo, Utah to the Missionary Training Centre for 3 months. This weekend were spent enjoying last moments together with Cade before he left on Monday morning.

My brother in law, Chris, requested that I make him a “man bag” for Christmas a few years ago. It had to be out of linen and just the right size to fit his scriptures and other bits and pieces he liked to take to church in it. I seriously thought it was a bit daggy to start with, but the trend has obviously caught on with Ty and Cade and our friend Paul requesting them! Ty and Cade got theirs for Christmas last year and I made Paul’s last week…his is black and looks pretty swish. (And also camouflages into his suit in this photo!) Boys in suits with man-bags…cracks me up!


We had to leave for the airport at 5:30am on Monday morning. That is just wrong. But good because everyone is too tired to cry and get all emotional!!! Actually Cade was so ready to go that I don’t think that we could have been all soppy about the whole departure. He was glowing and was just excited to be off.


I think I have a giraffe neck in this photo 😉 and I went to bed at 8:30pm the night before so was feeling extremely chipper at the airport!


We are so proud of him and can’t wait to hear about his missionary adventures in Japan. If only he could go shopping and buy me some special Japanese fabric…but unfortunately there won’t be a lot of spare time and in the little that he has I think he will rather be working out than fabric shopping!

Make It Perfect

.The new house – ENTRY/LOUNGE!.

(Thanks for the GREAT feedback in the last blog post and lots of emails that I have received regarding pattern sizing…I’ve got lots to think about now and need to make some decisions. Will let you know when I have worked it all out, I am excited about catering for older children though!)

Getting there with the house pics! Looking at these photos makes me realise how bare our walls are! I didn’t mind so much when we first moved in, but am ready to start some serious decorating now 🙂

Starting at the front door…it opens into a loooong hallway that goes all the way to the other end of the house. (Check out how dirty the grey weather boards are – that’s what happens when you have no grass outside! We should be getting topsoil down and start planting some grass in the next couple of weeks and then we can give the outside of the house a good clean.)


And looking back down the hallway from the dining room. We contemplated painting the inside of the door pink too but thought it would make the end of the hallway too dark. The door to the left goes into the garage/laundry and the break in the wall to the right to the lounge room. What to hang on the green wall? I’ve been thinking of a collection of fabric covered canvases all in different dark brown prints…any other thoughts?


Just as you walk through the front door there is an alcove in the wall with a built in bench. This is going to be a “pretty” area 🙂 I am on the look out for a BIG ornate frame that I can paint a solid colour and hang on the wall. Also going to find some nice baskets to sit on the floor to hold shoes.


Into the lounge room…see what I mean about being able to keep an eye on the kids playing on the deck from here?!


And this is our little computer nook. It sits in the wall between the loungeroom and the dining room. We installed a built in bench here too (same as in the front entry) so that we didn’t have to worry about a computer desk. Currently on the lookout for a little filing cabinet or drawer system to pop underneath and hide the cords – this is Tommy’s FAVOURITE place to play at the moment so we need to hurry up and find something that we like!


And there you have it! I think all I have to share now is the studio…might be awhile because it is NEVER clean 😉